
Introduction to the BootP-DHCP Server
The BootP-DHCP Server assigns an IP address to modules. Every node (most devices) on the same Ethernet Network must have a different IP address. To assign an IP address to a module, you must know what the IP address needs to be. An alternative method of assigning an IP (not using BootP) is found at the bottom of this post.
Finding the correct IP address
If you are a system designer, you can use an IP address according to the plant standards. If you are a troubleshooter, or replacing the module, please don’t guess at what the IP address needs to be.
The processor (and other automation equipment) is usually configured to look at certain IP addresses. If a module does not have the expected IP address, the results could be disastrous.
When you are replacing a ControlLogix ethernet module (such as the 1756-ENBT or 1756-EN2T), the IP address may be scrolling across the front of the module. If the module is totally dead, open the project in Studio 5000, and locate the module in the I/O configuration tree. Here, you may find the IP address that the new module needs to use.
It’s also a good idea to keep a record of all of your system’s IP addresses on a spreadsheet. This will help avoid confusion, and makes configuring drivers for devices much easier.
Running the BootP-DHCP Server
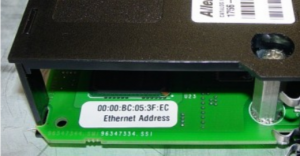 First, we need to write down the MAC (Media Access Code) of the module. You will usually find this information on a sticker that is on the side of a module. This is also called an “Ethernet Address” or a “Hardware Address”
Next, run the BootP Server. This is under Start | All Programs | Rockwell Software | BootP/DHCP Server
Secondly, you may get a message asking for some network information. The Subnet Mask is usually going to be 255.255.255.0. Normally, this is all the information that you will need to enter. If you are unsure of this, check with your system administrator.
Be sure your computer is on the same network as the module you are wanting to assign.
Thirdly, boot up your module, and you should see the MAC ID in the “Request History” list.
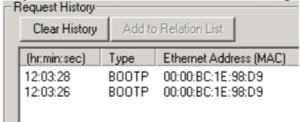
Double-click your module’s MAC ID. Be absolutely sure that you double-click the correct MAC ID in the request history list. Getting the wrong IP in the wrong module can be disastrous.
Fourthly, enter the IP address that you wish to assign to the module.
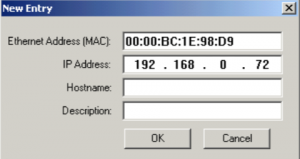
Press OK. In the meantime, the module should soon have the IP that you entered. Ping the IP from the command prompt to verify that the device with this IP is communicating on the network. The command prompt is at Start | All Programs | Accessories | Command prompt. Just type the word ping followed by a space, then the IP address that you want to verify.
Finally, be sure to disable bootP if you want the IP to be static (usually you will). This will ensure that when power is cycled, the module will keep the IP Address.
Alternative Method for Assigning an IP
Another method to assign the IP address to an ENBT or EN2T module is with the RSWho screen. If you use this method, you do not need the BootP Utility. Just have the DF1 (or USB) Driver available on the RSWho screen, and browse to the Ethernet Module. Then right click the module, and go to “Module Configuration” Finally, on the “Port Configuration tab, you can make the IP static, and set the IP. Furthermore, be sure to press “Apply” and “OK”.
For more information on ControlLogix, visit the ControlLogix Post page!
— Ricky Bryce
Pingback: Creating a FactoryTalk View project, and setting up communications.