
In this document, we will configure a Virtual Private Server (VPS) using the service “Linode”. This documentation is for example only. The purpose of configuring this server is to interface with Arduino projects for logging and displaying data. In this document, I will walk you through a step by step process in getting the Linode created, and installing the Apache web server, PHP5 support, and MySQL database using the Debian Linux 8 Operating System. There is no guarantee of security in these steps, so you will be responsible for implementing your own security, safety, etc. This document is provided “as-is” in the hope that I can give you some ideas for your projects. Should you decide to act on these steps, you are responsible for your own actions. “Personal Responsibility”! Although you don’t need to have a domain name to make your project work, I will guide you through the process of using a domain name, and I will use the domain name “LearnAutomation.com” in these examples.
Please utilize this link to configure your VPS. https://www.linode.com/?r=e74ad469f932a27c255a2013e86ce00a5d1e9827 I have tried many, many different VPS services, but I’ve found Linode to be the most reliable service with the best price (for my applications).
Step 1 — Create an account for your domain name
Please create an account with a registrar, such as godaddy.com, and register a domain name of your choosing. I will walk you through the DNS configuration for tihs doman later in the document. If this is your first time registering your domain name, most registrars will give you a good discount. If you choose to use only IP addresses for your project, you can skip this step.
Step 2 — Creating your VPS account, and VPS Server
Create a Linode account. Please use this referral link to help support this site:
https://www.linode.com/?r=e74ad469f932a27c255a2013e86ce00a5d1e9827
If you use the referral code, Linode may apply a credit to my server, and that helps with projects like these!
 Step 3)
 Step 3)
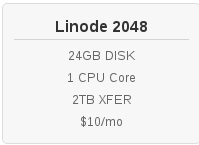
Choose your package. For this example, I will choose the least expensive option, which is currently a Linode 2048 for $10/month. T his package contains 24GB Disk space, and 1 CPU core. Choose the location that you would like to have your linode hosted, and then add the Linode. You will be prompted to complete your order on the next page.
Step 4 — Your VPS Setup
After a few minutes, your Linode will be created. Kindly make a note of your IP address. We will need this later to configure the DNS for the domain name you registered in Step 1. Click on the Link of your Linode ID. In this case, I will click on linode2587604.
Step 5 — Deploy the VPS Image

Next, we will deploy an image. This will automatically install our Operating System onto the server.
Step 6 — Set the parameters
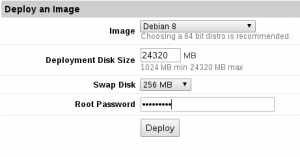
Here, I will choose Debian 8, and take full use of the hard drive leaving the swap size at default. If you find that your Linode is using a lot of swap space later on, you might consider upgrading your package. If the server is running low on memory, it will place data into the swap space on the virtual disk. This drastically decreases the performance of your VPS. Be sure to enter a root password, and then deploy your server.
Step 7 — DNS Zone
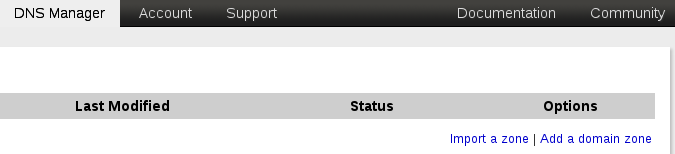
Next, we’ll configure the Reverse DNS. Although this is not required for most projects, we will set this up in case we decide to have our scripts send out email, or if we choose to use this linode as an email server. First, we must configure a forward DNS zone, so we can add the reverse DNS zone. Under DNS Manager, add a domain zone.
Step 8 — Forward Zone
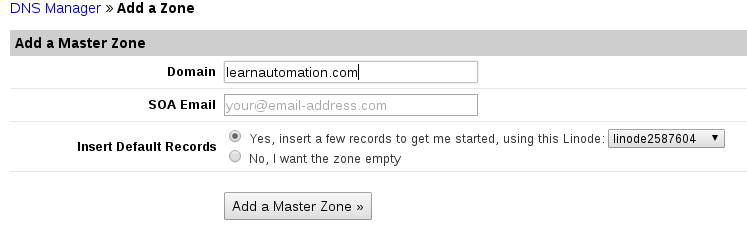
Enter the domain that you chose in step 1, and be sure to enter your email address for this DNS Zone. Add the Master Zone.
Step 9 — Reverse DNS
 Step 9 — Reverse DNS
Now, we will open our Linode again, and under “Remote Access”, choose “Reverse DNS”. Enter your domain name. Note: You may have to come back to re-visit this step if the forward DNS has not updated yet. You might even want to wait until the next day.
Step 10 — Boot your VPS
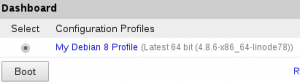
Congratulations. Your VPS is now set up, and we are ready to boot your VPS. After booting your VPS, please allow a couple minutes for the boot up process to complete.
Step 11 — Verify your domain name
Back at your registrar (such as Godaddy), please set the “A” record of your DNS to the IP address of your VPS. This will allow you to use your domain name from now on to access your VPS from your PC without having to remember your IP address. We will still need to use the IP address in some of our projects, however. It could take up to 48 hours for your domain name to work, but you can test this using the PING command from your command prompt. When you ping your domain name, the correct IP address should be returned.
Step 12 — Connect to your VPS server
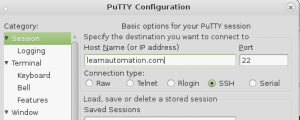
If you are using Linux, you can use your terminal to access the server. If you are using Windows, then you can download PUTTY. As of the writing of this document, PUTTY can be downloaded at http://www.chiark.greenend.org.uk/~sgtatham/putty/download.html Here, we will access the server as the “root” user. In linux, you can type ssh root@learnautomation.com (using your own domain name) or in putty, enter your domain name as the host, then open the link. Be sure to login as root, and use the password that you set up your linode with.
Step 13 — Get Updates
Next we will get the updates. To get the updates, we will just type: apt-get update When the repository update is complete (after about 5 minutes), type: apt-get upgrade to install the package upgrades to your system.
Step 14 — Set your Hostname
Now we will set the hostname of your server. We can do this with: hostnamectl set-hostname learnautomation.com (using your own domain name) Next let’s reboot the server. Just type: reboot to ensure all changes so far are in place.
Note: Documentation for the following steps is from https://www.linode.com/docs/websites/lamp/lamp-on-debian-8-jessie Thank you Linode, for providing great documentation! I will re-phrase some of the steps here.
Step 15 — Package configuration
Now, we will install some packages we will need. Log back into your server as root, and type: apt-get install apache2 mysql-server php5 php-pear php5-mysql nano You will be asked for the admin password for mysql-server during this installation.
Step 16 — Apache Configuration for KeepAlive
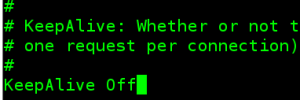
Now, we are ready to configure the Apache web server. First, we will shut off the KeepAlive feature of Apache. The KeepAlive feature might make your website a little faster, but it does increase memory usage on the server, which is limited in our case. While logged into the server using PUTTY or your terminal as the root user, type: cd /etc/apache2 Now, we will edit the apache2.conf file to shut off the KeepAlive feature. Type: nano apache2.conf Now, set the KeepAlive to off. Press Control-X on your keyboard, and save the changes. (press Y, then enter to confirm the file to which you are making changes.
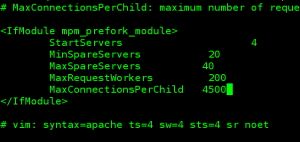
Step 17 — Apache Module Configuration
 Step 17 — Apache Module Configuration
Now, we will configure the mpm_prefork options. The prefork feature makes your server more efficient, but must be “tuned” on your server as to reliably serve web pages timely, yet not use up too much memory. Type cd /etc/apache2/mods-available/ Then we will edit the file with nano mpm_prefork.conf The values shown are a good starting point for a server with 2G of memory according to the documentation on the Linode website. Press Control-X to exit, then Y to save, and press enter to confirm the file name to save the changes to.
Step 18 — Enable/Disable Apache modules
Disable the Event module, and Enable the prefork module. Type: a2dismod mpm_event then type: a2enmod mpm_prefork You may find that these are already done on your Linode deployment. Now, restart apache with systemctl restart apache2
Step 19 — Virtual Hosting Directory
Eventually, we may want to have multiple websites running on the same server, so we will want to set up name based virtual hosting to accomplish this. In our case, we will just have a single virtual host, but it’s easier to set this up now, rather than to move things around later on. First, we’ll create a couple directories with the mkdir command. Type mkdir -p /var/www/vhosts/learnautomation.com/public_html Be sure to substitute your own domain name. I’m deviating a little bit from some documentation to remain consistent with my other servers. The public_html folder is where we will put the files for our website later on.
Step 20 — Virtual Host Configuration
Next, we must create the Apache configuration file for this domain. Type cd /etc/apache2/sites-available Now, we will create the configuration file. Type: nano 01_learnautomation.com.conf (Using your own domain name). Place the following text into nano making the appropriate changes:
<VirtualHost *>
DocumentRoot “/var/www/vhosts/learnautomation.com/public_html”
ServerName learnautomation.com
ServerAlias www.learnautomation.com
ErrorLog ${APACHE_LOG_DIR}/learnautomation.com-error.log
CustomLog ${APACHE_LOG_DIR}/learnautomation.com-access.log combined
<Directory “/var/www/vhosts/learnautomation.com/public_html”>
allow from all
Options None
Require all granted
</Directory>
</VirtualHost>
Now press Control-X to exit, y to save, and enter to confirm the file name.
Step 21 — Enable the site
Now, we will enable the site. Type: a2ensite 01_learnautomation.com.conf You will get a message to reload apache. service apache2 reload
Step 22 — Write a Test Page
Now, we need an index file that Apache2 can serve to anyone visiting your domain. Go to cd /var/www/vhosts/learnautomation.com/public_html also, let’s type nano index.php
We can test our site by entering the following information into the index.php file:
<html>
<head><title>This is my site!</title></head>
<body><h1>Welcome to my site!</h1></body>
</html>
Then press Control-X to exit, then Y to save changes, and enter to verify the file name.
Step 23 — Cleanup
Now, let’s just do a little cleanup. I always like to set apache as the user of the web directory. chown -R www-data:www-data /var/www/vhosts
Let’s set this site as default just in case our projects need to address it by the IP address, and not by the domain name: cd /etc/apache2/sites-available Then we’ll type: a2dissite 00-default.conf to disable default, then service apache2 restart
Now, just test your work! Open your web browser, and the text of your index.php file should be present in your browser window.
Step 24 — MySQL Configuration
Now, we’ll secure the MySQL server: Type: mysql_secure_installation I always answer yes to the questions, except for changing the root password. We set that earlier.
Step 25 — PHP Configuration
Now, we’ll just do some final configurations in PHP5! cd /etc/php5/apache2/
 Then, nano php.ini
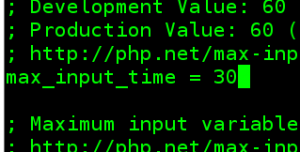
find the max_input_time variable, and set this to 30. (You can use Control + w to search) It might be the second instance.
While we are here, let’s adjust the maximum upload file, and the maximum post size.:
I will set the upload_max_filesize = 20M and post_max_size = 80M (you can search for these also)
You are ready to use your webserver with your electronic projects to log and display data! In other documents, I will walk you through how to log data to the mysql database from a device, and how to display this data onto a web page such as temperature and humidity of your house, or a water level of your basement sump! Pleaes let me know if you find any problems on this page, or any corrections that need to be made! — Ricky Bryce
PS. If you wish to continue to the steps for installing a wordpress page, please go to this link to continue:
https://bryceautomation.com/index.php/2016/12/22/configuring-wordpress/