
Introduction to Passing Parameters to Subroutines
We’ve already discussed simple subroutines. In most cases, subroutines are just used for the purpose of organization. Now, we will use subroutines as functions. We will create a subroutine that converts Celsius to Fahrenheit. Once we create the subroutine, we will use the subroutine any time we need to convert Celsius to Fahrenheit.
Another popular use of this method is to scale analog signals. A Pressure Transducer might be calibrated to send out a 4 to 20ma signal based on a pressure of 0 to 200psi. The analog module itself might not know how the transducer is calibrated, so the analog card places a 3277 to 16384 into the controller tag. We might send the raw value of this tag to a subroutine to convert the data back to 0 to 200psi. Then we store the answer in another tag that will be used for comparison in our logic.
The advantage of using this method is that the subroutine does not need any modification once it is completed. When we need to do a conversion, we’ll just add a JSR anywhere in the program that we like. We will pass a Celsius Value, and then once we get the answer back from the subroutine, we will store this result to a tag.
Create your tags
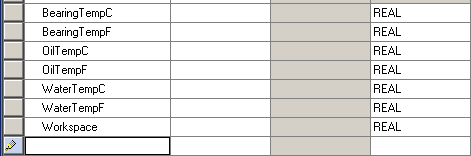
First, let’s create some tags that we will be using for this conversion. Here, we will have tags that will store random values. In your project, these tags will normally be populated by a thermocouple module, an RTD module, or any other analog input.
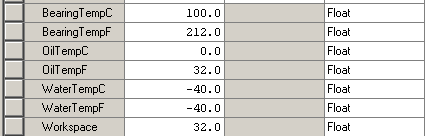
Create the following tags with the Data Type of “REAL” This data type will allow us to use decimal points in our values.
Now, go to “Monitor Tags” at the bottom of your Controller Tag Database, and place some values into Celsius tags as shown:
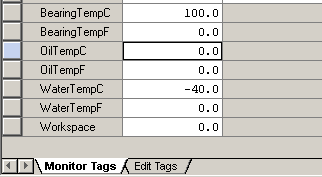
We know that if our subroutine is working, BearingTempC will be converted to a 212, and stored into BearingTempF. OilTempC will be converted to a value of 32, and the answer will be stored into OilTempF. Similarly, WaterTempC should return an answer of -40, and be stored into WaterTempF. (-40C = -40F)
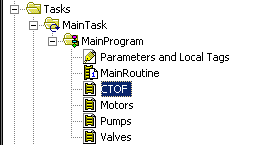
Next, Right click on the MainRoutine, and create a new Ladder Diagram named “CTOF”. When finished, your project should look similar to this:
Add the JSR to the MainRoutine
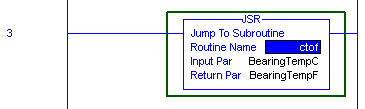
Now we’ll go to the MainRoutine and add our JSR Statement. We will add our first Input parameter and Return parameter. On the end rung, type: jsr ctof. To add the parameters, right click CTOF within the JSR instruction to add these parameters. Parameters are a little tricky to work with. You will have to remove any extra question marks. Make sure when you are finished, you have just ONE Input parameter, and ONE return parameter as shown.
Set up the Subroutine (CTOF)
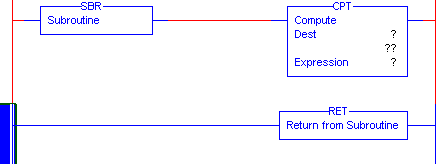
Next, open the CTOF Routine. Let’s build the structure of our logic first, then I’ll explain the purpose of each instruction. On the first line, type SBR CPT (SBR then a space, followed by CPT)
On the next rung, just type RET. At this point, your logic in the CTOF routine should look like this:
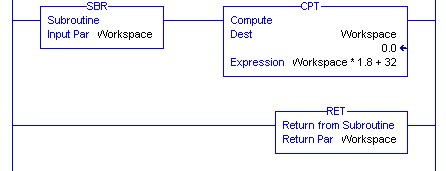
Now we need to add our parameters. We’ll start with the SBR statement. The SBR statement will receive the VALUE of BearingTempC. The SBR itself does not know where this value is coming from. It doesn’t care where it comes from, but it needs to store the value somewhere, so we’ll store this to our workspace tag. Right click the SBR instruction and add the INPUT parameter “Workspace”
Next, we have the value stored in the workspace tag that we need to convert. Right now, the workspace tag contains the value of 100.
Now, we’ll look at the CPT instruction. The CPT instruction will be used to convert the 100 to 212 (Celsius to Fahrenheit). Since we no longer need the value of 100, we will store the answer of 212 back to the workspace. Set the Destination of the CPT to “workspace” The expression of the CPT instruction will be “workspace * 1.8 + 32” Remember, within this subroutine, we don’t know where the values are coming from, or where they are going to. Only the JSR knows that. Our job here in the subroutine is just to receive a value, convert the value, and return the answer back to the JSR. Therefore, we need to add the return parameter to the RET instruction. The return parameter will also be “workspace”. You logic should appear as shown here:
Review
To recap: The JSR instruction in the MainRoutine passes the value of 100 from BearingTempC. The CTOF routine stores this value to the workspace tag using the SBR instruction. The, the CPT manipulates this value, and stores the answer back to workspace. Next, the RET statement returns the value of 212 back to the JSR in the MainRoutine. The JSR is configured to store the result to BearingTempF.
The advantage of using this method is that anytime we need to convert Celsius to Fahrenheit, we only need another JSR instruction that is configured to pass any tag containing a Celsius value, and store the answer back to a tag representing the Fahrenheit value.
Now, let’s add the other two JSR instructions to the MainRoutine now. No other changes are necessary to the CTOF routine. It’s already configured to do it’s job!
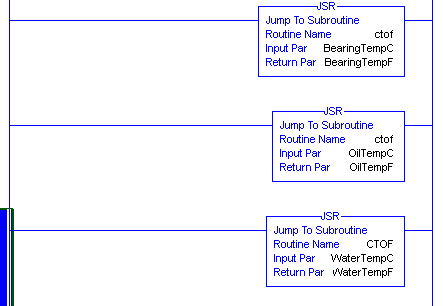
Finally, download to your processor (or finalize your edits if you are online). Open the controller tag database, and look at the Fahrenheit tags. They should have the correct answers. Modify one of the Celsius values. The Fahrenheit counterpart will also be updated.
Warning: You could fault the possessor if the number of parameters being passed and returned from the JSR instruction is not the same number as the subroutine expects! When passing parameters, it’s best to check your logic offline, or in a non-production processor.
— Ricky Bryce
What is the use case for this vs AOIs?
The AOI’s were introduced in RSLogix v16, and are a more portable, “improved” method. When using a PLC-5 (or a ControlLogix version prior to 16), this was the method used to create a “function”. Older processors, such as the 1756-L1 were only capable of updates to version 13. You will also see this method implemented in programs that were originally written many years ago, and the processors have been upgraded without changing the logic.
How to do this when calling an ST routine
i want to pass a Data Structure to the ST Routine each time i call it
You can do this the same way. For example: Let’s say we have 3 tags with a “Motor” Data type: MotorA, MotorAResult, and Workspace. The JSR in the mainroutine will have the INPUT parameter as MOTORA and the Return Parameter as MotorAResult. Your STX Subroutine would look like this:
SBR(Workspace);
……… Your logic here to manipulate workspace ………………
RET(Workspace);
All of the data from “Workspace” will be stored to “MotorAResult” after the workspace is returned to the JSR.
The advantage of this would be that anytime you want to manipulate other motors with the same logic, you just need to add an additional JSR with the input and return parameter.
Hope that helps!
Ricky
I would like to add one positive for subroutine.
The subroutine can be modified without stopping the controller. As far as I know, AOIs can be modified only when the project is offline, so downloading the change would require a controller stop.
This can be a factor, if one works on an active system.
Great article by the way. Much appreciated!
I have not thought of that before, but you are right. That is a very good advantage of using the JSR with parameters! Take care. — Ricky Bryce