
Introduction to the ControlLogix 1756-DHRIO Module
The ControlLogix 1756-DHRIO module allows you to interface with the older Data Highway Plus (DH+) Network. You can also connect to a maximum of four Remote I/O Racks per channel. Each 1756-DHRIO module has 2 ports. Each of which will support DH+ or Remote I/O protocol.
Network Setup
Whenever you set up a network to the DHRIO module, the recommended cable to use is Belden 9463. Most people will refer to this as “Blue Hose”. The Series B module supports a maximim communication speed of 57.6 Kbps. Conversely, the Series C module supports a maximum of 230.4 Kbps. With this in mind, the higher the network speed is, the shorter your maximum distance becomes. This is due to capacitance on the network cable.
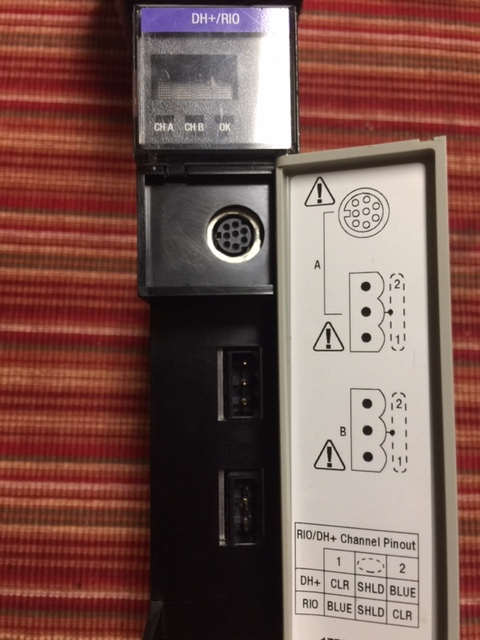
The blue hose is a 2 conductor cable with shield. Remember that when you wire up a network, the blue conductor is wired to terminal #1 for Remote I/O networks. Connect the clear conductor to terminal #1 for DH+ Networks. This will help you to keep track of which cables are for Remote I/O, and which cables are for DH+. You will daisy chain the network from one node to another. In other words, do not use a star topology. Each terminal on a plug will have 2 conductors: One coming in from the previous node, and one going out to the next node. Both ends of the network will have a termination resistor. Remember DH+ supports a maximum of 64 modes (0-77 octal), and remote I/O supports a maximum of 4 racks per channel.
Keep the following specifications in mind.
| Baud Rate | Maximum Distance | Terminator Value |
| 57.6 K | 10,000′ | 150 Ohms |
| 230.4 K | 2,500′ | 82 Ohms |
Configure the ControlLogix 1756-DHRIO Module
Before inserting the module in the chassis, be sure to adjust the settings on the module.
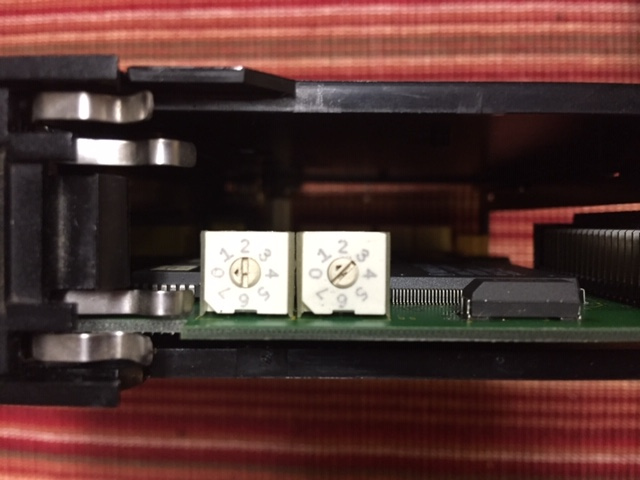
The first step is to set the mode of each channel. You will set each channel for either DH+ or remote I/O mode. Remember, the Series C module supports 230.4 Kbps, so you will configure the baud rate on this module as well. Below is a Series B module.
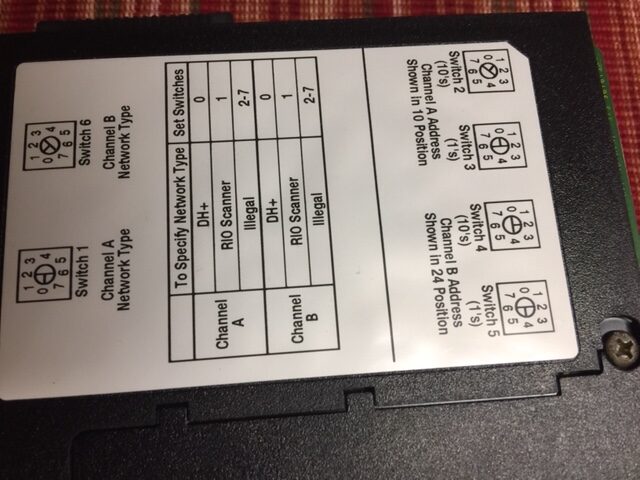
Obviously, by looking at the sticker on the side of the module, you will know how to set the configuration dials on the top of the module. In this case, Channel A is in DH+ mode. Conversely, Channel B is in Remote I/O mode.
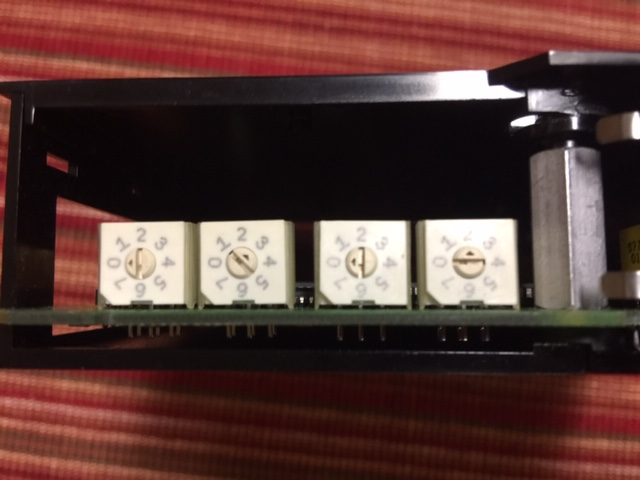
For channels in DH+ mode, you must also set the node address (0 to 77 octal). Look at the opposite end of the module. In this case, the node address is 03. (The first 2 dials are for channel A). The last two dials are for channel B, but only if the channel is in DH+ Mode. This setting of “02” for channel B is ignored in this case, because the channel is configured for Remote I/O.
Troubleshooting
When troubleshooting the status lights on the ControlLogix 1756-DHRIO module, we need to know which mode each channel is in. The alphanumeric display tells you the mode of each channel if the module is powered up.
For a channel in DH+ Mode, Solid green indicates that the module is communicating on the network. On the other hand, a flashing green light indicates the module is not seeing other nodes. Flashing Red indicates a duplicate node on the network, whereas solid red indicates a hardware fault.
For remote I/O channels: Solid green indicates the channel is healthy. A flashing green indicates shows that at least one device is not communicating. Flashing red indicates that you have lost communication to all devices on the remote I/O network. Solid red would be a hardware failure.
Overall, be careful how much traffic you place on these networks. Due to the bandwidth limitation, too much traffic can render the network unusable.
For more information on ControlLogix, visit the category page.
— Ricky Bryce
Pingback: ControlLogix Messaging over DH+ - Bryce Automation