
Introduction to Altair Front Panel Programming
Altair Front Panel Programming allows us to enter a program using the front panel switches. In the early days of computers, terminals were expensive. Most of those who were building the Altair 8800 would enter a program through the front panel switches. The advantage of entering programs this way is that you are learning how computers actually “think”. It does clarify how things came to be in the modern world.
Basically, we can enter a program directly in machine language. In this section, we’ll just enter a simple program to demonstrate how you would enter a program. Once you know how to enter a program, you can start experimenting with other commands. That way, you can slowly build up your knowledge, and programming skills.
To begin, you will need a good reference that tells us what the codes are for each command. Additionally, you need an explanation of what each command does. You can access the Altair 8800 manual here. You will find another good reference on the Altair 8800 instruction set here.
About Our Program
We’ll write a simple program that will just take a value in memory, and increment the value by 1. Although this doesn’t do much, it does show you how to get started with writing your own logic. Our steps will be as follows:
- Enter a value into address 100
- Starting at address 0000, Load the value of address 100 into the accumulator (LDA Instruction).
- Increment the value of the accumulator (INC)
- Store the result back to address 0200 (STA)
- Halt the program (HALT)
Octal Vs. Hexadecimal (BCD)
It’s important to realize that we must know the numbering system in which we are looking at the data. The Altair does not know what numbering system you have, and it doesn’t care. This is because you enter the values in binary regardless. For instance, lets say that you are entering the values from a worksheet that is in Hexadecimal. Every 4 switches represent a single digit (0 to F). On the other hand, if your worksheet is in Octal, then every 3 switches represent a single number (0 to 7). Look at the chart below:
| Decimal | Binary | Octal | Hexadecimal |
| 0 | 0000 | 000 | 00 |
| 1 | 0001 | 001 | 01 |
| 2 | 0010 | 002 | 02 |
| 3 | 0011 | 003 | 03 |
| 4 | 0100 | 004 | 04 |
| 5 | 0101 | 005 | 05 |
| 6 | 0110 | 006 | 06 |
| 7 | 0111 | 007 | 07 |
| 8 | 1000 | 010 | 08 |
| 9 | 1001 | 011 | 09 |
| 10 | 1010 | 012 | 0A |
| 11 | 1011 | 013 | 0B |
| 12 | 1100 | 14 | 0C |
| 13 | 1101 | 015 | 0D |
| 14 | 1110 | 016 | 0E |
| 15 | 1111 | 017 | 0F |
Consider the following LED’s
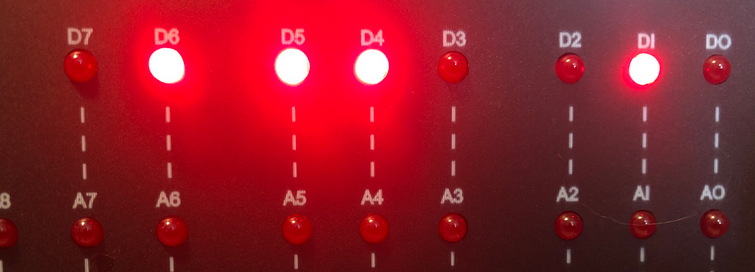
Here, we would say that our data is showing 162 Octal. The spacing of our lights represent each octal digit. On the other hand, if you was expressing this in Hex, then every four LED’s represent a single digit, so our hex code would be 72. In Hex, D7 to D4 represent the first Hex digit. Likewise, D3 to D0 represent the second Hex digit.
For this post, we’ll just keep everything in octal since that is the native spacing for the Altair.
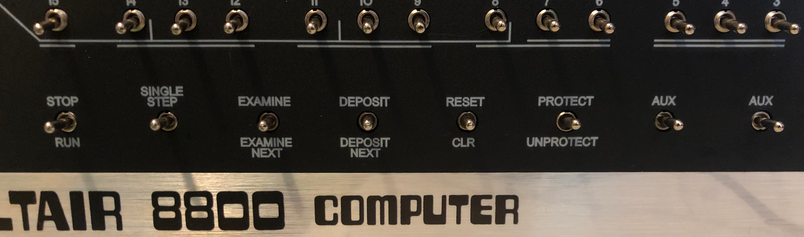
Prepare for Altair Front Panel Programming
To prepare to enter your program, press STOP, and RESET. Make sure the PROTect light is not energized. If it is, just press the UnProtect button.
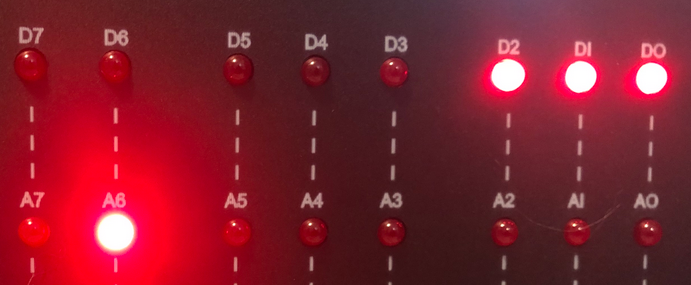
First, we’ll enter a value at address 100. In binary, this will be 01 000 000. In other words, only switch 6 is on. Now press, “Examine”. You will see that your address lights reflect the address you are looking at. Let’s enter a number such as 007 (00 000 111). Now, press “Deposit”. As you can see, this loads the value of 007 into address 100.
At this point we are ready to enter your program, starting at address 000. With all address switches off, press “Examine”. In the meantime, look at your address lights, you will see they are all off. This means the data we enter will go into memory location 000.
Enter the Program
LDA
At this time, we are ready to enter our very simple program. Keep in mind that we will first load the value of address 100 into the processor’s A register (Accumulator). We will use the LDA instruction. This is a three byte instruction. The OPCODE for this instruction is 072. (00 111 010). Keep in mind, all the values in this post are in octal. Once you set your switches to 071, press “Deposit”.
After that, we must enter the low and high byte of the address. Since the Altair can run 64k of ram, it takes 16 bits to designate an address to load from. We must enter the LOW byte first, then the HIGH byte. Since our address is 100, in octal, this is 000 100 (as 16 bits). This means that our low byte is 01 000 000, and the high byte is 00 000 000. Since the low byte is first, turn on switch 6. Obviously, all other addresses switches are off. In the meantime, press down on the “Deposit Next” button. This will automatically load a 100 into the lower byte. At this point, with all switches off, press “Deposit Next”.
INR
At this point, we need to INcRement the accumulator. This is the INR instruction. To be sure, look in your manual, the code for INR is 00 REG 100. Obviously, use 111 in place of REG for the A register. (Similarly, check your manual). As you can see, that gives us a code of 074 (00 111 100). Set this up on your switches, and press “Deposit Next”.
STA
At this point, we are ready to store the result back to address 100. In order to store the A register back to memory, we use the STA Command. Once again, this is a 3 byte address. We need the opcode for the STA instruction, then the low and high byte of the address we wish to store the answer to. The code for STA is 062 (00 110 010). Press “Deposit next”. Now, we enter the low byte which is 100 (01 000 000). Hit “Deposit Next” and the high byte, which is 000 (All off.) Deposit next.
HLT
At last, we are ready to enter the HALT instruction. The code for this is 166 (01 110 110). Deposit next.
Test your Altair Front Panel Programming
Keep in mind that before our program ran, we had a value of 007 (octal) at address 100.
To run your program, press STOP, then RESET. This will get you back to address 000. At any rate, I like to shut all the switches off, and press “Examine” just to be sure.
At this point, press “RUN”.
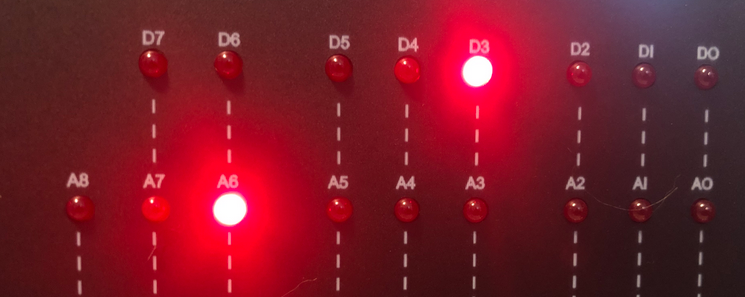
As you can see, your wait light is now on, so the program stopped. Let’s press STOP, and RESET again. Set up 100 on your switches, and hit “Examine”.
Summary of Altair Front Panel Programming
In short, programming the Altair via front panel switches is easy. Obviously, you need the codes for each instruction. Additionally, you need to know what instructions to use for the purpose of your program. Emphatically, use your resources. Without a doubt, the manuals are always a great tool to have beside you. In fact, it’s almost impossible to remember all of the codes for each instruction. This is especially true if you haven’t used your Altair in quite a while.
For more information, visit the Vintage Computers Category page!
— Ricky Bryce