
How to Add Programs to an IMSAI Disk
There are several methods to Add Programs to an IMSAI Disk. One way is to use XModem, which is a bit time consuming for many files. Another way is to add the files to an image using CPMTOOLS, which is the method we’ll use here. This example will be for a FLOPPY DISK. The procedure is very similar for a HARD DISK though. I’ll mention the differences at the bottom of this document.
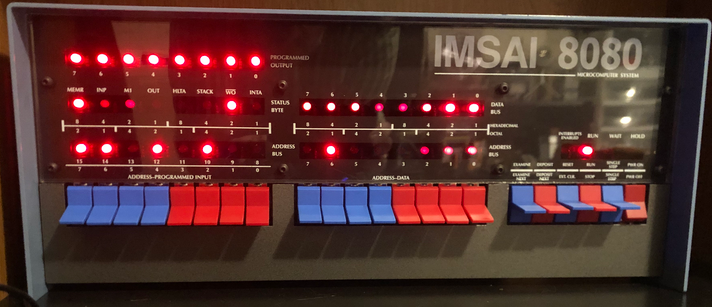
In this case, I’ll be using the IMSAI 8080esp kit from The High Nibble. An Actual IMSAI will usually cost over $5000, but this replica is under $300 at the time of this writing. It’s a great machine to learn the IMSAI with. The IMSAI 8080esp has a web interface that allows you to manage your machine, and even bring up a web-based terminal.
For this example, we’ll transfer a disk image (.dsk) to our Linux computer. We’ll remove all of the files from this disk image, then place a file (ARK11.COM) onto this disk image. We’ll rename the disk, and move it back to the IMSAI. After that, we can mount this disk, so it will appear under CP/M.
Before we begin, make sure you have cpmtools installed under a Unix/Linux environment. There is a way to use cpmtools to make a disk from scratch, but I’ve had more success with using an existing image.
Download and Rename the Disk Image
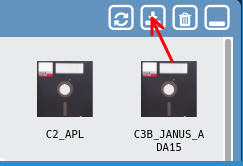
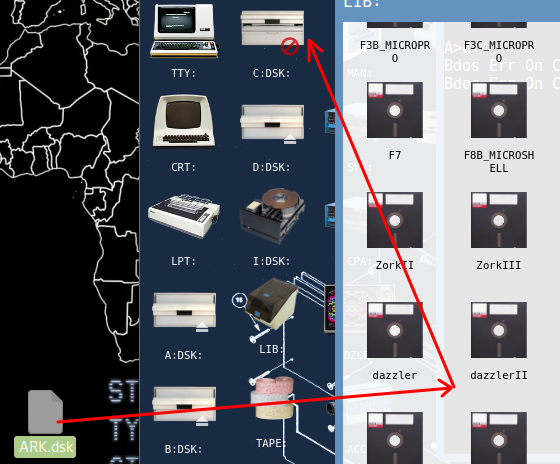
Since we will be clearing all the files off this image, it doesn’t matter which image we choose. Preferably, we would want a disk image that has as few files on it as possible. In the web interface for the IMSAI, open the disk library. Simply drag a disk image to the download icon.
After we download the file to our Linux computer, we’ll rename this to ARK.dsk.
Erase the Files
At this point, we need to go to our terminal to see what files are on this disk We will use the “cpmls” command. Your list of files will be different, depending on which disk image you downloaded.

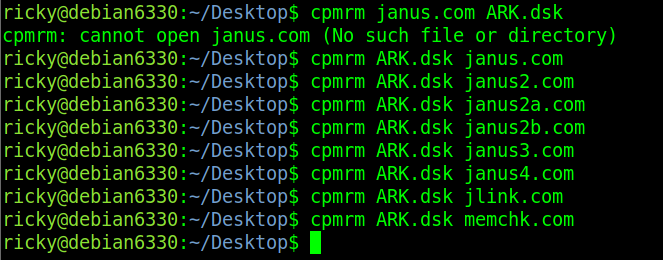
Now, use the cpmrm command to remove each file from the disk image.
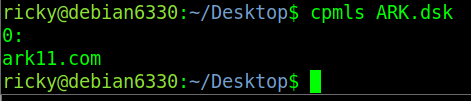
To verify you erased all of the files, use the cpmls command again.

As you can see, cpmls returns nothing.
Copy Files to your Disk Image to Add Programs to an IMSAI Disk
At this point, we are ready to place files onto your disk image. Before we do this, I would recommend making a copy of this blank image, then rename the copy to blank.dsk. That way you have a blank image to work with in the future. Just be sure to copy the bank image, and rename it before you move any files onto it. That way, you always retain a blank image.
To copy the files to the disk image, we use the cpmcp command.

Now, let’s verify the file is on the disk image.
Upload and Mount your Disk Image
That this point, you can drag the file from your machine into the library folder on the IMSAI 8080’s web interface. After that, you can drag the disk image into an empty drive. This will mount your disk image.
Verify the Contents of your Disk Image
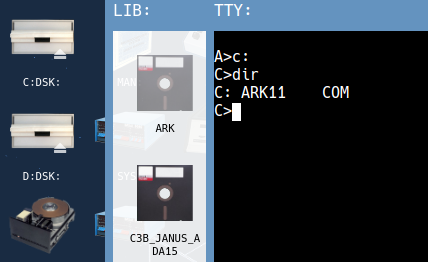
At last, you should be ready to use the file on your new disk image. Let’s open the teletype terminal (TTY). Change into the drive that you mounted the image to, and type “dir”. This will verify the contents.
Adding files to a blank Hard Disk Image
Basically, the procedure I use is the same to add files to a blank hard drive image. The only real difference is that we need to specify the format when copying the files. You could just leave the SD Card in the IMSAI, and upload and download the disk images. as we did with the floppy images. In this procedure though, I’ll walk through the method of removing and re-inserting the SD card several times. This will show you a slightly different approach.
I was not able to successfully create a file system from scratch that worked, so this procedure will use an existing hard drive image that you know works.
- Remove the SD Card from the IMSAI, and make a copy of a Hard disk image. For example, copy hd-ws4.hdd to a safe place. Preferably outside of your working directory for now.
- Be sure the drive you just backed up is mounted as your hard drive.
- Boot the IMSAI, and erase the entire hard drive: ERA *.*
- Remove the SD Card again, and copy this erased image to a file named blank.hdd. This way, you have a blank image to work with in the future.
- Copy blank.hdd to another file name. This will be the name of your new hard disk image. ie: mydisk.hdd
- Let’s say we want to copy the file UNZIP.COM to this new image. We would use this command: cpmcp -fz80pack-hd mydisk.hdd UNZIP.COM 0:UNZIP.COM (The first UNZIP.COM is the source, and the destination is 0:UNZIP.COM (USER 0)
- You can verify the contents of the disk: cpmls -fz80pack-hd mydisk.hdd
- Restore the original hard disk image that you erased earlier. Remember, we backed that up to a safe place.
- Now, eject the SD card from your modern computer, and place the SD Card into your IMSAI. Reconfigure the IMSAI boot settings (under SYS:) to use “mydisk” as your hard drive.
Summary of How to Add Programs to an IMSAI Disk
In short, we just need to download a disk image to our computer that we can work with. After that, we erase the files on this image, and rename it. At this point, you are ready to transfer files onto this blank disk image. Drag the image into your library, and then mount the disk.
For more information, visit the IMSAI 8080 Category page!
— Ricky Bryce