
Introduction to Kenbak-1 Indirect Addressing
Kenbak-1 Indirect Addressing allows us to point to a variable memory location which contains the operand. This is useful for instructions such as LDA, and STA, etc. We don’t always want to reference the same memory location.
Recall that in our last post, we create a program to act as a sequencer output. Our logic takes data from memory location 107 to 100 to send this to the display. The problem, of course, is that this is backwards from what we might expect. Let’s modify this program, so it will display data in the forward direction: 100 – 107.
Review of Indexed Addressing
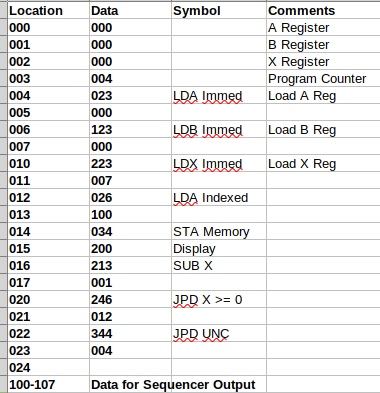
Basically, we initialized the registers, then loaded a value from our data array starting at 107. At this point, we stored that data to our display at address 200. Next, we decremented the X register, and ran through this loop again. We did this until X was below zero. After that, we just started the program again.
Set up the Registers for Kenbak-1 Indirect Addressing
At this point, we’ll make a few changes. If you have not read the post on Indexed Addressing, I highly recommend that you try that one first. After that, you will have a better understanding of how indirect addressing works in this post.
This time, instead of using the X register as our index, we’ll use the B register to tell the Kenbak-1 where to get data from. We’ll simply run the B register up from 100 to 107 to make our data display in the direction a user would expect. This means that we’ll have to change the instruction at memory cell 012 to use indirect addressing instead of indexed addressing. We’ll also have to add a few lines of code to the bottom of our logic. We are simply using the X register as a counter in this project.
Before we begin, you will probably want to print a few copies of the Kenbak Programming Worksheet.
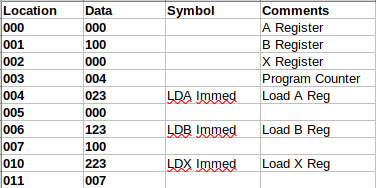
First, we’ll need to initialize the registers. In cell 003, we’ll start the program counter off on Memory cell #004. Cells 004 to 011 will initialize the registers. We’ll start B off with a value of 100. This is because we want to start getting data at cell 100. The X register will simply act as our counter. We’ll initialize this to 7, and it will work it’s way down to 0 later in the logic.
Use the LDA Command to get our Data
At this point, take a look at the programming worksheet to see how we need to set up the instruction at cell 012.
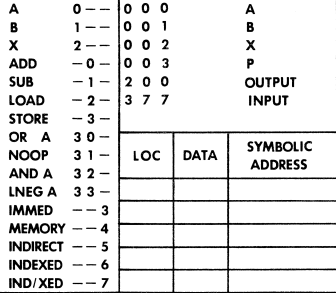
Instead of using just Indexed addressing to load the accumulator (A Register), we want to use Indirect addressing. Therefore our command needs to be to 025. The first digit is 0 for the A register. Our second digit will be a 2 (for load), and the third digit “5” indicates indirect addressing. Memory cell 013 contains the address that holds the value of the operand. Address 001 is the B register. Remember the B register will start at 100.

Store the A Register to the LED Display
Now that our A register contains the data we want to display, we must store this data to memory cell 200. Your Kenbak-1 worksheet tells us this is the display. The first digit is 0 since we are working with the A register. The second digit will be a 3 for a STORE command. Finally, we are storing the value to a memory location, so the last digit is 4. Our command is 034, and we store this to address 200.

Decrement the X register
Keep in mind that we are using the X register simply for counting. This started off at 7, so every time we update the display with new data, we want to decrement the X register. Our goal is to move this toward zero. Once the X register reaches 0, we can start over again.
We are now at memory cell 016. Let’s look at our programming worksheet again. Since we are using the X register, the first digit of the command is 2. For the second digit, a subtract operation is 1. We will be subtracting an immediate value. Therefore, the last digit is 3. The instruction is “213”. Cell 017 contains the value we want to subtract from the X register, which is 1.

Add 1 to the B register
At this point, we are ready to increment the B register. We are at memory cell 020. This will set us up to get data from the next memory location in our 100-107 array.
By looking at the worksheet, we can figure out our command for cell 020. Since we are operating on the “B” Register, the first digit will be 1. For an ADD instruction, the next digit is 0. Because we are adding an immediate value, the last digit is 3. Our command for cell 020 is “103”. We need to place the value of 001 into cell 021 since this is the value we want to increment the B register by.

Loop through Our Data
If our X register is still greater than 0, then we need to start looping through our data array until X=0. We will use a direct jump for this (JPD) since we always want to jump back to cell #012. Look at our programming worksheet. We’ll need to go to the middle section for this on the left side of your page.
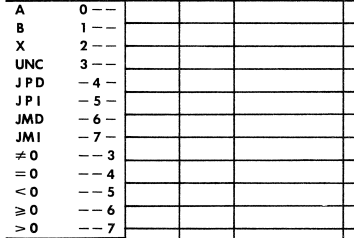
Since we base the jump on the value of the X register, the first digit is 2. For a direct jump (JPD) The second digit is 4. Lastly, we’ll jump as long as X is above or equal to 0. therefore, the last digit is 6. Our jump command in cell 022 will be 246. Cell 023 will be “012” because we want to jump back to cell 012 instead of all the way back to 004. We don’t want to re-initialize all of our registers just yet.

Restart the logic
Finally, if we have completed the loop, we can restart the program again at cell 004. This will be an unconditional direct jump. We’ll use 344 as the instruction even though we don’t really care about the condition. The cell we jump back to will be 004.

Octal Dumps for Kenbak-1 Indirect Addressing
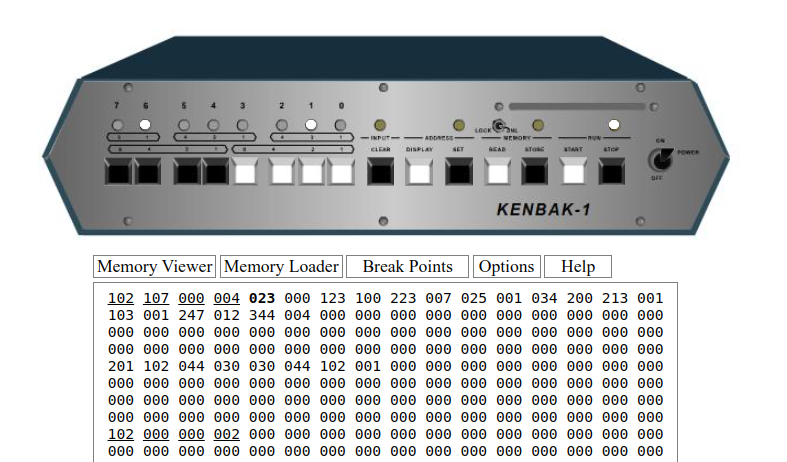
If you are using the Kenbak-1 Emulator, you can paste this code. Don’t forget to set the value of addresses 100 to 107 with the data you wish to display.
000 100 000 004 023 000 123 100 223 007 025 001 034 200 213 001 103 001 247 012 344 004 If you are using a hardware replica, you can paste the data in this format, or enter it manually.
000,100,000,004,023,000,123,100,223,007,025,001,034,200,213,001,103,001,246,012,344,004,s