
Introduction to Kenbak-1 Indexed Addressing
Kenbak-1 Indexed Addressing allows you to have a variable address. Typically, we use this to move through a series of memory locations to get or store data. In this example, we’ll create some crossing lights. In other words, the lights will start at both ends of the 8 bit display, and move toward the opposite end of the display. Effectively, they will “cross” in the middle. You can enter any bit pattern to display though. We are effectively creating a sequencer.
There are several ways to make this happen, but in this post, we’ll concentrate on how to use indexed addressing.
In this case, we’ll use addresses 107 to 100 to store our bit pattern. Our program will start in memory cell #4. Just keep in mind that to keep things as simple as possible, we will enter our bit pattern backwards. In other words, cell 100 will be the last bit pattern, and memory cell 107 will be the first.
I’ll be using the Kenbak-1 Simulator for this post, but you can use any Kenbak-1 replica that you like. You can build your own, or purchase a kit at adwaterandstir.com.
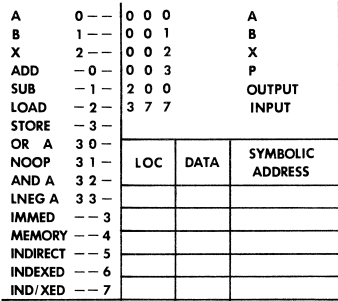
Before we begin, please print out some Kenbak-1 worksheets. This will help you to understand how we develop the instructions that we will enter.
House Keeping
Let’s start off with some simple house keeping. Keep in mind that addresses 000 to 002 are the registers. Also, remember that memory cell 003 is the program counter. We don’t really need to do much with the registers because our program will initialize those. However, we do need to start the program counter at 004. That way, when we run our program, the Kenbak-1 will start executing code from that memory cell.
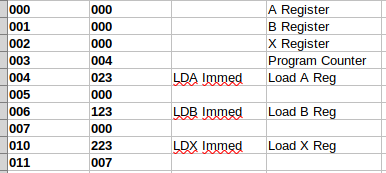
For memory cells 001 to 011 simply initialize our registers. Look at the programming worksheet, and compare this to memory cell #4. For the first octal digit, we specify 0 for the “A” Register. The second octal digit is 2, which is a load instruction. Next, we want to load an immediate value, so the last octal digit is 3. Therefore, in memory cell 004, we have “023”. Memory cell 005 contains the immediate value that we want to load to the “A” Register. We simply repeat this for the B register, “123”. Additionally, we need to start the X register at a value of 7. I’m doing it this way because with the Kenbak-1’s instruction set, it’s easier to count down toward 0, than to count up to an arbitrary value.
Send Data to the Display
Now that our registers have initial values, we can start to send our bit pattern to the display. As I said before, we will later store our bit patterns in cells 107 to 100. Recall that we have our X register set to 007. This is our index register.
When we use Indexed addressing to load the A register, we have a variable address. In other words, we will specify a specific memory location. The Kenbak-1 adds the value of the X register to this memory location . In other words, if we specify address 100 for the instruction, and the X register has the value of 7, then we will get data from memory cell 107.
Let’s give this a try. In memory cell 012, load the accumulator using indexed addressing, starting at cell 100. If you look at our worksheet, the instruction will be 026. 0 for the A register, 2 for a LOAD instruction, and 6 for indexed addressing. Memory cell 013 will have our reference value of 100.
At this point, we need to store the value of the A register to the display. Once again, look at your worksheet. To store the A register to a memory location, we specify 034 for our instruction in cell 014. Our worksheet tells us that the display is at address 200. Therefore, we will enter 200 into memory cell 015.

Decrement the Index Register for Kenbak-1 Indexed Addressing
At this point, we need to decrement the X register. We do this because the cell containing the data we want to send to the display next is in cell 106.
When we look at the worksheet, we can build this command easily. The command is 213, and this goes into cell 016. 2 for the X register, 1 for a subtract, and 3 for an immediate value. In cell 017, we specify how much to subtract from the X register. This will be 1, and this goes into cell 017.

We are not finished just yet. We need to continue to decrement the X register, and update the display each time. We’ll continue this until X reaches 0. Therefore, we will need a conditional jump. This needs to jump back to cell 012 where we reload the accumulator to display the next byte.
Let’s look a little further down in our worksheet to develop this jump.
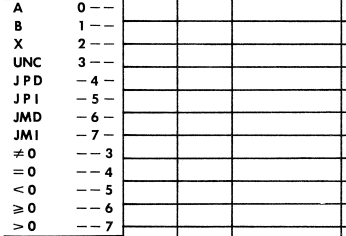
We want to base the jump on the value of the X register, so our first digit will be 2. Since this will be a direct jump, our second digit is 4. We want to continue this process while X is above or equal to 0. Therefore, our last digit will be 6. Our command is 246. This will be in cell 020, and the cell we want to jump back to is 012.
Note: Currently, I’m having a little trouble with the simulator, and trying to get that resolved, but a temporary fix is to change the instruction at 020 to “247”. You will just be missing the data at address 100 for now. On the Kenbakuino, though, it seems to work as listed here.

Restart the program
At this point, we are ready to restart our bit pattern. We’ll do an unconditional jump back to cell 004.
We need an unconditional jump, so the first digit will be 3. Since this is a direct jump, our second digit is 4. We don’t really care much about the conditions since this jump is unconditional. We’ll just set the last digit at 4. Therefore our Jump command will be 344, and we jump back to cell #004.

Entering Data for Kenbak-1 Indexed Addressing
To set up the data you wish to display, go to address 100. You can start entering display patterns up to address 107. Keep in mind this data will display backward for this example. Therefore 107 will show on your display first, then down to 100.
Program Listings
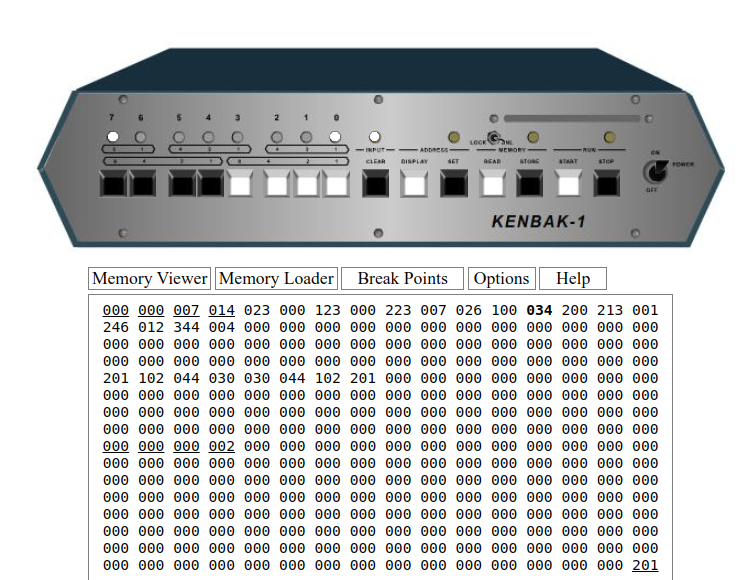
If you are using the emulator online, you can load this code: Just be sure to set your bit pattern in address 100 to 107.
000 000 000 004 023 000 123 000 223 007 026 100
034 200 213 001 246 012 344 004
If you are using a Kenbakuino, you can load this code: Again, don’t forget to set addresses 100 to 107.
000,000,000,004,023,000,123,000,223,007,026,100,034,200,213,001,246,012,344,004,sFor more information on the Kenbak-1, visit the Kenbak-1 Category page!
— Ricky Bryce