
Introduction to Creating a FactoryTalk View ME Project
When creating a FactoryTalk View project, there is some information we will first need to gather. You will need to know the model of your PanelView Plus terminal (such as Panelview 700). We also need to know the IP address of the chassis that we wish to connect to. If you have an Ethernet module in the chassis, this information will probably be scrolling across the front of the Ethernet module. If your Ethernet module is displaying “BootP”, then use the BootP server utility to assign an IP address. Another method of assigning an IP address is by using the RSWho Screen in RSLinx. Newer Ethernet Modules for ControlLogix also have on-board switches if you choose to use that method.
Next, we will Open FactoryTalk View ME Studio Machine Edition. To develop a project, we will use “Studio”. We don’t want to use “Station” yet, because that is for runtime only after our project is developed.
If you do not have a shortcut on your desktop, you can access Factory Talk View Studio by going to Start | All Programs | Rockwell Software | FactoryTalk View.
Setting up your new project.
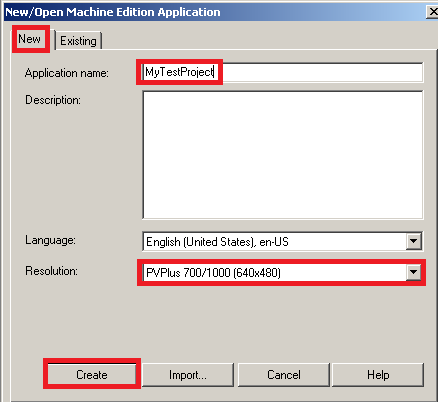
Once FactoryTalk View has been launched, let’s create a new project. Please be patient when clicking the “New” tab. This could take a few seconds to switch to the “New” tab.
Be sure to populate the name of your project, and the panelview type. Then press “Create”.
Communication
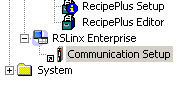
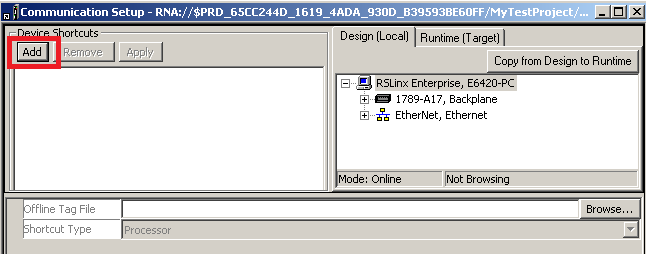
Next, we will configure communication to the processor(s) that we wish to read or write to. at the bottom of the explorer tree, we need to double click “Communciation Setup” under “RSLinx Enterprise”.
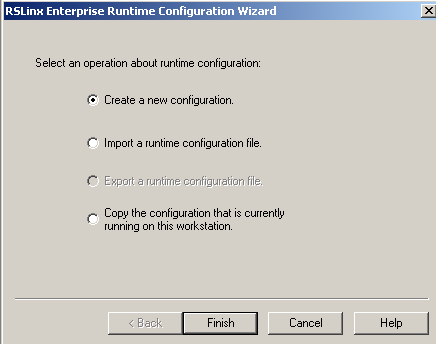
Here, we will be creating a “shortcut”. The purpose of this shortcut is to create a name that is associated with the path of your processor. Anytime we reference this shortcut, FactoryTalk View ME will know the path to your processor.
Let’s create a new configuration:
After, you press finish, we will click “Add” to add a new shortcut.
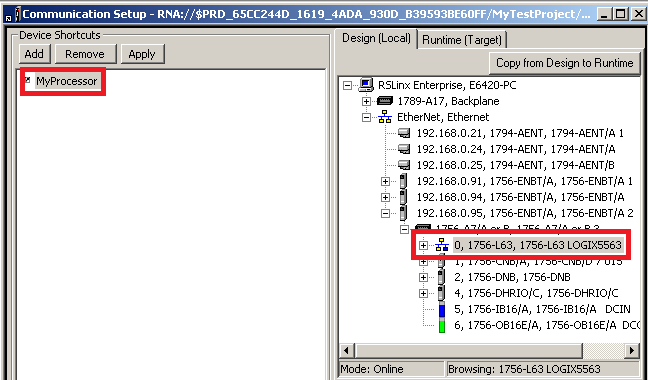
Next, name your shortcut, and specify the path of your processor.
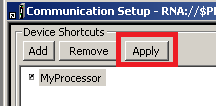
Be sure to click “Apply”
If your PanelView Terminal is running on Ethernet, and it’s on the same network as your laptop, then copy the shortcut from Design (Local) to Runtime (Target). The Design path is what you use to test your project as it’s being designed on your PC. The Runtime path is what the Panelview will use after you download your project to the Panelview Plus Terminal.

Press OK, and your communication is complete. You are ready to continue to the next document to begin developing display screens, and adding objects.
Next learn about navigating between display screens!
— Ricky Bryce
Pingback: Overview of FactoryTalk View ME (Machine Edition) software.
Pingback: FactoryTalk View Ellipse Animation -- Changing color
Pingback: Creating the Runtime, and Downloading FactoryTalk View ME application
Pingback: How to setup triggers and alarm messages in FactoryTalk View ME
Pingback: Information Messages in FactoryTalk View Machine Edition
Can FactoryTalk ME talk directly with IOLink or ArmorPoint ethernet-connected devices, or only with PLC processors?
I don’t know of any “easy” way to communicate directly with field devices from FactoryTalk. I can see how that could be useful though for simply monitoring or controlling devices manually. If you don’t desire a hard controller, you might be able to use a soft controller such as SoftLogix 5800. A cheaper option might be to get a small CompactLogix to gather the data, then FactoryTalk to read and write to the controller. You would want this on an isolated network though (with it’s own switch). The Ethernet/IP packets are very aggressive. If you try to run I/O over the plant network (the network with your office PC’s), you could bring that network to it’s knees very quickly with just a few I/O blocks.
If you do come across an easy way to communicate directly to the field devices, please let me know. I’ve personally never tried that, and it might be a good question for your distributor. I wouldn’t think FactoryTalk on it’s own would be capable of declaring an I/O connection.
Ricky