
Introduction to Kenbak-1 Basic Commands (OPCODES)
Kenbak-1 Basic Commands (OPCODES) allow us to program the Kenbak-1 using “Machine Codes”. The Kenbak-1 is considered to be the very first Personal Computer from 1971! Basically, we’ll only cover the most common commands in this post. In another post, we’ll get into some of the more advanced commands. I’ll be using the Kenbak 2/5 case for this. You can build this machine with a raspberry pi and a 3d printer. Another option is to purchase a kit. You can buy one at adwaterandstir. In this case, I just used the Kenbak 2/5 3d drawings, and put an arduino uno in it using the Kenbakuino sketch. Special thanks to those who have worked on these projects to keep the excitement going for these vintage computers!
Today we’ll discuss the Load, Store, and Jump commands. These are the basic commands we need to understand to write some simple programs.
LOAD will load a register, such as A, B, or X with an immediate value, or a value from another memory cell.
STORE will take the data out of the, A, B, or X register, and store that value somewhere else in memory.
Direct JUMP (JPD) will jump to another memory cell in your program. The memory cell that you jump to should contain an INSTRUCTION. That is what the Kenbak-1 expects.
Memory Layout for Kenbak-1 Basic Commands (OPCODES)
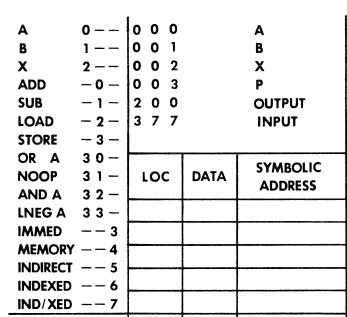
Before we begin, let’s take time to understand the purpose of a few memory cells. Keep in mind that all of the addressing is in OCTAL. In other words, there are no 8’s or 9’s anywhere in the addressing. We number the memory cells from 0 to 377 (octal). This is really 256 (decimal) memory cells, or 256 (decimal) bytes of memory.
Data Registers
Memory Cell 000 is the “A” Register. We can load data into this register with the LDA (Load A) command. Likewise, we can take data out of this register with the STA (Store A) command. This is our main register, or the Accumulator.
Memory Cell 001 is the “B” Register. Likewise, we can use this as a second register for math, or for loops. It’s just another place to store data.
Memory Cell 002 is the “X” Register. We use this register for Indexing. We won’t talk about indexing much in this post. However, if you are not using it for indexing, you can just use it as an extra holding register.
Memory Cell 003 is the “PC” Register. Obviously, this is the program counter. Your Kenbak-1 keeps track of what memory cell to execute next. Typically, when writing a program, we will start this register at 4. This is because 000-003 are already in use.
Memory Cell 200 is the “Output” register. Whatever we place into this register will display on our lights at runtime. In other words, let’s say we want the lights to reflect the value of the A register. We would simply store A (STA) to memory cell 200.
Memory Cells 201-203 are the “Overflow and Carry” registers for the A, B, and X registers. We’ll discuss these in more detail in another post.
Memory Cell 377 is the “Input” register. This is the status of the push buttons on the front of the Kenbak. We can Load this to the B register, for example. We can compare it against 0. If the B register becomes a non-zero number, we know that a button was pressed.
Program Commands
Although the Kenbakuino already has a program to count in binary, we’ll set up one on our own. This will help you to get used to how the programming works on the Kenbak. In this program, we’ll simply start with a 0 in the A register, and store the A register onto the display. After that, we’ll add the value of 1 to the A register. Then we’ll jump back to the top of the program where we store the A register to the accumulator again. Obviousy, the process will repeat infinitely, or until you press “STOP”.
At this point, let’s take a look at the Kenbak-1 Programming Worksheet. You might want to print out about 100 of these and keep them in a binder. In the LOC column, fill out she sheet with consecutive numbers. I like to start with 003, as 000-002 are the data registers. Remember, this register is the program counter. Our first command will start at memory cell 004. Don’t forget these are in octal. Don’t write down any 8’s or 9’s. For example, you will go from 003 to 007. Next will be 010 to 017, then 020 to 027, and so on.
Load 000 to the “A” Register
First, we need to load the value of 0 into the “A” register. Remember our program starts on Memory Cell #004. Since it’s the A register that we want to operate on, the first octal digit will be 0. You see this in the top left corner of the worksheet. Now move down to Load. Since we want to load the A register, our next octal digit for memory cell 004 will be 2. We will be loading an immediate value. Look down until you see IMMED on the worksheet. As you can see the next octal digit is a 3. Therefore, in memory cell #4, we will enter 023.
Each instruction in the Kenbak will use 2 bytes. In this case, the first byte will contain 023 to load an immediate value into the A register, but what value? The value we wish to load goes into memory cell #5. Therefore in Memory Cell #5, we place a 000.
Store the “A” Register to the display
As you can see on the programming worksheet, our display resides at memory cell 200. We need to take data from the “A” register and store that data to the display. We use a STORE command for this. Let’s see if we can come up with the octal code we need for memory cell #6.
Look at the top left of your programming worksheet. Since it’s the “A” register we need to get data from, our first octal digit will be 0. After that, we need a STORE Command. As you can see, this will be 3. Since it’s another memory cell we need to store the value to, our next digit will be “Memory”, which is 4. Therefore, memory cell #6 will contain the value 034. Memory cell #7 will contain the memory address we wish to store the result to. If you look at the top of your programming worksheet (in the second table), you will see OUTPUT is at address 200. Memory cell #7 contains 200.
Add 1 to the “A” Register
At this point, you are probably getting the hang of these instructions. We are on memory cell #10. Since we are still operating on the A register, our first digit is 0. The ADD instruction is also 0, and we will add an immediate value, which is 3. The code for memory cell #10 is 003. Memory Cell #11 contains the value we wish to add, which is 001.
Jump Back to Display the “A” Register
We are now at memory cell #12. At this point, we are ready to jump back to “almost” the top of the program. We don’t want to jump back to memory cell #4, or it would put a 0 back into our A register. We want to jump to memory cell #6. This will be an unconditional jump. That is to say, we want the program to always jump, and there are no conditions that we require it to meet.
Let’s look down at the second row of the table on the programming sheet.
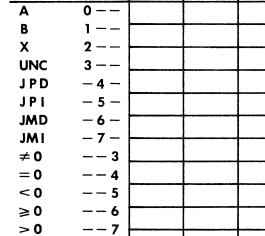
If you look at the 4th line in the chart above, and UNConditional jump will start with a 3. This will be a DIRECT Jump. A direct jump is the JPD instruction, so our second digit is 6. We don’t care about the last octet so much, since it’s unconditional, so we’ll just use a 4. Therefore, memory cell #12 will be 344. Memory cell #13 contains the location of the memory cell we wish to jump to. Obviously, this will be 006.
Enter Your Program using Kenbak-1 Basic Commands (OPCODES)
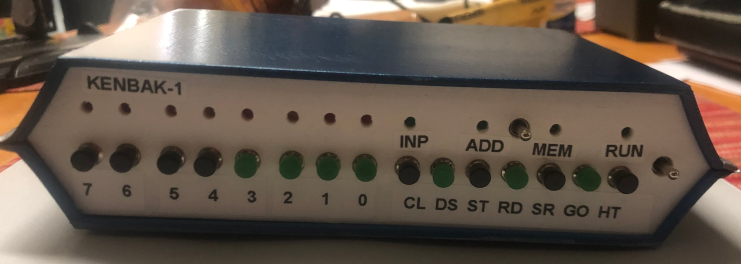
At last, we are ready to test your project. Be sure to press start then stop on the Kenbak. Now press CLEAR to clear the INPUT register, which your display reflects when the program is not running.
Understanding Octal to Binary conversion
Before we continue, let’s discuss how we would enter OCTAL values on the 8 push buttons of the Kenbak. Each octal digit can be 3 binary digits. Therefore think of your buttons in sets of 3. Obviously, the most significant digit will only have 2 available though (buttons 6 and 7). Now consider the following chart:
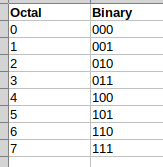
This chart tells us which buttons to press in binary for a corresponding octal number. Study these examples to make sure you understand how this works. The spaces between the binary numbers indicate a new octal digit.
Examples:
023 = 00 010 011
034 = 00 011 100
200 = 10 000 000
344 = 11 100 100
Enter Your Program
On your buttons, press START, then STOP to get the Kenbak into a known state. Now press CLEAR. Enter a 003 on your buttons, because we need to enter a starting number into the program counter. To enter 003, just press buttons 0, and 1, so the last two address lights are on. Now press SET. You are now ready to enter the data into program register #3. Press Clear again. Now, on your buttons, enter 004 in octal. In other words, press button #2. Keep in mind, 00 000 100 is a 4 in octal. Now press STORE then CLEAR.
From now on, you can just enter the data for each consecutive address, then press STORE then CLEAR after each line.
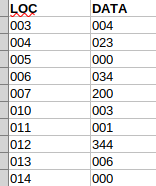
Here is our entire program to enter:
Now press “START”. Keep in mind that to slow your program, you can just press STOP, then HOLD 7 and press STOP again. Then press START. 7 is the slowest the program runs, and 0 is the fastest.
To review your program in memory, press STOP, then CLEAR. Enter 004 onto INPUT buttons. Press SET. Now press display. Your display should match what you have on your programming sheet for memory cell 4. Keep pressing the display button to read consecutive memory cells.
Summary for Kenbak-1 Basic Commands (OPCODES)
In short, programming the Kenbak-1 is very easy. Anyone can do it, but it just takes patience. Understand that a computer only follows instructions. You will make mistakes at first… many many mistakes! It will take a while to debug your programs. Usually, you will find that your error is a simple digit that you overlooked. The Kenbak will do exactly what you tell it to do though.
Now that you know about the basic programming procedure, take a look at the Kenbak Programming Reference to learn about more commands!
For more information, visit the Vintage Computer Category Page!
— Ricky Bryce