
Introduction to FactoryTalk Function Key Assignments
FactoryTalk Function Key Assignments allow you to assign function keys to objects on your graphics display. It’s important to realize that some panelview terminals do not have a touch screen. In this case, we need a different way for the operator to interact with objects.
Objects such as push buttons, navigation buttons, and numeric entries require the operator to input data. In this post, I’ll discuss how to assign a function key to these objects. Once we assign the function key, we simply need to label the object to inform the operator which key we are associating with it.
Assign a Function Key to an Object
Before we begin, let’s consider the following display:
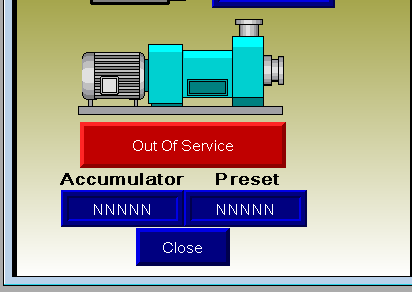
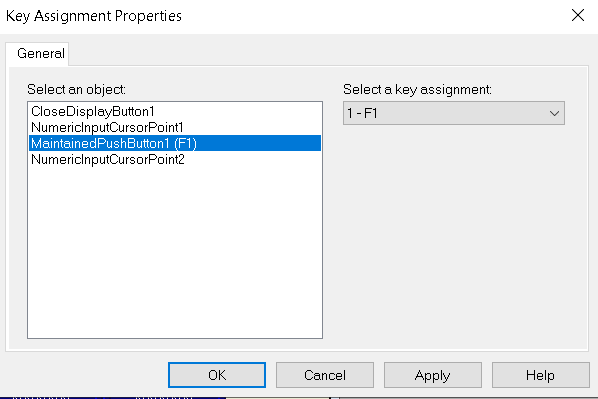
Our goal is to assign the “F1” Function key to the “Out Of Service” button. First, left click this button to make your selection. Next, Right-Click the button to go to “Key Assignments”. You will notice that “MaintainedPushButton1” is already highlighted. That is the name of our object that we selected. Select F1 as your assigned key, then press “Apply” and “OK”.
Label the Object according to FactoryTalk Function Key Assignments
At last, we need to inform the operator which function key to press to activate this object. Double click the same push button object. This will display the “properties” of the object.
On the “States” tab, be sure to include the function key label on each state.
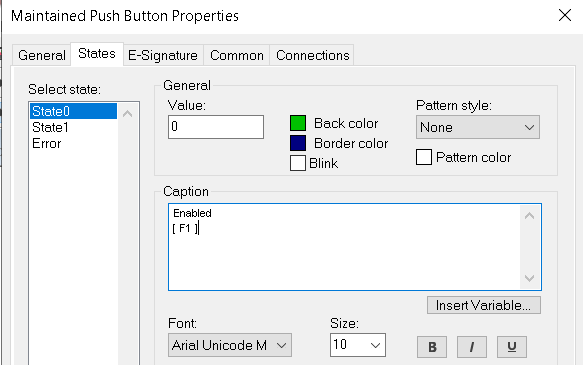
Press “Apply” then “OK”.
Resize the Object
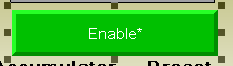
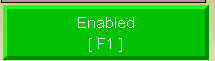
In this case, you can see an * on the label, and our [F1] label does not show yet. The * indicates the object is simply not large enough to contain our text. This leaves us with 2 options. First, we could change the font size. This would make the font size small enough that it would fit within the boundaries of the object. Secondly, we could resize the object itself. Since our text is already set very small, we’ll choose to resize the object.
When you click the object, you will see “handles” on each side, and all 4 corners. Move your mouse over one of the handles, and left-click and drag the handle to resize the object. As you can see, the object is now large enough, and our entire label appears on the button.
Create a Runtime and Download to the Panelview
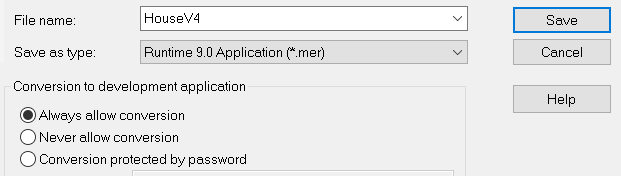
At last, you are ready to send the project to the Panelview. Since we made a change to the project, you need to re-create the runtime. To accomplish this, be sure to save your display. Next, go to Application | Create Runtime.
Under “Save As Type”, be sure to select the revision of your panelview, then click “Save”.
After a few seconds (or minutes), your runtime file is ready to transfer to the Panelview terminal.
Transfer your Application to the Panelview Plus terminal
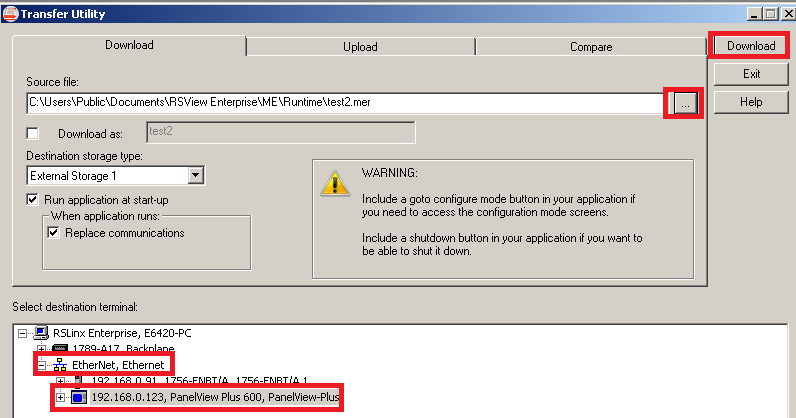
Before downloading, check with an engineer to make sure no unpredictable operation will occur. Go to Tools | transfer utility. Be sure to select the runtime that you just created. It’s not always the application the utility defaults to. If you want to reboot the panelview to the new runtime, be sure to check “Run Application at Startup”. You can also choose to replace communications if you made any changes to the communication settings.
Browse for your Panelview Plus terminal, then click “Download”. The Panelview should now reboot, and your changes will be active.
For more information, visit the FactoryTalk View Me category page!
— Ricky Bryce