
Introduction to the DHT11 and DHT22
The DHT11 or DHT22 will read temperature and humidity. We can then send this data to a display, to a web server, or used for alarming. This document will guide you step by step on how to set up this sensor on the Uno board. The DHT22 has improved accuracy, and that is the one we will be using in this example.
Make your connections:
F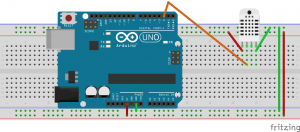 irst, we will make the connections for the sensor. On a breadboard, we will connect 5v and GND to the power rails, and jumper the power rails together. The DHT has 4 pins. Pin 1 is on the left, and will be connected to 5v on the power rail. (3.3v should work OK too if you have a 3.3v setup). Pin 2 on the DHT is our data pin, and for this example, we will connect this to I/O Pin 2 of the Uno board. Pin 3 of the DHT is unused, and Pin 4 will be connected to GND.
Prepare the IDE
I’m using v1.8 of the Arduino IDE. In this version, it’s very easy to install the libraries. Go to Sketch on the menu bar, and then go to Include Libary. Choose “Manage Libraries”, and you can search for the DHT library. From here you can install the library within the IDE. In old versions of the IDE, you had to download the DHT library from the Internet, extract the libary files, and place them in your arduino libaries folder.
Open the example sketch
Within the Arduino IDE, go to File | Examples | DHT Sensor libary | DHTtester. We may need to make a modification to this sketch depending on the sensor we are using. Locate this code, and uncomment the sensor type that you are using. Be sure the other sensor types are commented out as shown:
// Uncomment whatever type you’re using!
//#define DHTTYPE DHT11 // DHT 11
#define DHTTYPE DHT22 // DHT 22 (AM2302), AM2321
//#define DHTTYPE DHT21 // DHT 21 (AM2301)
Upload the sketch
In the Arduino IDE, go to Tools | Board, and select the board that you are using.
You will also need to select the COM port by going to Tools | Port If you are unsure which COM port you are using, you can get this information from the windows Device Manager.
You can now upload your sketch. This should be the second icon in your standard toolbar.
View your data
Under Tools, you can open the Serial Monitor. Be sure the baud rate matches the baud rate in your sketch. In my case, the baud rate defaulted to 9600. Each second, you should get an update from the DHT22 or DHT11 Sensor.
The code in this sketch can be used in conjunction with other code such as a web server, or an LCD display. Check out my other documentation on how to log data to a web server over wifi!
— Ricky Bryce