
Introduction to GSV with a UDT
Today we’ll discuss how to structure a tag to hold the system clock using the command GSV with a UDT (User Defined Data Type).
We use the GSV (Get System Value) command to pull data from the system, and copy that data to a tag. This allows us to use system data in our ladder logic. In this example, we will copy the system time into a tag that is structured with a UDT. As a result, we will have tags available such as Time.Year, Time.Month, Time.Day, etc.
In contrast, if we copy the data to a standard array, our tags would be Time[0] for the year, Time[1], for the month, etc. Therefore, by incorporating a UDT, we have more user friendly tags.
Structuring the UDT
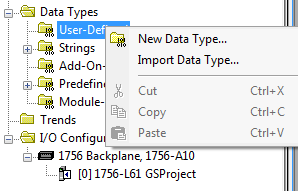
First, we’ll create a UDT that has 7 elements. To do this, right click the “User Defined” folder under “Data Types” to create a new Data Type. A Data Type is simply the way data is structured within a tag. Basically, we are adding a new “Menu Item” to our Data Types.
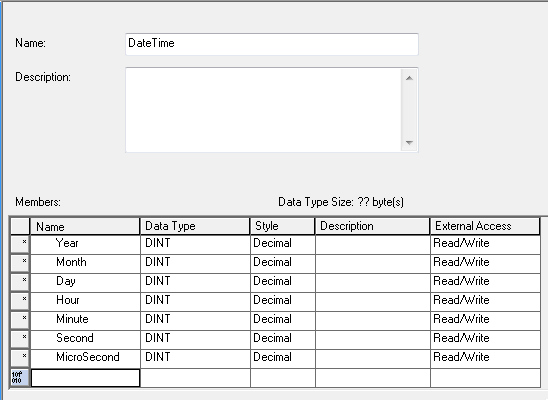
Structure your data Type as follows. First, name your Data Type. In this example, we’ll name our data type “DateTime”. Secondly, add the seven members as follows. Be sure the data types of each member are all DINT’s. Finally, hit “Apply” and “OK”.
Create the Tag
Meanwhile, I’ll go to “Controller Tags” . Controller tags are Global. This will give the ability for any program to access your system time. Under Edit tags, I’ll add a new tag called “Time” with the “DateTime” Data Type. This is the Data Structure that we just created.
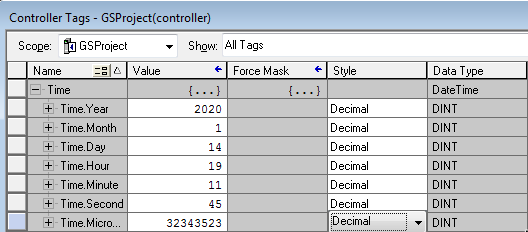
After we hit the enter key, we will expand the “Time” Tag, to verify the sub elements are laid out as we like.

In effect this gives us Time.Year, Time.Month, Time.Day, Time.Hour, Time.Minute, Time.Second, and Time.Microsecond.
Add the GSV Command
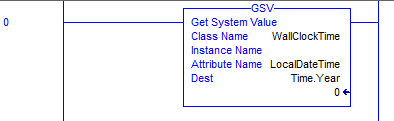
Finally, add the GSV Command to our logic. Since the system time might be used by all logic, I’ll just add it to the Main Routine. Add a GSV Command. The class will be “WallClockTime”. Likewise, the attribute will be “LocalDateTime” to account for the time zone. Notice there is no selection for the Instance. In reality, there can be no other present time than “right now”. There is no other instance. Store the result to Time.Year.
Now that we have the GSV in place, I will finalize my edits and go to “Controller Tags”. When in Run mode, you will see the time similar to what is shown below. Your tags will update every processor scan.
Please feel free to post any questions you have on creating the GSV with a UDT! Now that your system time is in a tag, you can use this for time stamps, generating reports at certain times, or even a blow a horn for lunch break!
For information on other features, visit the ControlLogix Category Page!
— Ricky Bryce
Pingback: ControlLogix GSV command (WallClockTime) -- System Time
Hi,
How would I capture a “CurrentValue” attribute of the WallClockTime data?
Hello, Jhenna — Just follow the procedure for getting the standard system time using the GSV command with 2 exceptions: the tag you create in the controller tag database will be a LINT datatype, and when you write the GSV command, you will use “current value” instead of LocalDateTime. Let’s say the tag you create is called Jhenna, and it’s of the LINT type. Jhenna would then be the destination of the GSV instruction. Remember that current value is Epoch time. Although it’s good for timestamping, it does not directly show the individual elements of the processor time like LocalDateTime would. Here is the link to the general GSV command. Use this procedure with those modifications I just talked about:
http://bryceautomation.com/index.php/2017/06/03/controllogix-gsv-command-wallclocktime/
If you want to log the current value, then follow the procedure for indirect addressing with the following modifications:
http://bryceautomation.com/index.php/2017/06/12/controllogix-indirect-addressing/
*Start at the topic called “Create a Fault Log”
*Your faultlog will simply be an array of 200 elements: ie: faultlog will be LINT[200]
*The source of your COPy instruction would just be Jhenna
*The destination of the COPy instruction would be Faultlog[pointer]
*The destination of the FLL instruction would be Faultlog[0]
*The length of the FLL will be 200.
Hope that helps. Let me know if you have any questions.
— Ricky