
Introduction to ControlLogix Forcing and Associated Dangers
In this section, we’ll discuss ControlLogix Forcing and Associated Dangers. ControlLogix Forcing simulates real world jumpers to some extent. Forcing works on real world inputs or real world outputs. You can also for aliases to real world inputs or real world outputs. You can even force Produced and Consumed tags.
When forcing, you must be aware of your own plant’s regulations on forcing. This document serves as a general guideline of how forces work. It is your responsibility take all safety precautions. It’s your responsibility to verify the accuracy of any information on this site before implementing it in any way! You can cause severe damage to equipment and persons if forcing is not implemented properly. Additionally, there may be some hidden dangers, or unexpected side effects of forcing I/O on your equipment.
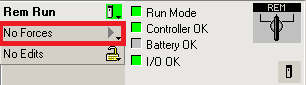
Before attempting a force, check the amber force light on the processor to ensure no other forces have been installed. Otherwise, when you enable your force, you will also enable other forces that might have been left in the processor. You can also check your online toolbar to ensure no forces are currently installed.
Be aware that forcing inputs may affect more than one rung. It will affect all rungs that are looking at the input that you are forcing! Also, when forcing outputs, be aware that the output device may feed inputs back into the processor, and cause other things to happen.
Forcing Inputs
Here, we will force a real world input on a rung. We’ll assume the switch has gone bad, and we can’t find a replacement. We will install, and enable a force to make the output energize.

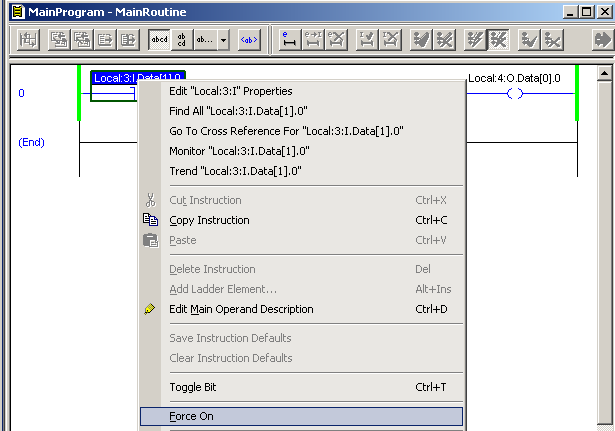
To install a force, I will right click “Local:3:I.Data[1].0”, and choose “Force On”
At this point, the amber FORCE light on the processor will be flashing. We will also notice the rung is indicating that the force has been installed.

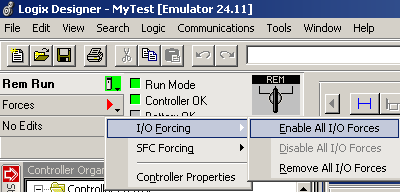
Now, to activate the force, we must enable forces. In the Online toolbar, click your pull down window next to “Forcing”. Then go to I/O forcing, and enable all forces.

Now, the amber force light on your processor will be solid. You will also notice in your rung that we are now calling for the output to energize.

Input Forcing Explanation
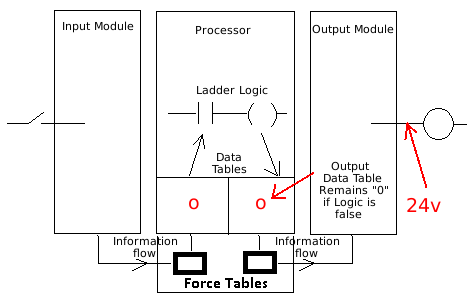
Consider this diagram:
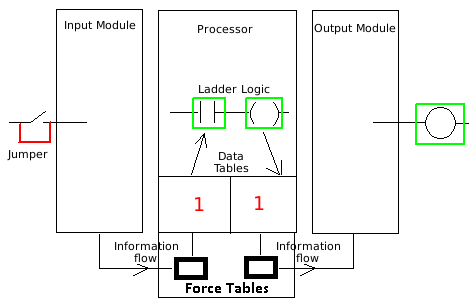
Notice the similarities between a force and a jumper. If we jumper the switch in the real world, the status indicator will come on the input module. Then the value of 1 will be written to the controller tag causing the logic to go true. The output will then energize.
When enabling the force, the status indicator will not illuminate on the input module if there is no voltage on the input module. However, the controller tag will change to the value of 1, and the rung will still go true. The output will energize.
Note: You can also Force tags OFF. In that case, the simulation would be breaking the wire.
Forcing Outputs
Sometimes there is a misconception on forcing outputs. Forcing an output on does not necessarily change the controller tag for the output to a 1. Again, let’s consider this rung: I removed the input force we added earlier, and disabled forces to start this section)
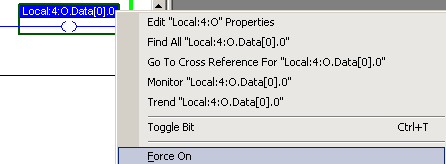
To install a force, I will right click “Local:4:O.Data[0].0”, and choose “Force On”
You will then see on the rung that a force has been installed.

You will also notice the amber force light on the processor is flashing. This indicates that a force is installed in the processor. Now, I will enable all forces.
Output Forcing Explanation
Consider the following diagram:
In this case, even though the switch is open, the output is on. We connected power directly to the light. The controller tags still depend on logic even though the output is jumpered in the real world. Look at the output controller tag. Any other logic looking at this output address will be evaluated as if the output is off until the switch is shut. It’s important to realize that we can’t always jumper voltage to an output this way. It’s best to remove the wire from the output module first. You could cause a short with some types of modules if the module is driving the output low in the off state.
Remember: When you force outputs such as a motor starter, the motor starter probably has auxiliary contacts on it. When the output is forced on, the auxiliary contacts will shut, and could feed inputs back into the processor. This could cause other things to happen in your system. If you force a cylinder, the cylinder will move, and could hit switches that also feed inputs back into the processor. Be aware of your entire system if you install a force or a jumper. Similar dangers also exist if you mechanically force a prime mover.
Removing and disabling forces
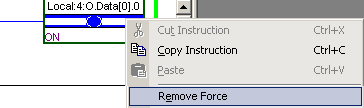
To remove a force, right click on the forced tag, and choose “Remove Force”.
Next, Disable forces:
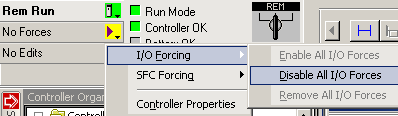
Note: In ControlLogix, forces can be still enabled, even if no forces are installed! So just because your processor has a solid amber force light does not necessarily mean that forces are installed in the processor.
Searching for Forces
If you notice forces are installed in the processor, you can search for forces by clicking Search | Find.

Then choose “Forces”, and under “Find Where”, choose “All routines”.
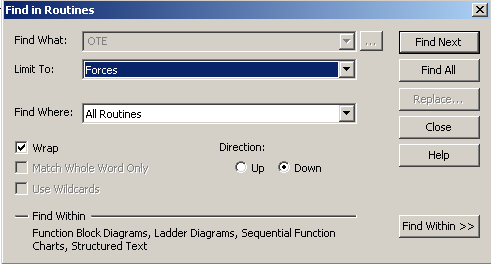
Then, just choose “Find Next” or “Find All” to search through your logic for forces.
Summary of ControlLogix Forcing and Associated Dangers
In short, before you force, know what you are doing. It’s possible to damage equipment or harm people. Usually, you might have similar policies at your plant for forcing as you have for installing real-world jumpers. The dangers are almost the same. Never rely on forcing for your equipment to run. Use it wisely for troubleshooting. Be sure to fix the actual problem with your equipment rather than to simply bypass a problem. Also keep in mind that if you rely on forces for your equipment to run, then you loose the ability to enable and disable forces at will for troubleshooting.
For more information on ControlLogix, visit the ControlLogix Post page!!
— Ricky Bryce