
Introduction to ControlLogix Aliasing
An Alias is just another name. ControlLogix aliasing is just another name for a tag. If you haven’t set up your I/O yet, look at the document on how to set up local I/O and remote I/O over Ethernet. You can alias a tag to almost any level. An alias is a direct “drop in” substitution for a tag name. The main reason for creating Aliases if for human clarification of the purpose of the tag. Also, I/O points for particular purposes might change in your system. If this happens, you just need to change the I/O Point that the alias refers to instead of having to change all of your logic to reflect the new point.
Consider this tag: Local:5:I.Data.0. This tag tells us where the data point is in the system, but it does not tell us what the tag is for. You can create a tag that is an alias (another name) for this individual data point, such as “CV101OpenLS”. Our logic could just look at “CV101OpenLS” to see if the limit switch has been made.
Another option is to create a tag at the word level. In this case our alias name might be “LimitSwitch”, and the tag might point to Local:5:I.Data (covering all the switches on the module) Obviously, the alias name is not quite as clear on the purpose of each I/O point, but you only had to create one alias per module. Your logic would choose a particular bit, such as LimitSwitch.0, LimitSwitch.1, etc. You are limited to 40 Characters with no spaces. Also a tag cannot start with a number (among a few other rules)
Create the Alias
![]() Let’s go to Controller Tags at the top of your controller organizer window. At the bottom of the Controller Tag database, we will need to be in “Edit Tags” mode.
Let’s go to Controller Tags at the top of your controller organizer window. At the bottom of the Controller Tag database, we will need to be in “Edit Tags” mode.
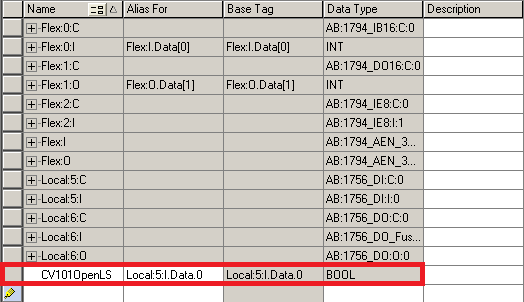 Here, we have a blank line at the bottom of the controller tag database. Be sure that your key is not locked into RUN mode (and you are online with the processor)
First we will enter the Alias name… Then enter the tag name the alias is pointing to. Press the Enter key after entering the Alias to accept the new tag.
Another option is to right click the base tag (Local:5:I.Data.0) and “Create a tag that Aliases Local:5:I.Data.0). In this case, a new line will be created with the alias field already populated. Then, you just need to type the tag name.
Now that our alias is created, we can use this in logic. Let’s see what a tag will look like in logic when it is being used on an individual instruction.

Notice the Alias is showing up in logic, as well as the base tag by default. This tells us both what the tag is for, and the location of our I/O point in the system. Keep in mind that this same bit could be referenced many, many times in your logic If the terminal on Local:5:I.Data.0 ever has a problem, we can move the wire to an unused terminal. Then all we need to do is change the data point that CV101OpenLS is pointing to. Otherwise, we would have to change the base tag throughout the entire project.
Scope limitations
Recall that ControlLogix has two scopes of tags. Controller tags are global, meaning any program or controller can access them. Program Tags (parameters) are local to the program they reside in.
We can create an Alias in the controller tag database which points to another controller tag. An alias in the program tag database can be created that points to another program tag. You can create an alias in the program tags, which point to a controller tag. However, you cannot create an alias in the Controller Tag database that points to a program tag.
— Ricky Bryce
ControlLogix has 4 types of tags, Global, Program Tags, Produced and Consumed.
Thank you, Sean. I changed the word “type” to “scope” in the post for clarification.