
Introduction to FactoryTalk View Security
FactoryTalk View Security allows you to secure displays screens or objects with a password. In this document, we will learn how to set up the users, and secure a display screen. You can also configure groups of users to better organize them, but we will keep things simple in this document.
We will:
- Set up users, and assign the users a password.
- Assign users to security classes.
- Assign a security class to your screens.
For example: Joe is assigned to class A, B, and C. Jane is assigned security class A and B only. If we have a pump control display assigned to security class B, then both Joe and Jane can access the display. If we have a motor control display assigned to security class C, then only Joe could access this display.
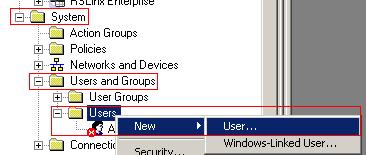
Configure the users
In the explorer tree, scroll to the bottom to find the System folder. Expand the system folder, and you will find “Users and Groups”. Expand “Users and Groups”, and you will see the “Users” folder. Right-click the “Users” folder, and select New | User.
Next, populate the required (and desired) fields to set up the user.
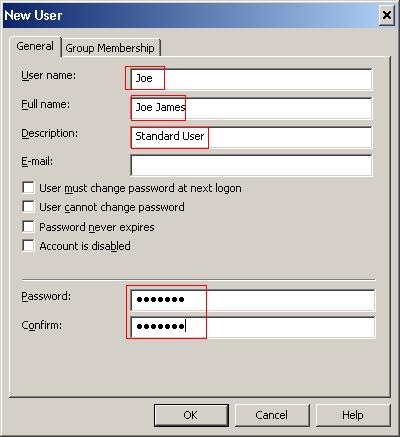
Now hit OK. Your user is added.
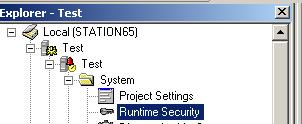
Runtime Security
Next we will assign the user to security classes under “Runtime Security”
Before we move on, let’s remove all security classes except for class “A” from the default user. The default user is considered the active user when no other user is logged in. We will use security class A for the Main Screen later on. This will allow anyone to still see the main screen when no one is logged in. The main screen is where we will later place the login and logout buttons.
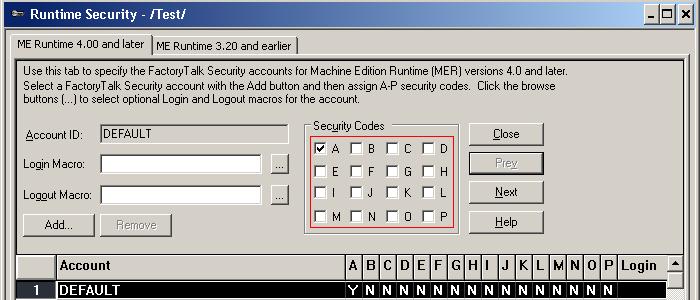
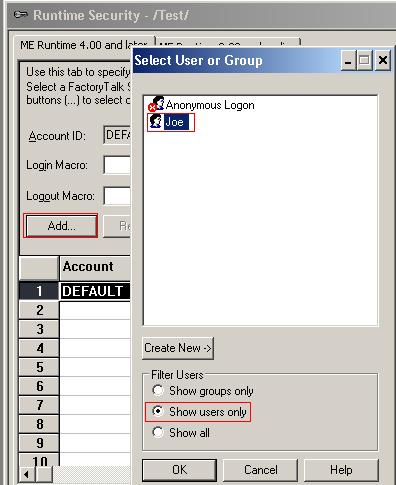
Now, we’ll click the “Add” button. Be sure to select “Show Users Only” (for what we are doing here). Then select the name of the user you wish to configure. Now press OK.
Now, be sure your user is selected. In this example, we will select the user “Joe”. Joe will have access to security class “A”, “B”, and “C”. Be sure to press the Accept button when you are finished. If you don’t press accept, the security classes for the user will not be updated!!!
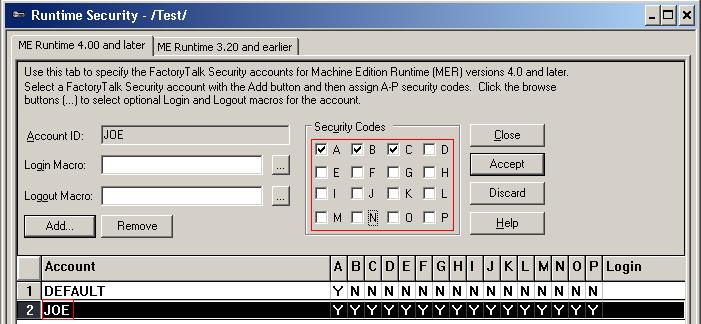
After you press “Accept”, you will see the security classes update for the user. When you are finished, press the “Close” button, and save your changes.
![]()
Configure the display screens
In this project, we have 3 total screens. Main Screen, Pump Control, and Motor Control. We want Joe to have access to any of these screens. If no user is logged in, though, the default user should only have access to the main screen. We will assume that you also have navigation configured between the screens.
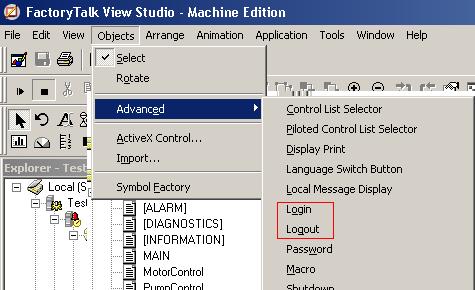
Open the Main Screen, and add a Login Button and a Logout Button. The Login and Logout buttons can be found under Objects | Advanced.
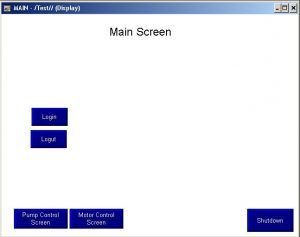
When finished, your main screen should appear similar to this:
Secure the screens
Next we need to configure the Pump Control and Motor Control screens to be in a security class. We will make the “Pump Control” screen have a security class of “B”. The “Motor Control” screen will have a security class of “C”.
Open the “Pump Control” Display. Right-click the Pump Control display and go to “Display Settings”. You can then assign the security class of “B”.
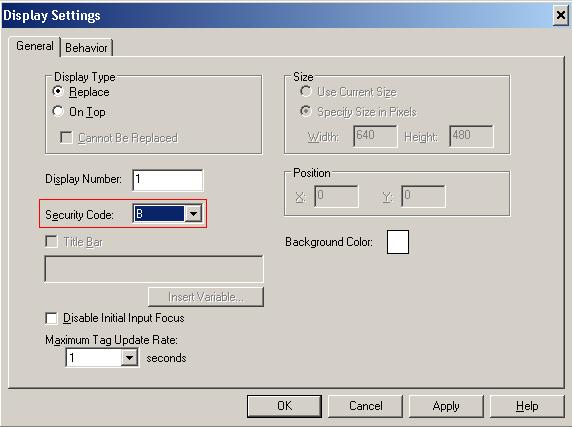
Using the same procedure, set the Motor Control screen to a security class of “C”.
Now, as a review, add another user called “Jane” that has access to security class A and B only.
Test run your project, and attempt to access a secured display screen. Notice that you will not be able to access the display until you log in. Test your work. When you are logged in as Joe, you can access any screen. When logged in as Jane, you cannot access the “Motor Control” screen, but you can access the “Pump Control” Screen.

— Ricky Bryce