
Introduction to Restart Lockout logic
Whenever we have a a large motor, a lot of current is required to start the motor. When the motor is pulling a large amount of current, heat is building up in the wingdings of the motor. Hence, we do not want to allow too much heat to build up in the motor. Usually, it’s important to limit the amount of times an operator can start a motor within a given time period.
In this instance, we will allow the operator to start a motor 4 times within a 20 second period. If the operator attempts a 5th restart within any 20 second window, the operator will be locked out. He cannot restart the motor until an additional 60 seconds has passed.
This code serves as an example only, but yo can modify this code for your own use. On many large motors, the code might be modified for only 2 restarts within an hour.
Common mistake
A common mistake when writing this code is to use a 20 second timer, and a counter with a preset of 5. The programmer will start a 20 second timer the first time the operator attempts a start. Then if the counter reaches 5 counts within 20 seconds the operator is locked out for one minute. The 20 second timer resets if 5 attempts have not been made.
This method is problematic because the operator could attempt the first start, which would start the 20 second timer. The operator could then wait 15 seconds and attempt 3 more restarts. When the 20 second timer restarts, the operator could immediately attempt 4 more restarts, say, within 5 more seconds. Because the 20 second timer is resetting, the operator could have then attempted 7 restarts within a 10 second period.
A better way
The only true way to write this code is with 5 timers. Each time the operator attempts a start, a new 20 second timer will run. In this case, each attempt expires after 20 seconds. If 4 timers are running, and the operator attempts a 5th restart, the 60 second timer will lockout out the output.
Let’s look at the code:
In the first two rungs, we allow for normal operation of a pump. If you are not familiar with Seals, Latches, and Interlocks, please read up on this first. A description of seal circuits can be found here.
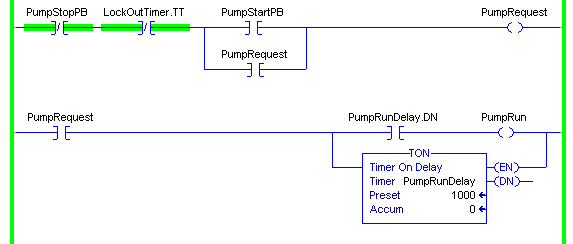
As long as we are not stopped, and not locked out, we can press the start PB, and the output will seal. If your stop button is wired differently, you can change the first instruction. We will assume the PumpRun tag is connected to the real output. We have a PumpRunDelay timer in the second rung. This helps to prevent accidental starts. The timer also eliminates a problem with “Bumping” the motor starter on a 5th start attempt before the lockout timer shuts the output back off.
Request Timers
Now, let’s take a look at the next two rungs:
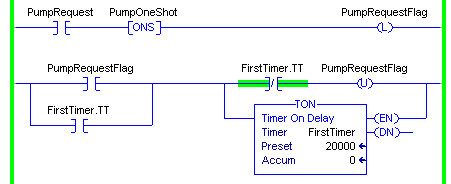
If a request has been made, we will set the flag. We have the OneShot instruction, because we do not want to hold this request flag high. We just want to indicate that a request has been made to start the pump.
In the next rung, if the flag is set, and this timer has not been started, we will start the timer and put the flag down. This indicates that we have acted on the event. The first time the operator attempts a start, the first timer will begin to run, and will time for 20 seconds.
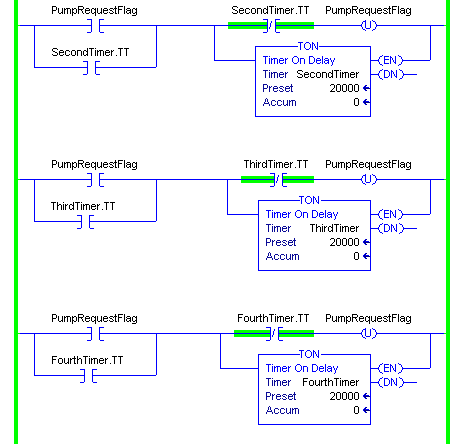
Similarly, we will do this for the next three start attempts. If the first timer was already running, then the PumpRequest flag is still high…. Therefore the next timer will start, and so on.
Lockout Timer
Finally, if all four timers are running, and the operator attempts a fifth attempt, the lockout timer will start running:
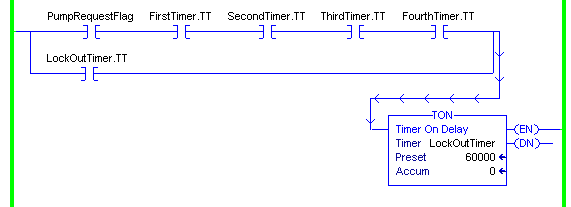
Recall that from the first rung: If the lockout timer is timing, the pump cannot energize. In this instance, after 60 seconds, the operator will be able to energize the rung again.
— Ricky Bryce