
Introduction to the FactoryTalk View Push Button Object
The FactoryTalk View Push Button Object is very simple to add to your project. Using push buttons on a FactoryTalk View display saves time and money. Think about the cost of a physical button on a panel. Each button alone can cost over $50. Then you have the time spent to knock out a hole in the panel, wiring, and the cost of the input module on the processor.
Most objects on a FactoryTalk View display screen take less than a minute to set up. The push buttons can be either maintained, or momentary. Maintained pushbuttons will write the value of 1 to a memory location in the processor. When the button is released, the value will remain at 1 until the operator presses the button again. Momentary push buttons will write the value of 1 only while the operator is pressing the button. When the button is released, a 0 is written to the memory location the object is pointing to.
Consider this line of logic:

Our goal will be to create a maintained push button. This pushbutton will write the value of 1 to ftv_Pump_0_Switch. As long as other conditions are made (such as a lube pump), then we will start Pump.0.
In our situation, we have created a display called “Pump Control” that we will add the object to. We will assume that you already have a shortcut created in RSLinx Enterprise.
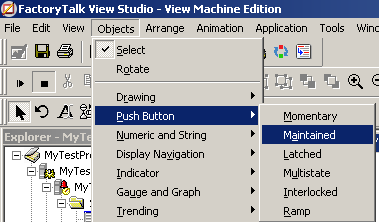
Add the Push Button Object
In FactoryTalk View, select Objects | Push Button | Maintained.
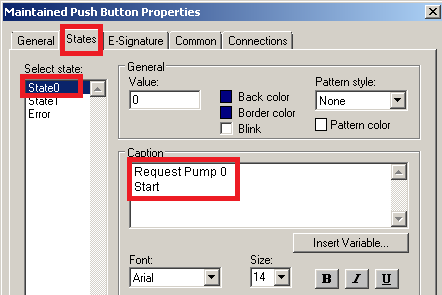
Next, draw your object onto the display screen, and the properties box will appear. On the “States” Tab, for “State 0”, we will create the text “Request Pump 0 Start”. This will tell the operatore that he needs to press this button to start pump 0.
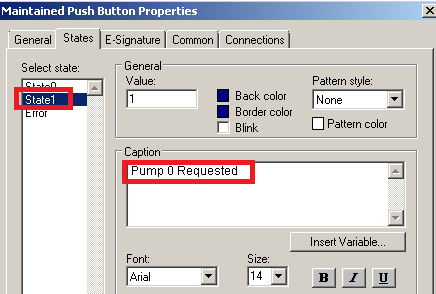
Let’s do the same thing for State 1. Remember this is a maintained pushbutton, so the text should reflect that the value of 1 is being written to the processor. Our text will read “Pump 0 Requested”.
Now we have to relate this object to a tag in the processor. In RSLinx Enterprise, I’ve set up a shortcut called “MyProcessor”. Whenever this shortcut is referenced, FactoryTalk View will know the path to the processor. Remember the tag we are writing to is “ftv_Pump_0_Switch”. We will set this up on the Connections Tab.
Relate the button to a tag
On the Connections Tab, press the Elipsis button. This will let us browse for the tag that we wish to write to.
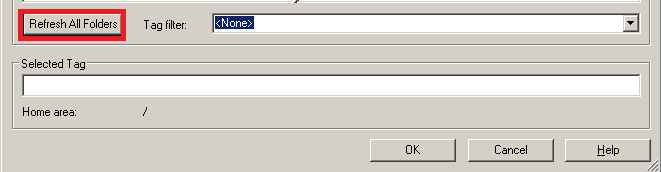
First, click “Refresh All Folders” to ensure you are seeing the latest tags that you’ve added to the processor.
Next, we will browse for the tag that we wish to write to when the operator presses the button.
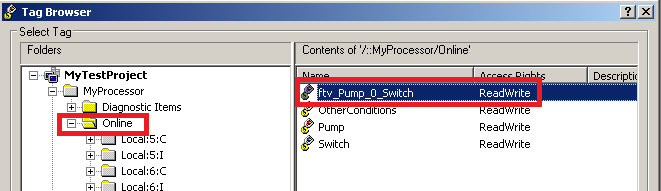
Remember that your basic (atomic) data types are in the ONLINE folder. You must click the ONLINE folder itself to be able to see these tags. Once “ftv_Pump_0_Switch” is selected, press “Apply” and “OK”.
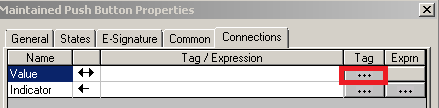
Your Value box should look like this:
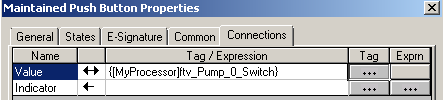
By default, the state shown on the button will be the same as the value tag (look at the arrows). If the state needs to be reflected by a different tag, when we would populate the “Indicator” field. Remember that our pump will not actually run until the “OtherConditions” tag is true. If we wanted the button text to reflect if the pump was actually running or not, we could set the Indicator tag to Pump.0 (see the logic above). In this case, though, our button text is just reflecting if a start has been requested or not, so we will leave the Indicator field blank. In another post, I will show you how to add an elipse object to indicate the actual state of the pump.
Test the display
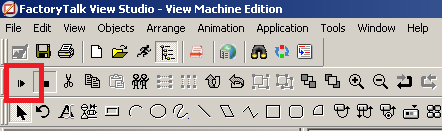
Now that everything is set up properly, press “Apply” then “OK”. Let’s test our screen. We don’t need to do a full application test to see if this object will work. We can just click the “Test Display” icon.
Now press the button we just added to test the connection.
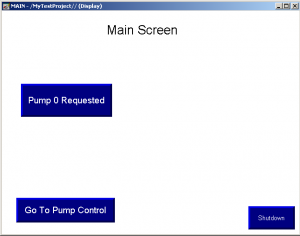
You will then see that your logic is true.

Next, learn how to configure the color animation of an ellipse object!
— Ricky Bryce
Pingback: FactoryTalk View Navigation -- How to set up navigation between displays.
Can more than one tag connection be configured? Being able to send data to more than one point?
You should be able to do this with a Macro. First create the macro to set your tags to the desired state when the button is pressed. Then add a Macro “button” object to your display. This is under Objects | Advanced. Select the macro you just created, and be sure to label your button. Let me know if that works!
Ricky
Hi Ricky,
Currently, I have a button that when pushed changes from blue to green. However, I would like the button to blink green while a motor is increasing to reach a predetermined value.
Is there a way to make a push button blink on and off?
Best,
Jhenna
Hello, Jhenna. You might want to check out this post: https://bryceautomation.com/index.php/2021/11/09/factorytalk-three-state-button/ Basically, you can simulate a third state by adding an animation to the button. If you have any questions, please let me know. In the animation state, you can just use an expression instead of the PumpStarting bit that I used. For example, replace that tag with system\BlinkSlow and ({[PLC]MotorSpeed}>1000). Using this method, be sure to set the expression true state to “Invisible”.
Another way would be to use a button to write to the start tag.
Then you can make the button invisible and put a multistate indicator
behind it.