
Introduction to Kenbak-1 Two Byte Addition
With the Kenbak-1 Two Byte Addition, we can add larger numbers. Keep in mind that with 8 bit addition, we can only have numbers up to 377 octal (255 decimal). That’s if we don’t even used signed values. This is very limiting. When we use two bytes for addition, we can have an unsigned value of 65536 (decimal). This is much more usable.
With two byte addition, our number carries over to an additional byte. We will have a low byte (least significant), and a high byte (most significant). Basically, we’ll perform the addition on the low byte first. Then if we have a carry, we need to add that to the result of our high byte addition.
In the Kenbak-1, we see the result in Octal (or binary). Additionally, we must enter our values that we want to add in octal (or binary) across two bytes.
In this example, we’ll enter our two values across four bytes. Cell 100 and 101 will contain the first number that we want to add. (100 is the low byte). Additionally, for our second number, we’ll use cells 102 and 103. Again, we’ll place the low byte first in cell 102. We’ll store the result to cells 105 and 106. Remember that if you check this with a programming calculator, the high byte is last.
This will be a simple program that will run one time then stop. This is just to demonstrate how we would add the values.
I’m using the Kenbak-1 Web Emulator for this example. At the end of the post, I’ll provide an octal dump that you can send to a Kenbakuino.
As always, please have some copies of the Kenbak-1 Programming Worksheet handy. This will help you to better understand the codes as we enter them.
Initialize the Registers for Kenbak-1 Two Byte Addition
I always like to begin by initializing the registers. If you are running short on memory in your project, you can decide if you wish to do this.
We’ll just start our program by placing zero in the A, B, and X register, and set the program counter to 4. After that, we’ll write zero to the A register. At this point, we’ll clear the carry register [201]. This is just in case you wish to restart the logic later on. 010 and 011 contain NOOP in case we need to add more code. We are writing this section in case we want to restart the logic later on.
RESTART
004: 023 000 LDA 000
006: 034 201 STA 201 CLEAR CARRY
010: 200 200 NOOP
Add the Least Significant Bytes (Low Endian)
At this point, we’ll add cells 100 and 102 together. We’ll place the result into cell 104. In order to do this, we’ll load the value of cell 100 into the accumulator. After that, we’ll add the contents of cell 102. Then we’ll use an STA instruction to store the result of the accumulator to cell 104. If we need to carry any bits, the Kenbak-1 will automatically set the carry flag in cell 201.
LSB:
012: 024 100 LDA [100] LOAD A FROM [100]
014: 004 102 ADD A [102] A=A+[102]
016: 034 104 STA [104] STORE A TO [104]
Check for Carry
You can read up on the overflow and carry bits. Basically, in cell 201, the overflow bit is #0. Likewise the carry bit is #1. The Kenbak-1 sets the overflow bit if our value exceeds 177 octal (127 decimal). The carry bit will be set if our value exceeds 377 octal (255 decimal). Since the Kenbak-1 only uses these two bits in each register, all we have to do is shift the bits to the right 1 position. If the result is still > 0, then we know the carry bit is set.
After we right shift, I always use a No-Op. This is because shift and rotate instructions are a single byte. I like to keep my commands on even numbers. This is just a way of “parity checking” my addresses as I program the Kenbak-1.
CRYCHK:
020: 024 201 LDA SF (LOAD A WITH STATUS FLAGS [201]
022: 011 200 RSHFT A (RIGHT SHIFT A 1 POSITION, THEN NOOP
Add the Most Significant Bytes (High Endian)
At this point, we are ready to add cell 101 to the A register. Remember the A register still contains the status of our carry bit. After that, we’ll add cell 103 to the A register. We’ll store the result to cell 105.
MSB:
024: 004 101 ADD A [101] (A=A+[101])
026: 004 103 ADD A [103] (A=A+[103])
030: 034 105 STA [105] (STORE A TO 1[105])
032: 000 000 HLT (HALT PROCESSOR)
Set the Addends
Finally, we’ll reset all registers up to 107, and place the addends in registers 100 to 103.
034: 000 000 000 000 (ZERO REST OF 03X)
040: 000 000 000 000 000 000 000 000 (ZERO REST OF 04X)
050: 000 000 000 000 000 000 000 000 (ZERO REST OF 05X)
060: 000 000 000 000 000 000 000 000 (ZERO REST OF 06X)
070: 000 000 000 000 000 000 000 000 (ZERO REST OF 07X)
100: 376 001 004 002 000 000 000 000 (SET 10X)
Full Code
You can paste this code into the Kenbak-1 Emulator’s memory loader to test your logic.
INIT:
000: 000 000 000 004

RESTART
004: 023 000 LDA 000
006: 034 201 STA 201 CLEAR CARRY
010: 200 200 NOOP

LSB:
012: 024 100 LDA [100] LOAD A FROM [100]
014: 004 102 ADD A [102] A=A+[102]
016: 034 104 STA [104] STORE A TO [104]

CRYCHK:
020: 024 201 LDA SF (LOAD A WITH STATUS FLAGS [201]
022: 011 200 RSHFT A (RIGHT SHIFT A 1 POSITION, THEN NOOP

MSB:
024: 004 101 ADD A [101] (A=A+[101])
026: 004 103 ADD A [103] (A=A+[103])
030: 034 105 STA [105] (STORE A TO 1[105])
032: 000 000 HLT (HALT PROCESSOR)

034: 000 000 000 000 (ZERO REST OF 03X)
040: 000 000 000 000 000 000 000 000 (ZERO REST OF 04X)
050: 000 000 000 000 000 000 000 000 (ZERO REST OF 05X)
060: 000 000 000 000 000 000 000 000 (ZERO REST OF 06X)
070: 000 000 000 000 000 000 000 000 (ZERO REST OF 07X)
100: 376 001 004 002 000 000 000 000 (SET 10X)
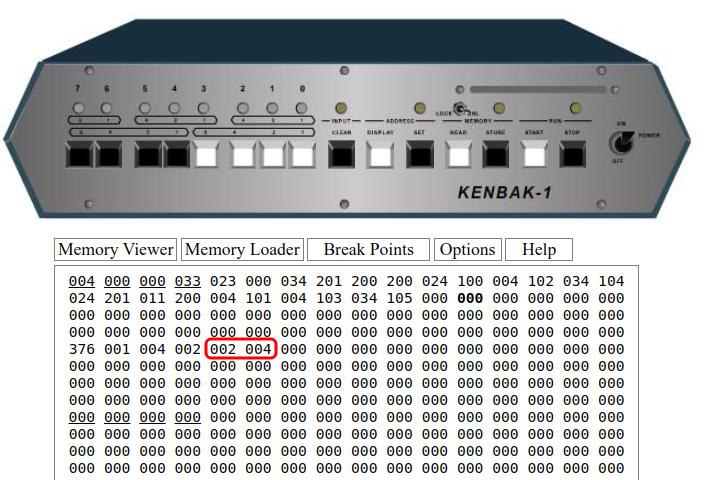
Test Your Work
As you can see, our logic is working. Cell 104 contains the low byte of our result, and cell 105 contains the high byte.
Kenbakuino Octal Dump
000,000,000,004,023,000,034,201,200,200,024,100,004,102,034,104,024,201,011,200,004,101,004,103,034,105,000,000,000,000,000,000,000,000,000,000,000,000,000,000,000,000,000,000,000,000,000,000,000,000,000,000,000,000,000,000,000,000,000,000,000,000,000,000,376,001,004,002,000,000,000,000,sAfter you run your program, check the contents of memory cells 104 and 105. To check these cells, press CLEAR, then enter 104 on the front panel buttons. Press SET, then READ. You will see the contents of 104. Simply press READ again to display the value of cell 105.
For more information, visit the Kenbak-1 Category Page!
— Ricky Bryce