
Introduction to Altair BASIC For Next Loop
In this section, we’ll discuss the Altair BASIC For Next Loop. Manipulating variables is an important part of any programming language. For this example, let’s go back to 1975. The median pay was $13,720 per year. We’ll assume that you signed a contract to receive a pay increase of 3% per year. We’ll write a program to calculate what you will make each year for the next 10 years. We will begin with assigning some static numbers to variables. After that, we’ll manipulate the variables using expressions.
In this case, we’ll use several BASIC programming instructions. The LET statement assigns a value to a variable. The FOR NEXT loop creates a loop that allows us to run the calculation for 10 years. The PRINT statement simply prints a result to your terminal.
I’ll use the Altair-Duino for this post. I’m using Altair Hard Disk BASIC. However, the procedure should work on most any version of BASIC that can perform floating point math.
Load Altair Basic
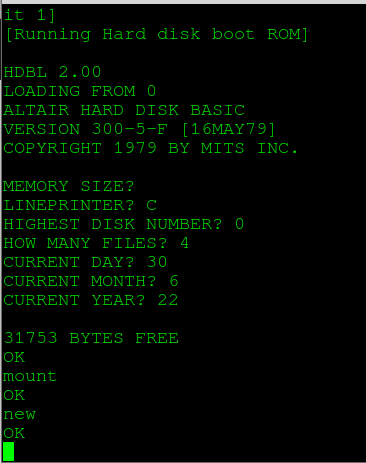
If you have the Altair-Duino, simply raise switches 13, 12, and 1. Press AUX 2 down. Next raise ONLY switches 3, 2, and 1. Press Aux 1 Down. I’m going to hit enter on the memory size, and capitol C for line printer. I chose the highest disk number of 0, and 4 files. Next enter the date in the corresponding prompts.
At this time, simply type MOUNT to mount the hard disk. Furthermore, type DIR to see the files on the hard drive. Keep in mind that LOAD “FILENAME” loads a file. On the other hand, SAVE “FILENAME” saves a file to your drive. Before we begin, type NEW to ensure that you are starting clean.
Declare and Initialize Variables
At this point, there are some variables we need to declare. We do that with the LET statement as follows:
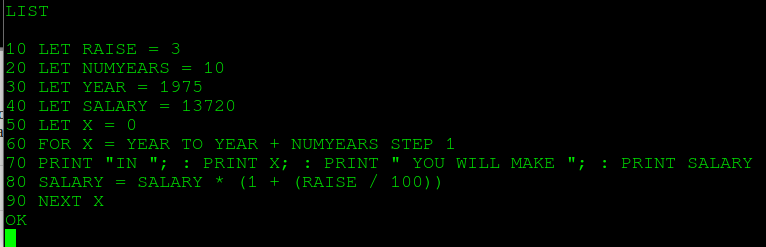
10 LET RAISE = 3
20 LET NUMYEARS = 10
30 LET YEAR = 1975
40 LET SALARY = 13720
50 LET X = 0
Basically, this sets us up for a 3% raise each year starting in 1975. Keep in mind that I do not have to use the word “LET” to assign values. Additionally, we can place all of the assignments on the same line. We simply separate them with a colon.
For Next Loop
At last, we’ll get into the final part of our project. We’ll set up our For Next loop. In this case, we need the For Next loop to start at the year 1975. We’ll print the initial value to our display. We’ll add 3% to our salary, then increase the year by 1. In short, this will print out our salary every year for the next 10 years.
60 FOR X = YEAR TO YEAR + NUMYEARS STEP 1
70 PRINT "IN "; : PRINT X; : PRINT " YOU WILL MAKE "; : PRINT SALARY
80 SALARY = SALARY * (1 + (RAISE / 100))
90 NEXT X
Our code should appear similar to this:
Notice that I also used the STEP option. STEP allows us to increment X by a specific value each time the loop executes. In this case, we are just incrementing X by 1.
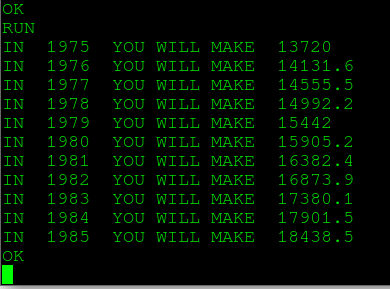
At last, we’ll type RUN. This will run our program, and let’s see the result.
Summary
In short, we use the FOR NEXT loop to perform a similar operation multiple times. In this case, we incremented the year each time the loop executes. Additionally, we increment the salary by the amount of our raise. In another post, we’ll discuss the INPUT statement. This will allow the user to enter his own variables without having to change the BASIC code.
To expand your BASIC knowledge, check out the post on READ DATA RESTORE!
— Ricky Bryce