
Configuring the RSLinx DF1 Driver
In this section, we’ll set up the RSLinx DF1 Driver. Communications is very important in Industrial Automation. If you cannot communicate, you cannot go online to troubleshoot or change the program in your system. This document will guide you through Configuring the DF1 Driver in RSLinx. RSLinx is the communication server that interfaces between your processor and RSLogix/Studio 5000. We will use the same procedure to an SLC5/03 or higher, Micrologix, or PLC-5. The ControlLogix L6x or earlier has a serial port by you can communicate using the DF1 Driver.
What you will need:
To communicate with your ControlLogix system, you will need a 1756-CP3 cable (or other null modem cable). You will also need RSLogix/Studio 5000 installed on your computer with RSLinx, and an available RS232 port on your PC. New computers are not usually equipped with an RS232 port, so you can use a USB to Serial adapter. Just make sure to install the drivers for your adapter if you haven’t already.
Beware of some serial adapters under Windows 10. If you happened to get a “fake” FTDI chip in your serial adapter, it may not work at all under Windows 10. It’s my understanding that for a while, the FTDI driver would disable the fake chip in your adapter. After that, the new driver caused the fake chip to just transmit garbage. This could cause damage to equipment and personnel.
Since there were so many fake FTDI chips on the market, it might be difficult to determine if you have the genuine or fake chip in your adapter. Read this article for more information. I’ve had trouble with some of the Prolific chips under Windows 10 as well. If you have this issue, you may be able to downgrade your windows driver.
If you are using a Micrologix 1000, please use a 1761-CBL-PM02 cable. If you are connecting to a PLC-5, realize that the PLC-5 has a 25pin RS232 port, so you may need a 9 to 25 pin adapter. .
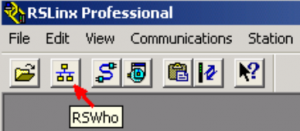
1) Open RSLinx Communication server
Access RSLinx at it’s default location, which is under Start | All Programs | Rockwell Software | RSLinx | RSLinx Classic. If your computer has a shortcut on the desktop to access RSLinx, you will see the following icon:
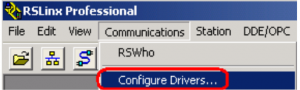
2) Go to the “Configure Drivers” screen
Next, we will click on Communications | Configure Drivers within RSLinx. A driver is just a set of instructions that tell your software how to interface with the hardware.
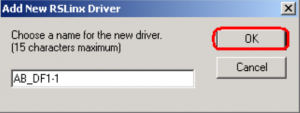
3) Choose “RS232 DF1 Devices”
The list of drivers can look very intimidating, but keep in mind that there are probably only a few drivers on the list that you may need to be concerned with for your location. Of course we need to choose the RS232 DF1 Devices driver.

Next, you will be prompted to enter a name for the driver. Here, we can just hit OK.
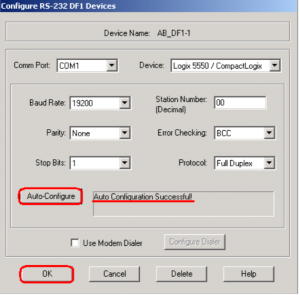
4) Configure the RSLinx DF1 Driver
RSLinx makes this step very easy. We do need to know which COM port your RS232 port is appearing at though. If you are unsure of this, go to your “Device Manager” in Windows. Then, press the + next to ports, then you will see the COM Ports that are available. In our case, the port is COM1. As long as you are connected to the processor, and the port is set at DF1 (which is default), you should have no problem using the Autoconfiguration feature. Finally, press the Autoconfig button, and you should get a message that the Autoconfiguration completed successfully. Finally, press OK, and close the “Configure Drivers” screen.
5) Verify Communication through the RSLinx DF1 Driver
Of course to make sure you are communicating, go to the RSWho Screen. The RSWHO screen will verify communication.
Next, select the DF1 Driver on the left side of your screen.
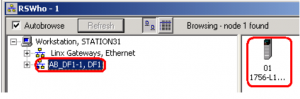
Consequently, you will see your processor appear on the right side of the screen.
Summary of RSLinx DF1 Driver
In short, the RSLinx DF1 Driver is very simple to set up. You just need a working COM port, and a Null Modem cable. Additionally, just go to Device Manager to see what COM port the serial port appears on. After that, add a DF1 Driver, set the COM Port and AutoConfig. In some versions, you may need to choose the correct processor type first. The AutoConfig feature automatically finds the correct communication parameters. Next, just go to RSWho to verify communication.
For more information, visit the SLC-500 or ControlLogix Category Page.
— Ricky Bryce
Pingback: Starting a new project in the SLC-500 - Bryce Automation