
Introduction to the Imsai 8080 Replica Build
The Imsai 8080 Replica Build went very smoothly. I’ve always wanted one of these units. The quality of the parts were very good, and I have to say the pictures you see do not do it justice. It’s best to see one in real life.
Shipped from Australia, the price was around $350 or so USD. It takes about a day to build if you take plenty of long breaks. Otherwise, working diligently, you could probably build it in about 4 hours.
There is plenty of support for this unit, and you can purchase one from The High Nibble. It took about 2 weeks to arrive.
The packaging was nicely done, and there was no damage during shipping.
This unit is powered by an ESP processor, and can run in i8080 or z80 mode.
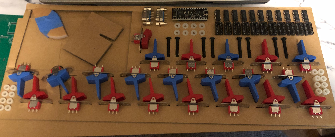
Imsai 8080 Replica Build — The Board
The board is easy to assemble, with only two surface mounted components. The PSRam, and the SD Card reader. Just be sure to watch your soldering time and temperature as always. Pay close attention to the direction of the IC’s. The LED’s come with a spacing and alignment tool, so this would be very difficult to mess up!
Take care not to lay the board down on the ESP processor. You will bend the antenna. Always be sure to take out the processor when you begin to work on the board.
For the most part, once you install the main components, there are just a few miscellaneous components to add such as headers, and a transistor.
Be sure to test your board before moving on though. Once you mount the switches, the shift registers are very difficult to remove or re-insert.
When you align the switches, you will use the same alignment tool that you used for the LED’s. That tool has slots that will align the switches as well.
Now that you soldered all of your connections, you can go back over them with a magnifying glass. In my case, I missed one of the terminals for the tactile reset button.
The Case
If you follow the instructions, the case is also easy to assemble. The procedure avoids problems you have with spacers falling out, etc. Be careful putting everything together as to not get the screws too tight. You can crack the case, or strip the vinyl nuts.
Once you have the case on, it’s a bit difficult to connect a straight micro-usb connector to the processor. One option is to get a 90 degree elbow for this. Since I’m cheap, I just hit the strain relief rubber (on the cable) with my heat gun and bent it 90 degrees. That worked out very well in this case. You don’t want to place any strain on the processor’s micro-usb connector.
Configuration
Dave has set up a Configuration Guide. At this point, you can connect to the IMSAI directly from your web browser. By default, the IMSAI creates an access point that you connect to. After that, you just go into the web page at 192.168.4.1. From there, you can go to “SYS”, and click the picture of the gear in the top right side of your window. The configuration manual explains how to set your time zone. I just set the SSID, and password of my WIFI router.
After that, I just off the IMSAI by it’s power switch. There is still power to the processor at this point. Hold examine, and tap the TACTILE reset button. After a few seconds, let go of the Examine switch. You will see the status led’s scrolling. This means you are in configuration mode. I just set the switches to 00001001 0101 1000 then pressed “Deposit” to save the configuration. Once I powered on the IMSAI, it connected to my own wifi network. That way, you don’t have to switch access points to bring up the web page for the IMSAI. Additionally, this will boot to CP/M in Z80 mode, and 4MHz with this configuration. The configuration guide explains what each switch is for in the configuration.
If you cannot enter Configuration mode, be sure the front panel power switch is off, and hold examine, while tapping reset. Then let go of examine a few seconds later. Remember that reset switch I forgot to solder? That prevented me from getting into configuration mode.
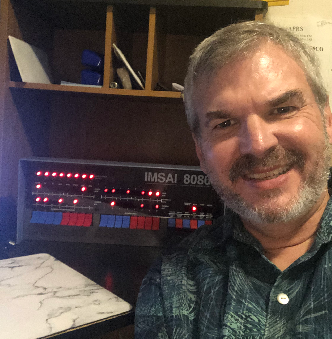
Summary of IMSAI 8080 replica Build
Dave did a VERY nice job putting this kit together. If you are a fan of vintage machines, you will not be disappointed. It’s very straight forward to build, and even has a google group for those with questions, to share experiments, and to give you lots new ideas on how to use this machine!
Check out my other posts on vintage computers!
— Ricky Bryce