
Introduction to the KIM-1 (UNO) 6502 ScoreBoard
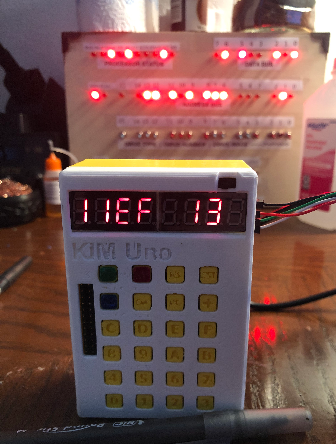
In this section, we’ll build a KIM-1 (UNO) 6502 ScoreBoard. Basically, you will have the visitor score on the left, and the home score on the right. I’m separating the two displays with the letters “EF” in the center display. (Enemies on left, and Friends on right). Button 6 and 7 will control the visitors score. Likewise, buttons 2 and 3 will control the home score. With these buttons, you can increment or decrement each team’s score value. Pressing 0 resets the score, and E will exit to KIM.
If you have not obtained a KIM-1 emulator, or replica, they are easy to find on the Internet, or to build your own. In this case, I’m using an Arduino Pro Mini. This site has great information on how to put your own together. Occasionally, you can find one on Ebay as well for around $24 at the time of this writing. Corsham makes a good replica that actually uses the 6502 processor.
Write the Code
You might want to use a good assembler if you want to manipulate the code. I like to use the one at Masswerk. I will paste the object code at the bottom of this post, though, if you want to just copy and paste it into your terminal to program the KIM.
Let’s begin by setting our starting address at $0200. We’ll also initialize some values. Keep in mind that $FB, $FA, and $F9 will show up on the display. $FB will be at the left, and show the visitor’s score. $FA will always show “EF”, and $F9 will show the home team score. Obviously, we want to start both of those at zero. As you can see, we have a restart label. The purpose of this is to create a location to jump to when the operator presses “0”. This resets the score.
.ORG $0200

RESTART:
LDA #$00
STA $F9
STA $FB
LDA #$EF
STA $FA
LDA #00
Key Handling for the KIM-1 (UNO) 6502 ScoreBoard
At this point, we need to handle the keys. Remember, 0 resets the score, and E will exit the program. Button 6 decrements the visitor score, and button 7 will increment it. Likewise, buttons 2 and 3 control the home score. We need to continually scan for keys that could be pressed, and take action based on those keys.
MAIN:
JSR $1F1F  ;SCANDS
JSR $1F6A  ;GETKEY
CMP #$0E
BNE CONT
JMP $1C64
CONT:
CMP #$07
BEQ INVIS
CMP #$06
BEQ DEVIS
CMP #$03
BEQ INHM
CMP #$02
BEQ DEHM
CMP #$00
BEQ RESTART
JMP MAIN
Basically, if the Accumulator equals the value specified in a compare statement, then the BNE becomes true. The logic will jump to a particular label. If the operator does not press any key during this scan, the processor will hold in this loop by jumping to MAIN.
Increment and Decrement the Scores
At this point, we need to create some logic that will perform specific actions when the operator presses a key. The labels INVIS, and DEVIS will increment and decrement the visitor’s score. Likewise, INHM, and DEHM control the home score.
Obviously, we want to use the SED instruction to set the mode to decimal for a more readable output to the user. Once we complete each of these actions, we can CLD (Clear Decimal).
Generally, if we use an ADC (Add with Carry) instruction, we will clear the carry before performing the ADC statement. On the other hand, if it’s an SBC (subtract with borrow), we want to set the carry bit (SEC) before we do the math. SBC subtracts the NOT of the Carry bit from the accumulator as well as the memory or value we specify. You can read up on these instructions in more detail in the MOS 6500 Programming Manual.
INVIS:
CLC
SED
LDA #$01
ADC $FB
STA $FB
CLD
JMP MAIN

DEVIS:
SED
LDA $FB
SEC
SBC #$01
STA $FB
CLC
CLD
JMP MAIN

INHM:
CLC
SED
LDA #$01
ADC $F9
STA $F9
CLD
JMP MAIN

DEHM:
SED
LDA $F9
SEC
SBC #$01
STA $F9
CLC
CLD
JMP MAIN
Object Code
Here, I will place the object code, so you don’t have to assemble it yourself. To paste the object code onto the KIM, be sure you are using a programming terminal that supports character and line delay. I set them both to 10ms. Press TAB to get into TTY mode, then 0200 space. This will put you on memory cell $0200. After that, you can paste the code. Go back to 0200 (space), then press TAB again to go to keypad mode. From there, you can press GO and run your program.
A9.00.85.F9.85.FB.A9.EF.85.FA.A9.00.20.1F.1F.20.6A.1F.C9.0E.D0.03.4C.64.1C.C9.07.F0.13.C9.06.F0.1B.C9.03.F0.24.C9.02.F0.2C.C9.00.F0.D3.4C.0C.02.18.F8.A9.01.65.FB.85.FB.D8.4C.0C.02.F8.A5.FB.38.E9.01.85.FB.18.D8.4C.0C.02.18.F8.A9.01.65.F9.85.F9.D8.4C.0C.02.F8.A5.F9.38.E9.01.85.F9.18.D8.4C.0C.02.For more information, visit the Vintage Computer Category Page!
— Ricky Bryce