
Starting a Project (from scratch) in Studio 5000
When you are starting a project in Studio 5000, you are building a new project from scratch. Many of you will need to do this if you have a unit set up in your shop. At times, you will want to try some logic in a “sandbox” before implementing changes on production equipment. The procedure for setting up a project is easy, but there are some things we will need to know. You will need the catalog number of your processor, the revision of the processor, your chassis size, and the number of slots in your chassis.
If this is a brand new processor, you will flash the processor to the revision of your project before you download. Studio 5000 will prompt you to do this on the first download. If the processor is unsealed, then someone else has probably already set a revision in the processor. You can find this revision in the processor’s properties in RSLinx. Another method to find the revision is to use your web browser. If you are on the same network as your chassis, just enter the IP address of your processor or Ethernet module. The IP address will scroll across the front of the module. Next, you can “Browse Chassis” if you have a separate Ethernet module to find the processor’s revision.
Open Studio 5000
 Studio 5000 is under Start | All Programs | Rockwell Software. Older versions (prior to 21) are called RSLogix 5000. Once Studio 5000 is open, we will create a new project. If this menu does not appear, you can create a new project by clicking “File” on the menu bar.
Processor Information
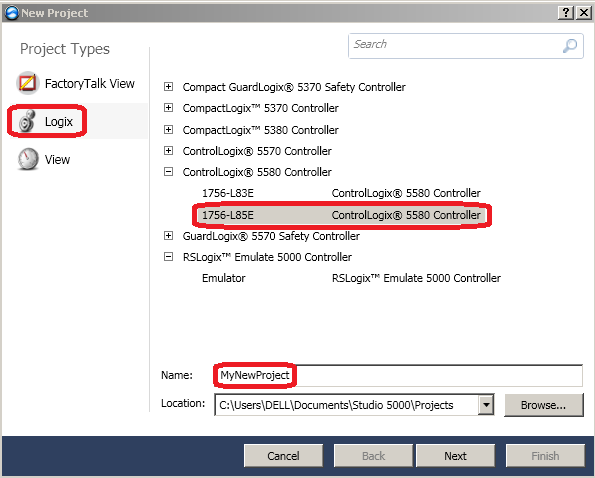
Next, we will need to enter information about our processor. Select the model of your processor, and give your project a name. Here we will name the project “MyNewProject”.
Now, be sure to select the proper revision, processor name, chassis size, and processor slot. Recall that if the processor already has a revision, we an get this revision by using the RSWHO screen in RSLinx, or our web browser.
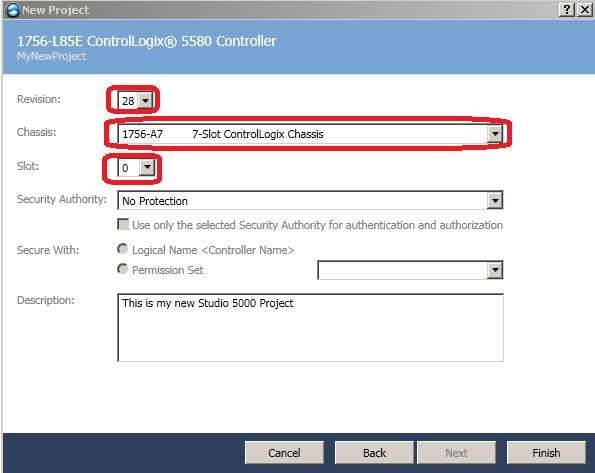
Finally, you can press “Finish”. This will build our project, and you will see the Studio 5000 IDE (Integrated Development Environment). Let’s discuss the names of the different toolbars. By knowing the names of the different toolbars, this will help us in other parts of this documentation. Also, if you accidentally remove a toolbar, you will need to know the name of the toolbar to get it back under View | toolbars.
Logix Designer Toolbars

At the very top of the IDE is the Title Bar which displays information about your project, such as the name and processor type. Underneath the Title Bar, you will find the Menu Bar. Then underneath the menu bar, is the standard toolbar with some standard icons. These toolbars are very common among many windows applications.
On the left (at the bottom of the image), you will find the Online toolbar. This tells us if we are online or offline. When online, we are actively communicating with the processor, and the status of the processor will be displayed. This will reflect Run, Prog, Rem Run, Rem Prog, Faulted, or if we are in Test mode. It will also display if we have forces in the processor, pending edits, and the status of the I/O.
You will find the Instruction toolbar to the right of the online toolbar. These are instructions that we can drag down into our logic to make things happen.
Communication Path
At the right is the Path bar which displays the communication path from our laptop to our processor. If no path has been established yet, be sure your necessary drivers are configured in RSLinx, and go to Communications | Who active. Now, you can browse for your PROCESSOR and select the path. Be sure to select the proper path to your PROCESSOR. A common problem is that most people will select an Ethernet module, such as a 1756-ENBT or 1756-EN2T, and cannot download to the processor. Be sure to drill through the Ethernet module, across the backplane to get to your processor. If you are communicating over DF1 or USB, then your processor is the first module you will come to. If you have the 1756-L8x, then your ethernet port is built onto your processor, so the processor is the first module you come to under the Ethernet Driver.
Controller Organizer
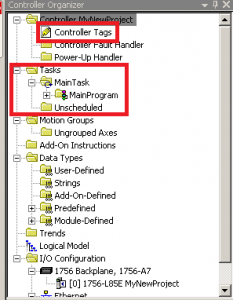
The Controller Organizer window displays information about the project that you will download to your processor. There are two main divisions of the processor’s memory: Tags and Tasks. Tags store data, and Tasks contain the logic that manipulates your data.
On a default project, there are no tags whatsoever. However, as you add modules to the I/O Configuration, Studio 5000 will build tags that are associated with those modules. You will also create other tags for timers, counters, and internal BOOL bits. Controller tags are global, meaning any program or any controller can access the tags. There are also program tags (within a program) that are local to the program they reside in.
At the bottom of the Controller Organizer window is the I/O Configuration tree. Here, we will add all of the I/O or other processors that we will be communicating with.
To view other documents on the ControlLogix system, check out the ControlLogix category on this site!