
How to Configure Minicom for Kim-1 (Uno)
To Configure Minicom for the Kim-1 (Uno), there are a few parameters we will want to set. Once you set up everything properly, you should have no problem connecting to and enjoying the Kim-1 Uno! Without proper configuration, though, your experience will quickly turn bad.
In this post, we’ll walk through how to set up the baud rate, and other parameters. We’ll also configure the character delay in case you post code into your KIM. Additionally, we need to reconfigure the escape character. The default escape character for minicom is Control-A. This conflicts with the ability to enter address mode on the KIM.
If you are unfortunate enough to be stuck with Windows, then you might think about Tera-Term or PUTTY instead. I’ve tried several different terminal emulators. For me, minicom seems to work the best.
For this post, I’m going to do everything in the terminal window.
Install Minicom and Configure Groups
The installation of minicom depends on the distribution of Linux that you use. I use Debian, so my options were to install it from the command prompt, or use the graphic installer. From the command prompt, I simply type “sudo apt-get install minicom”. If you run RedHat or CentOS, you can probably do the same thing with “dnf install minicom”.
Once you have minicom installed, we’ll need to configure the user groups. If you find that you must run minicom as super user to make it work, then you probably don’t have the groups set up correctly. You should be able to run minicom as yourself.
The main group to add yourself to is the dialout group. “sudo usermod -a -G dialout username”. Of course substitute your own username. I’ve also added myself to the tty group, and the uucp group, but dialout only should work OK.
To be sure you’ve added yourself to the group correctly, just type “groups” in your terminal window.
You may need to reboot your computer for the group changes to take effect.
Find Your USB Device and Launch Minicom
In my case, my USB device is /dev/ttyUSB0. There are a couple ways to do this. What I usually do is type lsusb to find the name of my device. Then I type “su dmesg” to find out what tty device my adapter is on. Another way is to just plug in your KIM Uno, and launch the Arduino IDE. Under “Tools” go to “Ports”. It should be listed there.
Next, be sure to close any applications or ports that might lock your USB device. To launch minicom, just type “minicom -D /dev/ttyUSB0”. Substitute ttyUSB0 for your own device.
Configure Minicom for KIM-1 (UNO)
To Configure Minicom, there are a few things we’ll have to do. First, we’ll set up the general configuration. Press CTRL-A, then Z. This will bring up the command summary. Now press O to configure minicom.
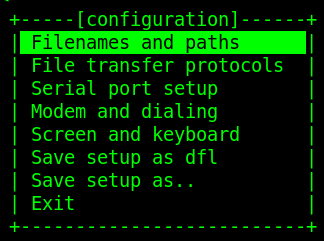
At this point, cursor down to “Serial port setup”.
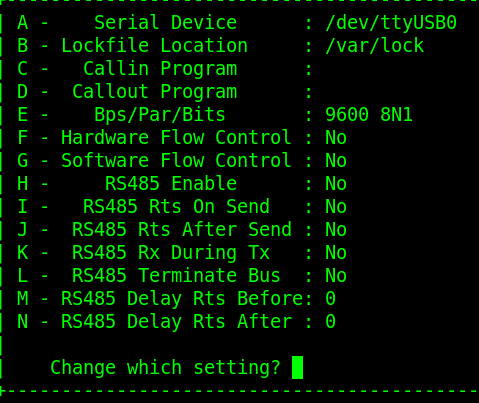
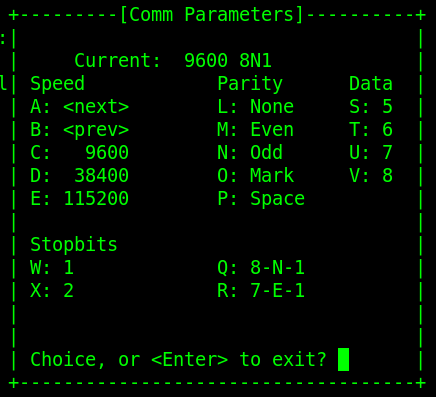
I’ve configured minicom as follows. 9600/8/N/1 with no flow control.
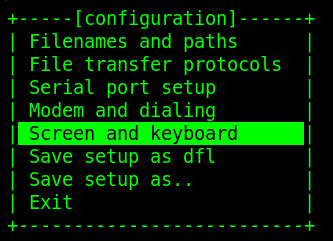
Press ENTER, then go to Screen and Keyboard. We need to re-configure the command key.
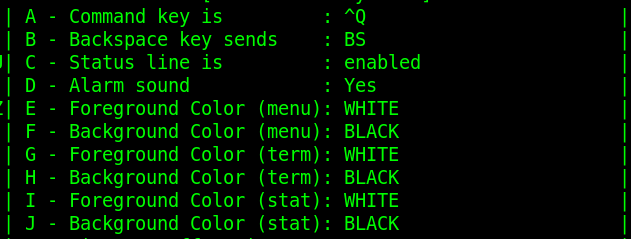
Press A, and we’ll change the command key to Q. We are doing this because we need to use CTRL-A to go to address mode.
At this time, press escape, and then we’ll save our settings as default.
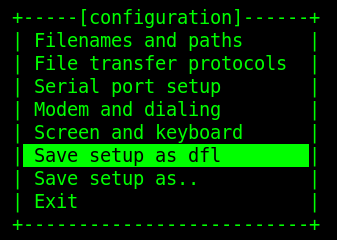
Now, cursor down to “Exit” and hit enter.
Configure Terminal Settings
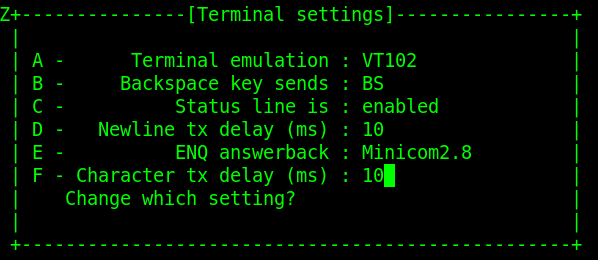
At this point, we are ready to configure the terminal settings. Once again, press CTRL-A, then Z
Press “T’ for Terminal Settings. If you paste hex code, then we will need to configure the character and line feed delays. I set these both to 10ms. I have not found a way to make minicom save the delay settings. Before you paste any hex code, be sure to set up this window again. If you know of a way to save these settings, please post in the comments below.
Verify Comm Parameters
Press CTRL-Q then Z. Now type P. Let’s just make sure the parameters are set up for 9600/8/n/1 with no flow control.
Using Minicom with the Kim-1 (Uno)
There are a few things to know about using your Kim-1 (Uno) with a terminal:
Tab Key — Use the tab key to switch between Keypad and TTY mode.
Keypad Mode
When you are in keypad mode, your terminal will look something like this:

While in keypad mode, keys 0-9, and A-F will work as if you entered them on the keypad.
- CTRL-G — Go
- CTRL-T — sTop
- CTRL-R — Reset
- CTRL-P — Program Counter
- CTRL-A — Address Entry Mode
- CTRL-D — Data Entry Mode
- [ — Shuts off single step mode
- ] — Turns on single step mode
- + — Steps through addresses just like the + on the keypad
TTY Mode
While in TeleType mode, you can use the following keys. Be sure your caps lock is on. The KIM does not recognize lower case addresses and commands.
- Space — Sets the address. For example: 0200 (space) will take you to address 0200
- Period “.” — Accepts your data. For example, if you are on address 0200, and enter “A9.” (period after A9), then address 0200 holds the data “A9”.
- Enter — Steps through addresses, reading memory cells.
- G — GO
- [ = Single Step Off
- ] = Single Step On
- Remember that TAB goes back to Keypad mode so you can run your program.
For more information, visit the Kim-1 Category Page!
— Ricky Bryce