
Introduction to the Kim-1 (UNO) SCANDS Routine
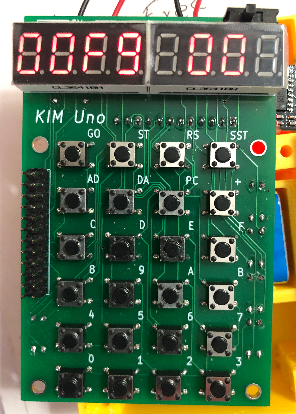
The Kim-1 (UNO) SCANDS Routine is built into the Kim-1. This allows you to display data on the 6-Segment LED display. Basically, this just takes data from $FB, $FA, and $F9. We simply use the JSR instruction to jump to the subroutine at $1F1F to show these values on the display. Each byte uses 2 digits on the display. The data at $FB will show up on the left-most digits. Likewise, $FA shows up on the middle two digits. $F9 shows up on the right two digits.
In this post, we’ll write a very simple program that will display 12 34 56 onto the display. We’ll use several instructions for this. LDA will Load the Accumulator. Our STA (Store Accumulator) instruction will store the accumulator to the memory locations. Additionally we’ll need a JSR instruction to execute our SCANDS routine, and a JMP to loop our program.
Write a Demo Program for the Kim-1 (UNO) SCANDS Routine
Set up Your Memory Values
At this point, we’ll write a simple program to demonstrate how the SCANDS routine works. We’ll start at address 0200. Stop the Kim-1, and press the ADDRESS button. Enter 0200. This is our starting location for most programs.
First we’ll load the value of 12 into the accumulator, and store this value to memory location FB. The opcode for LDA is A9. Likewise the opcode for STA is 85. Therefore, we need to press A9, +, 12, +, 85, FB, +.
You should now be at address 0204. In like manner, we’ll load the value of 34 into location FA. We’ll use the same instructions, but different data and memory locations. Enter A9, +, 34, +, 85, +, FA, +.
At this point, we are at address 0208. We are ready to enter the data for the last digit of the display. In the same way, we’ll load the value of 56 into the accumulator, then store this value to memory location F9. Enter A9, +, 56, +, 85, +, F9, +
We should be at address 020C, and we are ready to run the SCANDS Routine
Execute the SCANDS Routine
SCANDS is a subroutine. We use the JSR to execute it. When the subroutine finishes it’s execution, the KIM-1 will return back to our main code, and execute the next instruction. The opcode of 20 is a JSR, and we need to jump to memory cell 1F1F. Therefore, at address 020C, we need to enter 20, +, 1F, +, 1F, +
You are now at memory location 020F, and we need to Jump (JMP) Back to the beginning of our logic. The opcode for a JMP is 4C, then we enter the low byte of the address to jump to and the high byte. Therefore, in cell 020F, we need to type 4C, +, 00, +, 02, +.
Test your Logic
At this point, your program is finished. Press the ADDRESS button, and go back to address 0200. Press GO. Your display should read “123456”.
Assembly Language
If you would prefer to use the mnemonics to program, you can try out on online 6502 assembler. Your assembly code would be as follows:
.org $0200

BEGIN:
LDA #$12
STA $FB
LDA #$34
STA $FA
LDA #$56
STA $F9
JSR $1F1F
JMP BEGIN
If your program assembles correctly, you will see a Hex Dump. This is useful for providing a quick list of commands to enter. Additionally, as you learn more about the Kim-1, you can just format this hex dump and paste it into a terminal to program the Kim-1. If you prefer to go that route, I would recommend using a terminal that supports character and line delays such as minicom for Linux, or Teraterm for Windows.
0200: A9 12 85 FB A9 34 85 FA
0208: A9 56 85 FB 20 1F 1F 4C
0210: 00 02
To learn more about the capabilities of the Kim-1 (Kim Uno), check out this post.
For other information on vintage computers, visit the vintage computer category page!
— Ricky Bryce