
Introduction to the Kim-1 Scan Based Timer
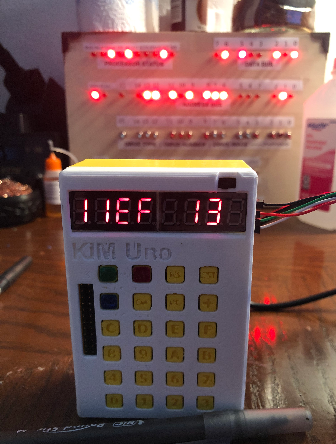
In this post, I’ll cover some code I wrote for a Kim-1 Scan Based Timer. I’ll be using the Kim UNO for this post. You may have to modify the program for your own use. You can calibrate this timer by changing the number of loops, or by adding NOP instructions to get it just right for your application. I put this timer together to tune some PID loops. Not all PID controllers have an accurate time base, so this gave me the ability to adjust how fast the timer runs. It’s not a perfect way to run a timer, but it works well if you need something you can calibrate to a specific application.
The settings in this project are fairly accurate, but you might want to make some adjustments on your own to calibrate it further. It’s set up to run as a stop watch. Key #1 starts the timer, and Key #3 stops the timer. After you stop the timer with Key #3, you can either reset the timer (#2), or exit (#4). I used the 6502 Online Assembler to compile this project before sending the OPCODES to the KIM.
After compiling the project, you can just shut off the addresses in the online compiler, and copy/paste the code into notepad. Remove any Carriage Return / Linefeeds, and replace the spaces with “.” (be sure there is also one at the end). After that, you can paste it into your KIM in TTY mode. In this case, I set up the character and line delays for 10ms.
Initialize the Registers for the Kim-1 Scan Based Timer
As usual, I always like to start off a project by initializing the registers. It’s probably not a bad idea to CLD (Clear Decimal) as well, although I didn’t worry about that in this project.
.ORG $0200

RESTART:
LDA #00  ; Load Zeros to Registers
LDX #00
LDY #00
STA $F9  ; Store Zeros to Display
STA $FA
STA $FB
Wait for User Input
At this point, we need to wait for the user to press a key. We’ll continue to update the display while we wait this user input. After that, if they press 2, then we will clear all registers. Basically, this just restarts the program. If they press 4, then we jump to $1C64, which exits back to KIM. If there is no user input, then we jump back to the WAIT label. However, if they did press key 1, then we jump to the BEGIN Label. We’ll describe this logic in the next segment of this post.
WAIT:
JSR $1F1F  ; SCANDS (Update Display)
JSR $1F6A  ; GETKEY (Check keys on Keypad)
CMP #$02   ; If 2, then Restart at Zero
BEQ RESTART
CMP #$04   ; If 4, then Exit to KIM
BNE CONT4  ; I had to BNE, since $1C64 is out of branch reach.
JMP $1C64  ; Exit

CONT4:
CMP #$01   ; If 1, then go to BEGIN to start the timer
BNE WAIT
JMP BEGIN
Running the Kim-1 Scan Based Timer
This next section is where we set up the delay loop, and can calibrate the timer. As you can see, we start off by updating the display. After that, we load 9 into the X register. Think of this value as a “course adjust” for calibrating the timer. The NOPS are just there to burn some time. While we are waiting in this loop, we might as well check the buttons again as well. If we see a 3, then we’ll enter wait mode.
Remember X started off as 9, so now that we’ve burned some time, we’ll decrement X, and jump back up to the DELAY Label. We’ll continue in this loop until X=0.
Next we need to increment our hundredths of a second. Since our loop took almost exactly .02 seconds to complete, we’ll load 2 into the accumulator. After that, we have a NOP, and you can add more, or remove this NOP for “fine” calibration of the timer.
Next, we clear carry and overflow (CLC and CLV). We switch to decimal mode with SED, because we want to display the numbers in decimal instead of hex. Finally, we’ll add whatever is on the display at $F9 to the accumulator, and store the result back to $F9. This is the right-most digits on your KIM display. Then we’ll clear decimal mode with CLD.
If Carry was set, then that means we’ve gotten to 100 hundredths, and it’s time to increment the seconds, so we’ll branch to the INCSEC label. If not then, we need to restart the delay loop again.
BEGIN:
JSR $1F1F  ; SCANDS

LDX #$09   ; Calibration for timer
DELAY:
NOP
NOP
NOP
JSR $1F6A  ; GETKEY
CMP #$03   ; If 3, then enter WAIT mode
BEQ WAIT

AFTERKEYCHECK:
DEX
BNE DELAY  ; Continue loop until it's time to increment hundredths by two.  ie. wait .02 seconds
NOP
CLC        ; Clear Carry Flag
CLV        ; Clear Overflow Flag
SED        ; Set Decimal Flag
LDA #2     ; Load 2 into the accumulator
ADC $F9    ; Add right most digits to accumulator (increment by 2)
STA $F9    ; Store the incremented value back to the display
CLD        ; Clear Decimal Flag

BCS INCSEC ; If Carry is set, then it's time to increment seconds.
JMP BEGIN  ; Go back to BEGIN
Incrementing Seconds
Recall for the last section that if we saw a carry bit, then it’s time to increment our seconds. This routine will handle that. Basically, we clear the carry (CLC), and set decimal mode (SED). We only want to increment the seconds by 1. Therefore, we will load 1 into the accumulator. After that, we’ll add whatever is in $FA to the accumulator. Next, we store the result back to $FA Effectively, this increments $FA. $FA is the middle two digits on your KIM display. Next, we clear decimal and check for carry. If we have a carry, then we know it’s time to increment the hundreds of seconds. If we don’t have a carry, then we simply jump back up to execute to the delay loop again.
INCSEC:
CLC        ; Clear Carry Flag
SED        ; Set Decimal Flag
LDA #01    ; Load 1 to Accumulator
ADC $FA    ; Add middle 2 digits to accumulator (increments by 1)
STA $FA    ; Store the value back to the middle 2 digits
CLD        ; Clear Decimal Flag

BCS INCHUN ; If Carry is set, it's time to increment the left digits
JMP BEGIN  ; Go back to BEGIN
Incrementing Hundreds
This routine works almost exactly like INCSEC. The exception is that we just increment the left-most digits instead of the middle digits. This is at memory location $FB. Just like in the last second, we clear carry and set decimal. We load 1 into the accumulator, then add $FB to the accumulator. After that, we store the result to $FB. Then we’ll clear decimal, clear carry, and jump back up to our loop.
INCHUN:
CLC        ; Clear Carry Flag
SED        ; Set Decimal Flag
LDA #01    ; Load 1 to Accumulator
ADC $FB    ; Add left most digits to accumulator (increment by 1)
STA $FB    ; Store the incremented value back to the display
CLD        ; Clear Decimal Flag
CLC        ; Clear the Carry Flag

JMP BEGIN  ; Back to BEGIN
Object Code @ .org $0200 for Kim Uno
A9.00.A2.00.A0.00.85.F9.85.FA.85.FB.20.1F.1F.20.6A.1F.C9.02.F0.EA.C9.04.D0.03.4C.64.1C.C9.01.D0.EB.4C.24.02.20.1F.1F.A2.09.EA.EA.EA.20.6A.1F.C9.03.F0.D9.CA.D0.F3.EA.18.B8.F8.A9.02.65.F9.85.F9.D8.B0.03.4C.24.02.18.F8.A9.01.65.FA.85.FA.D8.B0.03.4C.24.02.18.F8.A9.01.65.FB.85.FB.D8.18.4C.24.02.
Using the PAL-1 @ .org $0200
When setting this up on the PAL-1, I ran into a couple issues. It seemed like the X register did not decrement like I thought it would, and the keypad reads #$15 when not pressing the keys. I’ve modified the object code, so this should run on the PAL-1. You may need to adjust the delay loops in order for the timer to work properly. Basically, this is the same program with an extra inner delay loop, and counts in tenths instead of hundredths.
A9.00.A2.00.A0.00.85.F9.85.FA.85.FB.20.1F.1F.20.6A.1F.C9.02.F0.EA.C9.04.D0.03.4C.64.1C.C9.01.D0.EB.20.6A.1F.20.1F.1F.C9.15.F0.F6.4C.2E.02.20.1F.1F.A9.13.85.10.A9.4E.85.11.C6.11.D0.FC.20.1F.1F.20.6A.1F.C9.03.F0.C5.C6.10.A5.10.D0.E8.EA.18.B8.F8.A9.0A.65.F9.85.F9.D8.B0.03.4C.2E.02.18.F8.A9.01.65.FA.85.FA.D8.B0.03.4C.2E.02.18.F8.A9.01.65.FB.85.FB.D8.18.4C.2E.02.Give it a shot, and if you have questions, or comments please post below!
For more information, visit the KIM-1 Category Page!
— Ricky Bryce