
Introduction to ControlLogix Trapping
ControlLogix trapping is important for locating fast moving bits, or infrequent bits. An example would include equipment guard doors. Periodically, a guard door might loose connection, and shut down your equipment. Intermittent problems are very difficult to locate. Since the condition existed for only a fraction of a second, we do not know which guard door is to fault. We could also use this feature for alarms to log which alarms go high. Since one condition can cause a cascade of events, you can look at your trap log to see which alarm was true first.
Once you have a trapping program set up in a PLC, you can just modify the logic to change the bits that you need to trap for a given problem. A big advantage of having a trapping program is that you do not need to leave your computer on the plant floor. When a failure occurs, simply open the trap log to see which condition caused the failure. Before utilizing this document in any way, be sure you are familiar with ControlLogix, and Electrical safety. This document is as-is and example only.
Create the Program, and add Parameters
First, create a program for ControlLogix Trapping. To do this, I will right-click the main task, and add a program. I’ll just name the program “Trap”.
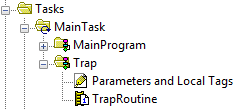
Notice, I also renamed the MainRoutine to “TrapRoutine”. This is where we will add all of our logic. Next, within the trap program, open “Parameters, and Local Tags”. Likewise, if you have an earlier version, this might be called “Program Tags”. Add the following local tags. Be sure to pay attention to the data types.
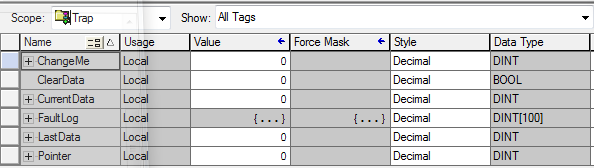
First of all, let’s discuss what the purpose will be for each tag:
- ChangeMe (DINT) — This will be used as a “place holder” in logic. When you set up a trap later on, you will replace the ChangeMe bits with the bits you wish to monitor.
- ClearData (BOOL) — This is a bit that you can toggle to clear your fault log when you start a new trap.
- CurrentData (DINT) — This is a buffer that your trap conditions will be stored into. This allows you to represent all of your bits within a single word to simplify our logic.
- FaultLog (DINT[100]) — This is an array of 100 DINTs. This is the log where your bit changes will be stored.
- LastData (DINT) — We will use this to compare against the current data. If the CurrentData changes, then it no longer matches the LastData. This will prompt the logic to log the change to the FaultLog.
- Pointer (DINT) — This will allow our indirect addressing to know the next location to log data in the fault log.
Write the Logic
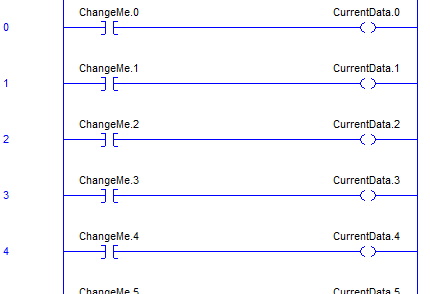
First, we’ll write the logic that stores our conditions into the CurrentData tag. Remember, when you are ready to use the trap, just replace the “ChangeMe” bits with the conditions you want to trap. I’ll give you the first three rungs, but be sure to continue this pattern all the way through Bits 31.
Secondly, we’ll write the logic that performs the trapping of our fault conditions: I’m using Indirect addressing to index through the fault log.
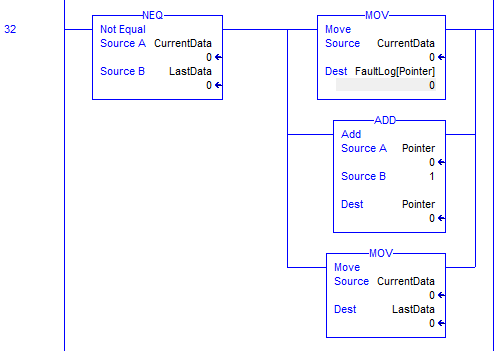
I’ll explain this rung in plain English. If the CurrentData is not equal to the LastData, that means a change has occurred in the conditions we wish to trap. This has happened since the last time we’ve logged our data. So if we have this mismatch, move the current data to the next element of the FaultLog. Remember how indirect addressing works with FaultLog[Pointer]. Simply substitute the value of the pointer tag for it’s name, and that is where the data is logged. Furthermore, we have an ADD instruction. After we log the data, increment the pointer by 1. This ensures the next data logged will go to the next element of our FaultLog. Lastly, we will move the value of the CurrentData to the LastData. This way, we will not log anything else until another change occurs in our trapped conditions.
Reset the FaultLog
Above all, we do not want to fault the processor. If the previous rung tries to write to an element that does not exist, the processor will fault. We are trying to solve problems, not create more. We’ll also give ourselves a way to reset the fault log manually.
Again, in plain English. If the pointer tries to go too high, or if we manually toggle our ClearData bit, we want to do a few things. Move 0 into the pointer. This will allow rung 32 to start logging at the top of the FaultLog tag again. Next we will move 0 to LastData. This is a known state to compare against. Then, we will fill the FaultLog with 0’s to wipe it clean. Finally, if you manually initiated this event, unlatch the “ClearData” bit. This way, you don’t have to manually toggle it again for the FaultLog to work.
Reading the FaultLog for ControlLogix Trapping
To view any changes since the FaultLog was last cleared, open Parameters and Local Tags (Program Tags).
Next, change the STYLE of your whole FaultLog tag to “Binary”. Click the + next to the fault log.
As you can see, in this case, bit 3 is the last bit to drop out. Originally the first 8 bits were on.

If you forget what condition bit 3 represents, simply scroll up to Rung 3. You will see the condition that you mapped to Bit 3.
For more information on ControlLogix, visit the ControlLogix Category Page!
— Ricky Bryce
Great job!!! Thanks for posting this. I am currently dealing with issues on a turbine gas compressor. This is going to help out a great deal.
Thanks
Thanks, John! I’m glad it helped. If you know anyone who needs ControlLogix or FactoryTalk View training, please have them send me an email for on-site training! Take care, Ricky
Thank you, John… Trapping is great for finding problems. With Indirect addressing, you can also create a fault log. https://bryceautomation.com/index.php/2017/06/12/controllogix-indirect-addressing/ If you need any on-site training, please let me know! — Ricky