
Introduction to the Ultrasonic Distance Sensor
 The HC-SR04 ultrasonic distance sensor has a variety of applications:
1) It can be used in robotics for a robot to detect the distance to an object that it needs to avoid.
2) The sensor can be used to measure the water level in a tank.
3) For security, it can be used to detect if a door is open or closed.
Operation
Ultrasonic distance sensors provide a sound that is above the pitch at which the human ear can hear. We can then listen for the echo from an object. By the time difference between the pulse and the echo, we can calculate the distance if we know the speed of sound. The speed of sound will change with temperature, but we will keep this simple, and assume room temperature. If you wish for more accurate measurements, you can incorporate a temperature sensor, and change your calculations accordingly.
Make the connections
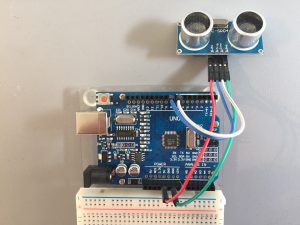
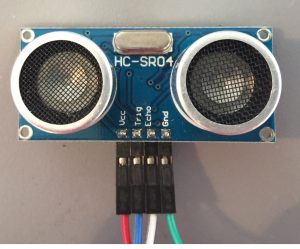
The HC-SR04 has a total of four pins. We will connect 5v to the VCC pin, and GND on the Uno to GND on the sensor. We also need to make the connections for the trigger, and for the echo pins, so the trigger pin will be connected to I/O pin 8, and the echo will be connected to pin 7.
Example Code
Your HC-SR04 has a range of 2cm to 400cm. The code below will set up the trigger pin as an output (pin 8), and the echo pin as input on pin 7. Then it will measure the duration between the trigger and the echo. This will be a raw value, so we will need to scale that into a distance by dividing the value by 58.2. This is actually twice the raw value to the object, because the sound must get to the object, and then we need to receive the echo signal.
/*
HC-SR04 Ping distance sensor:
VCC to arduino 5v
GND to arduino GND
Echo to Arduino pin 7
Trig to Arduino pin 8
This sketch originates from Virtualmix: http://goo.gl/kJ8Gl
Has been modified by Winkle ink here: http://winkleink.blogspot.com.au/2012/05/arduino-hc-sr04-ultrasonic-distance.html
And modified further by ScottC here: http://arduinobasics.blogspot.com.au/2012/11/arduinobasics-hc-sr04-ultrasonic-sensor.html
on 10 Nov 2012.
*/
#define echoPin 7 // Echo Pin
#define trigPin 8 // Trigger Pin
#define LEDPin 13 // Onboard LED
int maximumRange = 200; // Maximum range needed
int minimumRange = 0; // Minimum range needed
long duration, distance; // Duration used to calculate distance
void setup() {
Serial.begin (9600);
pinMode(trigPin, OUTPUT);
pinMode(echoPin, INPUT);
pinMode(LEDPin, OUTPUT); // Use LED indicator (if required)
}
void loop() {
/* The following trigPin/echoPin cycle is used to determine the
distance of the nearest object by bouncing soundwaves off of it. */
digitalWrite(trigPin, LOW);
delayMicroseconds(2);
digitalWrite(trigPin, HIGH);
delayMicroseconds(10);
digitalWrite(trigPin, LOW);
duration = pulseIn(echoPin, HIGH);
//Calculate the distance (in cm) based on the speed of sound.
distance = duration/58.2;
if (distance >= maximumRange || distance <= minimumRange){
/* Send a negative number to computer and Turn LED ON
to indicate “out of range” */
Serial.println(“-1”);
digitalWrite(LEDPin, HIGH);
}
else {
/* Send the distance to the computer using Serial protocol, and
turn LED OFF to indicate successful reading. */
Serial.println(distance);
digitalWrite(LEDPin, LOW);
}
//Delay 50ms before next reading.
delay(50);
}
Verify Operation
Once the code has been uploaded to the processor, we will check to see if it is working. Open your serial monitor (Tools | Serial Monitor), and be sure your baud rate is set to 9600. Take any object (I will use my coffee cup), and as you move the object closer to the sensor, you will see the distance value change in your serial monitor. I changed the delay from 50ms to 1000ms so we can see the changes more easily in the image.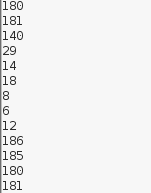
Examples of places to order the ultrasonic range sensor would be Ebay, Amazon, or SparkFun!
— Ricky Bryce