
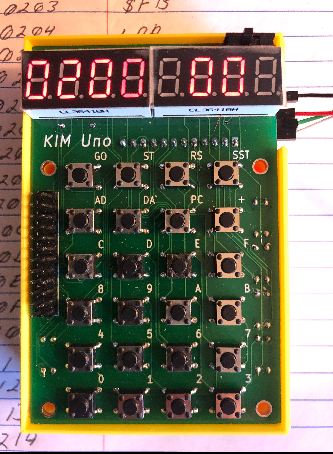
Introduction to the KIM-1 (UNO) 6502 Counter
In this post, we’ll build a KIM-1 (UNO) 6502 Counter. We’ll use assembly language for this project. Basically, you can use this code to learn more about assembly. In this project, button #1 will increase the counter. Likewise, button #2 will reset the counter. Press the “E” button to exit back to the KIM.
Writing the Code for the KIM-1 (UNO) 6502 Counter
I’m using KWRITE in Linux to develop the code, but you can use a simple editor such as windows notepad just the same. After you write your code in assembly, you need to compile that code. Masswerk has a good utility that you can use to build the project once you write the assembly code. Keep in mind that if you see a # before a value, then it’s a constant. $ before a value indicates the value is in hex.
Basically, I just copy the object code back into the text editor. After that, I remove the line feeds, and be sure there is still a space between every byte (2 hex characters). Then I replace the spaces with a period, and be sure to have a period on the end of the object code. At this point, I’ll just set the KIM’s address to 0200, and paste the formatted object code. I’m using minicom to communicate with the KIM, but if you run Windows, Teraterm would be a good option. I’m just setting the character delay and line delays to 10ms in the terminal programs.
Initialize Your Program
First, we’ll tell the assembler that we are starting at memory cell $0200. After that, we’ll write zeros onto $FB, $FA, and $F9. These are the memory locations that will eventually appear on your KIM-1’s display.
.ORG $0200

RESTART:
LDA #$00       ;CLEAR DISPLAY
STA $F9
STA $FA
STA $FB
Update Display and Handle Keys
At this point, we are ready to update the display by jumping to the subroutine at $1F1F. After that, we’ll run the subroutine at $1F6A to update the accumulator with the key being pressed. If you don’t press any key at all, this value will appear as $FF.
We’ll run a compare on the accumulator, and if a key is pressed, we’ll take action for that particular key. In other words, we’ll jump or branch to a different part of your logic. Labels such as BEGIN: define places in your logic that we can jump or branch to. As you can see, if the user presses key #1, we will jump to the LO: label. This is where we increment the display value.
If the user presses key #2, then we branch back to the top of the program, and restart at zero. If the user presses the E button, then we will jump to $1C64, where we exit back to KIM. In other words, E will exit the program.
BEGIN:
JSR $1F1F      ;SCANDS
JSR $1F6A      ;GETKEY
CMP #$01
BEQ LO
CMP #$02
BEQ RESTART
CMP #$0E
BNE BEGIN
JMP $1C64
Increment the Counter’s Value
When the user presses key #1, we need to increment our value. Obviously, that is the purpose of our next section, which has the “LO:” label. We’ll use the SED instruction to set decimal, since hex isn’t very friendly to average users. At this point, we’ll clear the carry (CLC), and load the value of 1 into the A register. We do this with the LDA instruction.
After that, we’ll use the ADC instruction to add the value of our right most display ($F9) to the accumulator. At this point, the accumulator has the value of $F9 plus 1. We use the STA instruction to store this value back to $F9. However, since we are in decimal mode, if we go over 99, we’ll set a carry bit. That is the purpose of our BCS (Branch on Carry Set) instruction. If we go over 99, then we need to execute a routine that will increment the middle two digits by 1. Otherwise, we just jump back up to the BEGIN: label, where we wait for the next valid key.
LO:
SED
CLC
LDA #$01
ADC $F9
STA $F9
BCS MID
CLD
JMP BEGIN
Handling values over 99
If the total counts are above 99, then we must deal with this in the next part of your display at $FA. That is the purpose of our logic under the MID label. As you can see, it works very much the same as our logic that increments the right-most part of our display. Here, we simply increment the value of $FA, then reset $F9 back to zero.
MID:
SED
CLC
LDA #$01
ADC $FA
STA $FA
LDA #$00
STA $F9
BCS HI
CLD
JMP BEGIN
Handling values over 9999
At last, we need to deal with values over 9999, which is the purpose of our HI: label. Again this is very similar to the logic we write in the last section. If you don’t wear the button out first, you will be able to achieve counts of up to 999999.
HI:
SED
CLC
LDA #$01
ADC $FB
STA $FB
LDA #$00
STA $FA
CLD
JMP BEGIN
Object Code for the KIM-1 (UNO) 6502 Counter
If you paste this into an assembler, then the assembler will build the object code. You can then paste this into a text editor, remove carriage returns and line feeds. At this point, replace all of the spaces with a period. This is what the KIM expects to see to accept data for each cell if you program it from a terminal.
A9.00.85.F9.85.FA.85.FB.20.1F.1F.20.6A.1F.C9.01.F0.0B.C9.02.F0.EA.C9.0E.D0.EE.4C.64.1C.F8.18.A9.01.65.F9.85.F9.B0.04.D8.4C.08.02.F8.18.A9.01.65.FA.85.FA.A9.00.85.F9.B0.04.D8.4C.08.02.F8.18.A9.01.65.FB.85.FB.A9.00.85.FA.D8.4C.08.02.Uploading the Code
Simply use a terminal program such as TeraTerm or Minicom. Connect to your KIM. Set the character and line delays to 10ms. after that, press the tab key to go into TTY mode. Enter 0200 (space) to set the starting address to 0200. At this point, you can paste your code.
Running the Code
To run the code, press TAB on your terminal to go back to Keypad Mode. Enter 0200 on your keypad then press “GO”. Button #1 should increment the counter. Likewise, button #2 should reset the counter. “E” exits to KIM.
For more information, visit the Vintage Computer Category Page!
— Ricky Bryce