
Introduction to Motion Axis Gearing
Motion Axis Gearing allows one axis to follow another axis using a certain ratio of gearing. For example: A slave axis might follow a master axis, but at twice the speed, and cover twice the distance in a given amount of time. A practical application for this is two rollers that are transporting a sheet of paper or plastic. You will want to maintain tension on the product. By making the downstream roller a slightly higher speed than the upstream roller, you can achieve this tension. Other uses for Motion Axis Gearing (MAG) would be due to difference in the physical gearing of different pieces of equipment.
In this example, we will use our Virtual Axis. If you have not read up on the previous documents, be sure you have two virtual axis set up. Also familiarize yourself with how to use Motion Direct commands, and how to use the MAM command.
Remember, if you are using physical axis instead of virtual axis, be sure to take all safety precautions. This procedure will cause movement, and the movement could be unexpected.
Gearing the Axis
Our goal in this demonstration is to move VirtualAxis2 at twice the speed of VirtualAxis1. Make sure you have already downloaded and are online in run mode. Right-Click VirtuaAxis2, and choose “Motion Direct Commands”.
Configure the Motion Axis Gearing (MAG) command as follows:
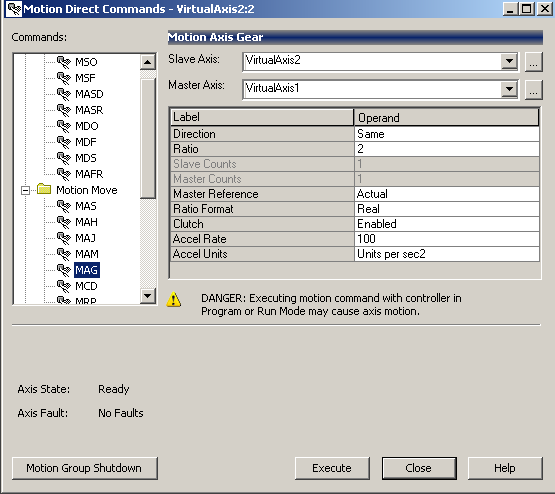
The slave is VirtualAxis2. We are gearing this to VirtualAxis1, so that will be our master. The axis for this demonstration will move in the same direction. Our gear ratio is 2. Movement will take place from that actual position of Virtual Axis1 in this example. To keep things simple, our ratio format will be “Real”, which is 2 to 1. Otherwise we would have to calculate the encoder counts that we want the ratio to be based on. It’s a good idea to have the clutch enabled. If an actual master axis is moving when the gearing takes place the slave would accelerate very quickly, and would likely cause a position error. With the clutch enabled, we can set an acceleration for the slave to catch up with the master. This prevents an instantaneous lock, which would likely cause a position fault.
Press “Execute”, and the slave axis will be geared to the master.
Moving the master axis
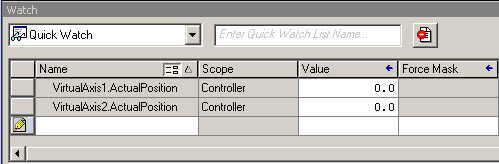
Next, you can go to View | Watch, and in the QuickWatch window, we can monitor the actual position of each axis before we execute the MAM command.
Next, we will attempt movement to test our gearing. We will do this with the MAM command on VirtuaAxis1. Right click on VirtualAxis1 to access it’s motion direct commands. We will choose the MAM command.
Configure the MAM command as follows:
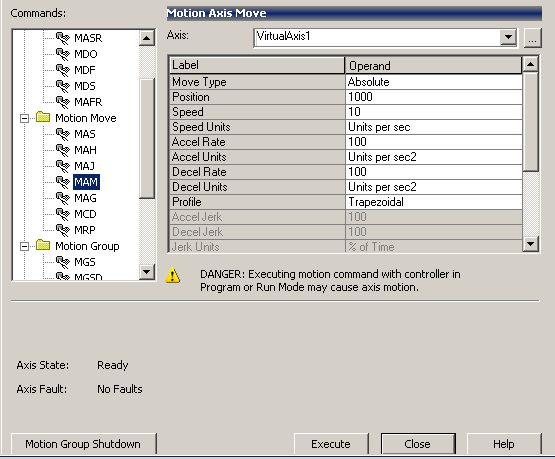
We will move to the position of 1000 with a speed of 10. Here, I will leave the other fields at default. This should be slow enough so we can see the gearing take place.
Now, press “Execute” and watch the position of each axis.
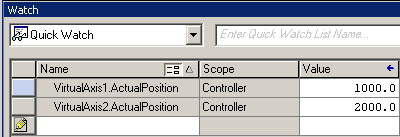
Here, we can see that VirtualAxis2 is moving twice as fast as VirtualAxis1.
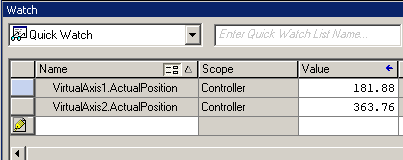
Finally, when VirtualAxis1 has reached it’s commanded position, VirtualAxis2 has moved twice the distance.
In conclusion, MAG command can be used in logic, just as the MAM command to automate the process of gearing and moving the axis.
— Ricky Bryce
Pingback: Using the Motion Axis Move Command in a ControlLogix processor