
Introduction to the Kenbak-1 Indirect Indexed Addressing
The Kenbak-1 Indirect Indexed Addressing may seem a bit intimidating at first. However the concept is simple. Let’s say we have two different “sequencers” with different bit patterns. One bit pattern resides at memory cell 107-100. Another set of patterns reside at address 157-150. We want operator input to decide which of these sets of bit patterns to run. We’ll default to 157 to 150
The simplest way to display this data would be to work backwards ie: 107 to 100, and 157 to 150. We’ll use this method to keep our logic as simple as we can. The goal here is to understand the basic principal. After that you can try to modify the logic on your own to make the sequencer run forward.
Obviously, we’ll use X as our Index register. Our B register will store the array,’s starting point, which will either be 100 or 150. We’ll base this on the user’s input, but initially, without any operator input, we’ll default to the array at memory cell 100 to 107.
It’s important to realize there are other ways to do this, but the point of this exercise is to understand Indirect, Indexed addressing.
Before we begin, print a few copies of the Kenbak-1 Programming worksheet. Since this is somewhat of an advanced topic, I would also recommend reading the post on programming the Kenbak-1 if you are not familiar with how to use the programming sheet. Compare each command in that post with your worksheet. Additionally, you will want to read up on developing the basic OPCODES to program the Kenbak-1.
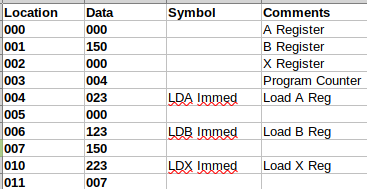
Initialize the Registers
We’ll start by initializing the registers. This will be address 000 to 011. Really, it doesn’t matter at this point what we put in memory cells 000 to 002. Our program will re-initialize these variables anyway. In memory cell 003, we need to set the program counter to 004 though. The Load instructions will load initial values into cells A, B, and X.
Test for User Input
At this point, we want to check for user input. If the user hits button 0, we want to run the array from 107 to 100. On the other hand, if the user hits button 1, we will start executing the sequence from 157 to 150. The change will take effect once the current sequence is complete.
We can simply subtract 1 from the buttons to get the three states we need for the jumps. After we subtract 1, we know that if the value is negative, then our buttons were 0. If the result is equal to 0, then we know the user is pressing button #0 to run the first sequence at 107 to 100. Likewise, the number is greater than 0, then we know the user selected a different button. In this case, we will run the sequence of values from 157 to 150.
Let’s write our user input detection logic.
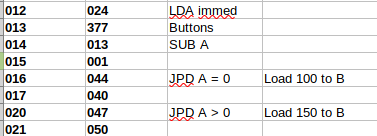
First, we are loading the buttons into the A register. Next, we subtract 1 from the A register. If the result is equal to zero, we jump to an area of memory (040) that sets the B register to 100. Likewise, if the result is greater than zero, then we’ll jump to another area of the program that loads 150 into the B register. We’ll discuss those routines later. For now, let’s keep going in sequence.
Load and Display the Values in our Data Arrays with Kenbak-1 Indirect Indexed Addressing
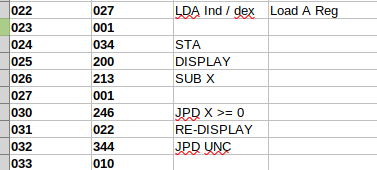
This code is the heart of our post. In cell 022, we load A from an indirect, indexed address. Cell 013 contains the value of 001. This means that we use the B register as the starting point. Remember, the B register starts at the value 150. Since this is also indexed, we add the contents of the B register to this address. This gives us the memory location containing the data we want to load into the accumulator. Our X register starts at 7. Therefore, the first memory address we get information from will be memory location 157. We then store this to our display in cells 024 and 025. At this point, we decrement the X register. As long as the X register remains positive (0 or above), we will continue to cycle through this loop.
One at a time, we get data from cells 157 to 150, and store this to the display. Once the X register drops below 0, we set the program counter to restart at line 10.
At this point, we go up and test for user input again. If the user happened to press button 0 at any time, then we change our reference point to address 100 once this sequence is complete.
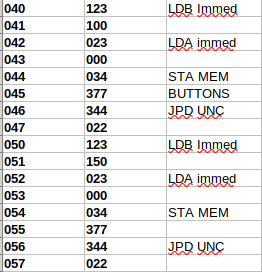
Setting the “B” Register
Recall that in cells 016 and 020, we tested for user input. here are the subroutines we execute to reload the B register with a new reference point. We base this on the button the user pressed. If the user pressed button 0, we execute cells 040 to 047. On the other hand, if the user pressed button #1, we execute cells 050 to 057. Basically, this code loads a new value into the B register as our reference point. After that, we load the A register with 0, and clear cell 377. This clears the previous user input.
Enter Data into the Arrays
Don’t forget to put your own bit patterns into locations 107 to 100, and 157 to 000. To demonstrate, these should be different bit patterns to prove that your logic is working.
Octal Dump for the Kenbak-1 Indirect Indexed Addressing
I’m using the Kenbakuino emulator, which is a hardware emulator. You can purchase one, or build one on your own!
000,100,000,004,023,000,123,100,223,007,024,377,013,001,044,040,047,050,027,001,034,200,213,001,246,022,344,010,000,000,000,000,123,100,023,000,034,377,344,022,123,150,023,000,034,377,344,022,sFor more information, check out the Kenbak-1 category page!
— Ricky Bryce