
Introduction to ControlLogix Indirect Addressing
ControlLogix Indirect Addressing allows you to have a variable address. This is an address that changes on the fly. Imagine a tank farm with 28 tanks. We would have the exact same logic for each tank, but a different address to access for volume calculations. Indirect Addressing allows us to write the logic one time, and feed a different index into the logic. This index would tell the logic which tank to perform the calculations on.
Another example would be a fault log. Each time a fault occurs, we want to log the system time to a different memory location. The next day, we would then look back at the fault log. This would tell us how many faults occurred, and the exact time of each fault.
In this tutorial, we will start off with a simple demonstration of how indirect addressing works in the ControlLogix processor. Then, we will build a fault log for the purpose of troubleshooting. I will assume that you are working on a test station with a new project in this example.
General Explanation of Indirect Addressing
If you have not yet done so, follow the tutorial on how to access the system time. In this tutorial, we copied the time into an array of 7 elements. The name of this Array is “SystemTime”. We will use this array in the example below.
Since we’ve already created the SystemTime tag, create two more tags: “MyTag” and “Pointer”. The data type of each tag will be “DINT”.
Next, we will add a simple MOV instruction to the MainRoutine.
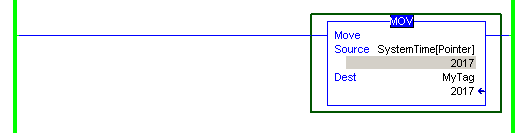
Since the value of Pointer is 0, the source of the MOV statement is SystemTime[0], and the year is moved into “MyTag”. If we change the value of the Pointer tag to 1, then the month is moved. Our source would be SystemTime[1]. Let’s take a look at the tags. We’ll go to “Monitor Tags”, and make this change.
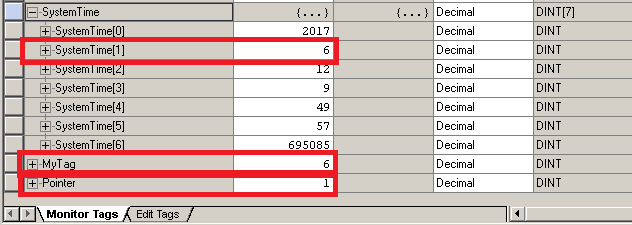
Try this with a pointer having the values 2 through 6 watching the Controller tags until you are sure that you understand how the Indirect addressing is working. With a pointer value of 2 in this case, our MOV would place the value of 12 into MyTag. With a pointer value of 3, you will see a 9 in MyTag.
Warning: If the pointer value attempts to access an address that does not exist, you will fault the processor!
When you are sure you understand how Indirect Addressing works, remove the MOV statement we just placed into your logic. This will prevent a fault in our next section of this tutorial. Also, put the pointer back to a value of 0 to prepare us for the next section.
Create a Fault Log
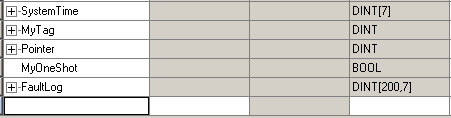
Now that you understand how Indirect Addressing works, we will create a Fault Log. First, we must create some tags that we can use in this exercise. Please create the tags as follows: MyOneShot (BOOL) and FaultLog (DINT[200,7]). Notice the FaultLog tag is a 2 dimensional array (200 x 7).
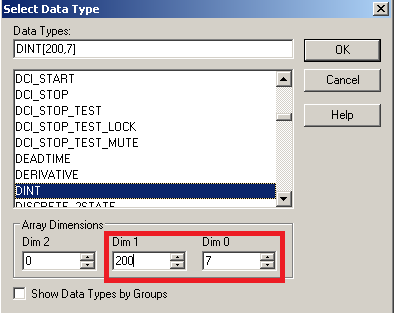
An easy way to create the 2-dimensional array is to click the elipsis next to DINT as shown:

Then create the array as 200 x 7. You will need to set dimension 0 to the value of 7 first. Then you will set dimension 1 to 200.
When finished, your tags should look like this:
Here, we will use real I/O, but if you do not have a real world switch, create two BOOL tags that you can toggle manually. These will be for the fault condition, and for a reset Now we will add the logic to make our Fault Log work.
Description of operation
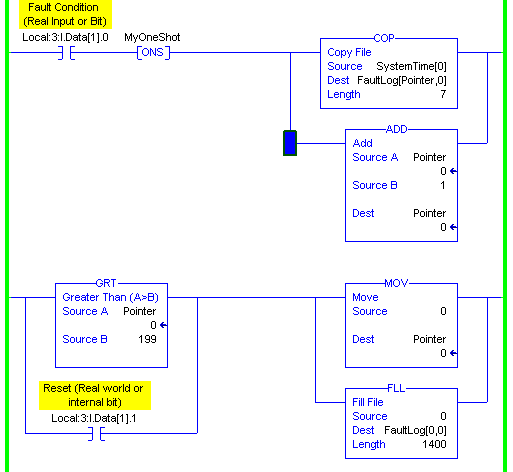
In the first rung, the XIC will be our fault condition. The One Shot instruction will only execute the copy one time per alarm condition. Otherwise, we would fill up the fault log very quickly! Remember our pointer is at 0. The COP instruction will move all 7 elements of the SystemTime tag to FaultLog[0,0]. The ADD statement will then increment the value of our pointer. This way, the next time a fault occurs, our starting point will be “FaultLog[1,0]”, and so on.
The second rung is our reset. If the pointer goes above 199 (or we hit the reset button), we will move the value of 0 back into our pointer. This will cause the logic to start writing data again at the beginning of the FaultLog Tag. We will also use the File Fill instruction (FLL). This will clear the fault log starting at the beginning (FaultLog[0,0]), and fill the file with 0’s 1400 times. Since our array is 200 x 7, this will be 1400 elements.
Test your logic
Now, we will make everything work. Be sure you are not on a real process until you know what you are doing. With Indirect Addressing, it’s very easy to fault the processor if our pointer is out of range.
We will press the button on the first rung to simulate a fault. If you don’t have any remote I/O and used an internal bit, then right-click the bit to toggle it. Open your FaultLog tag, and you will see the processor logged the exact time of our first fault.
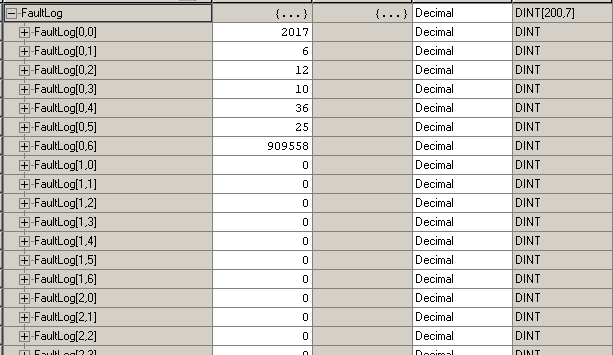
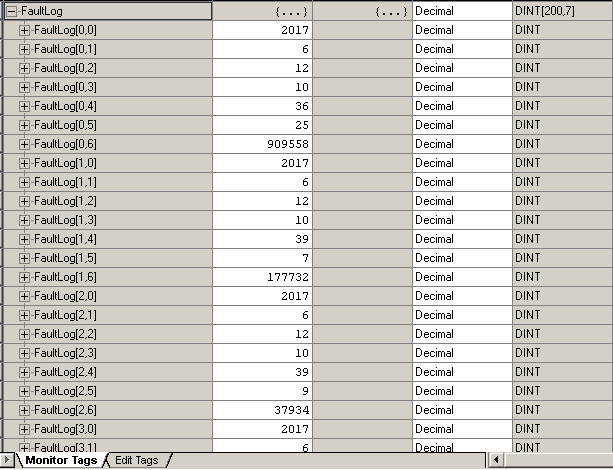
Our pointer was 0, so we copied the SystemTime tag into FaultLog[0,0]. Now, our pointer is at 1. The next time we have a fault, our system time will be logged at FaultLog[1,0] and so on. Toggle the switch (or fault simulation bit) on the first rung a few times, and watch the fault log!
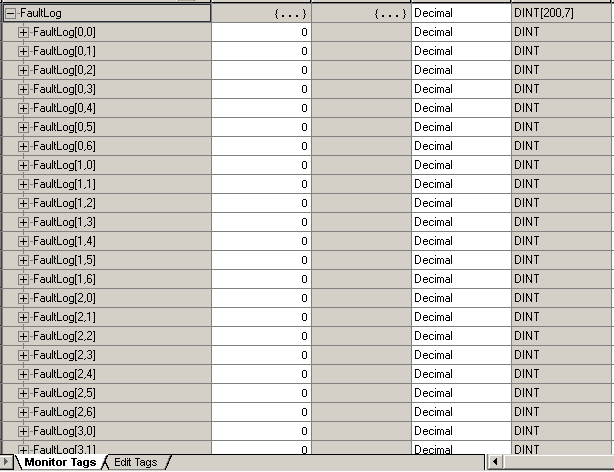
Now if you press the reset button in the second rung, the FautLog will clear.
For more information, please visit the ControlLogix post page!
— Ricky Bryce
How do I make the log so the newest is always the first and the old once move up
and when the array gets full it should only delete the last one?
Thanks
If I understand you right, you want to move all of the data in the faultlog down one element, and always log to element zero. This would not be very efficient, but if you really need to do that, you could create a loop that executes 200 times before you log your data once an event happens. You would need to start at the bottom of the fault log with two pointers. One pointer’s value will start at 199, and the other 198. Copy the data from element 198, to 199. Decrement both pointers, then copy 197 to 198, decrement again, and move 196 to 197, etc. Once you copy data from element 0, then you are ready to log to element 0. The very last element 199 will always be overwritten. This might be a little easier to do in a structured text FOR loop, but ladder logic has a FOR loop too. Just check out my posts on the structured text loops. https://bryceautomation.com/index.php/2022/01/19/controllogix-for-do-statement/
Your loop will be 199 to 0 by -1 (exact settings depend on how you write your logic) — Take care — Ricky