
Introduction to ControlLogix Add-On Instructions
ControlLogix Add-On Instructions allow you to create your own instructions. Whenever you feel that you are writing the same logic over and over again, there is usually a better way of doing things. For example: You can also use add-on instructions for motor control if there are multiple motors in your system. Add-On instructions can also be used for common math conversions such as Celsius to Fahrenheit. They are also portable. This means that you can export your instruction, and import it easily into another project.
Imagine a simple ADD instruction. This instruction has two inputs. These are the two numbers that you are adding together. You also have an output of the ADD instruction. This would be the destination tag. Add-On instructions work very similar to the standard ControlLogix instructions. The main difference is that you are writing them yourself.
In this example, we will create a simple instruction that converts Celsius to Fahrenheit. This will give you a good understanding of how to create an add-on instruction. You can then experiment with creating other Add-On instructions for conversions, scaling, control, or troubleshooting.
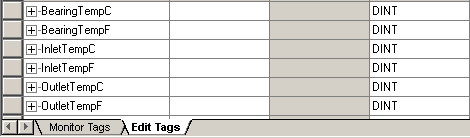
Step 1: Create your tags.
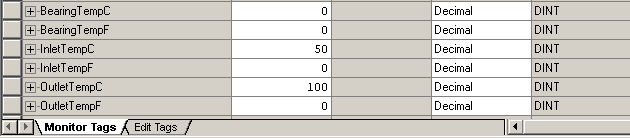
We will just set up some simple tags, and place random values into them. This would simulate real world inputs from thermocouple modules. Later in the exercise we will see the values converted and stored to Fahrenheit tags.
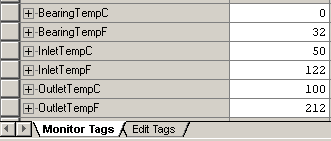
In “Edit Tags” mode, create all six tags with a DINT data type. Then go to “Monitor Tags”, and place random values into the Fahrenheit tags. Here, I’ve placed the values of 0, 50, and 100 into these tags.
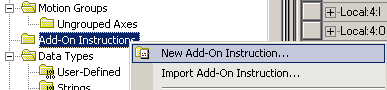
Step 2: Create the ControlLogix Add-On Instruction
To create the instruction, right-click the Add-On Instruction folder, and select “New Add-On Instruction”.
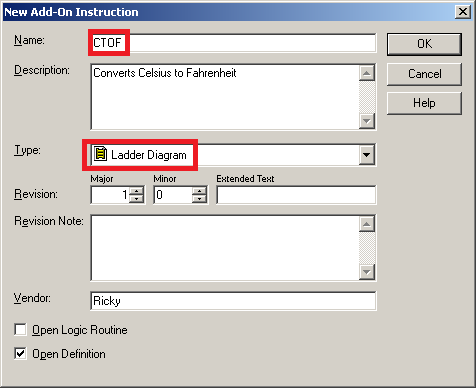
Next, name your instruction, and complete the other fields. You will notice that you can set the revision number. You may constantly be improving your add-on instruction to add new features. The version number allows you to keep track of the changes you make.
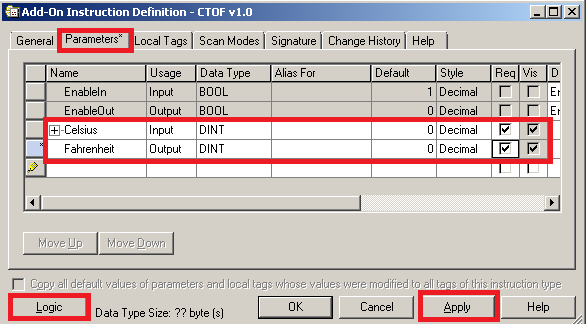
Next, add your parameters. This will be information that you receive from a tag for use in your logic (Inputs). You will will also create output parameters which will be information that you store to another tag. You might also need internal (workspace) tags. Click the help button for more information on the usage of the parameters. When finished, click “Apply” so the parameters are available. Click the “Logic” button when your parameters are complete. If you ever need to get back to this screen later on, you can right click the Add-On instruction itself in the Controller Organizer window, and “Open Definition”.
Now, add the logic as follows:

Close the logic screen, then press OK on the definition screen.
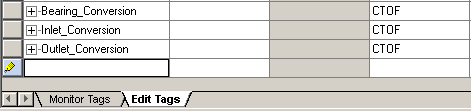
Step 3: Create tags for your instructions
Each CTOF is going to need a tag to store it’s internal information. The tags that we create will need a data type with the name of the instruction that we just created. We will need a tag for each instruction that we are going to use. Create three tags as follows:
Step 4: Use your instruction
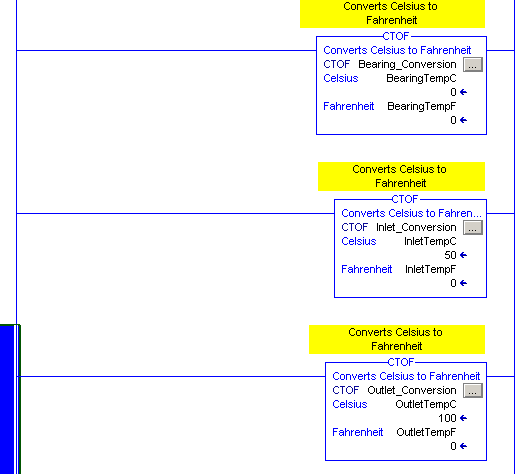
We are now ready to utilize the Add-On instruction in logic. I will add these three instructions to the MainRoutine. Once the instruction is in place, all we need to do is utilize it anytime we need to convert Celsius to Fahrenheit. Remember the instruction itself doesn’t do anything until we add the instruction to our regular routines.
Step 5: Test your work.
Download to the processor, and you should see that the Celsius values are converted, and the correct answers are stored to the Fahrenheit tags.
For more information, visit the ControlLogix category page!
— Ricky Bryce