
Introduction to Programming Loops on the Kenbak-1
When Programming Loops on the Kenbak-1, we will use the JPD instruction. Basically, we set a register to a specific value. For this example, we’ll use the X register. Every time our loop executes, we decrement the X register. When the X register approaches zero, we drop out of the loop.
We base this on conditions that we set. We might drop out of the loop when this register is at zero, greater than zero, less than zero, etc.
This is similar to the FOR… NEXT… loops that you might see in other programming languages. It’s just backwards.
Reasons for Programming Loops on the Kenbak-1
We create a loop when we need certain logic to execute a specific amount of times. This includes multiplication, division, and delay loops. Additionally, we might use loops when we need to write to or read from different memory cells. You might do this for creating a sequencer using indirect addressing. In this case, you are taking data from different sequential memory cells, and displaying this on your LEDs one at a time. Additionally, you might log data to a different memory cell each time an event happens.
For this post, we’ll just create a simple delay loop. A delay loop simply keeps the processor busy. It “slows down” your logic execution. You might use this delay loop for debounce when detecting if the user is pressing a button. Another use for delay loops is for displaying data. If you have two memory cells to display to the operator, you might display the first cell, then after a period of time, display the second cell.
To demonstrate, we’ll simply display the value of 1. Then after a short delay, we’ll display the value of 2. After that, we’ll delay again and restart the program.
Initialize the Registers
Before we begin, I always like to initialize the registers. That is to say, we’ll set A, B, and X to zero. This is how I like to start each program. Please be sure you have a programming worksheet printed out. This will help you to build the instructions we will need.
I’ll be using the Kenbak-1 Emulator for this, but you can do the same with a hardware emulator. I’ll post an octal dump of the logic at the bottom of this post that you can send directly to the Kenbakuino.
With the Kenbak-1 emulator, you can write this logic in the memory loader. Mr. Richardson made the memory loader smart enough to know the memory cell you are specifying, and the data that belongs in each memory cell. It ignores the text after your data that we use for documentation.
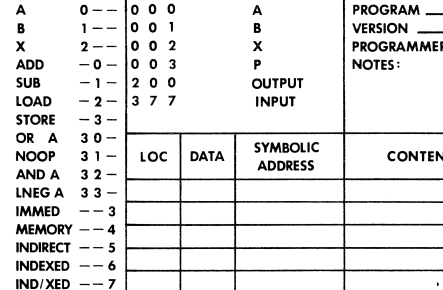
Pay attention to the worksheet for each OPCODE. To begin, we are simply loading the immediate value of 0 into each register.
INIT:
000: 000 000 000 004

RESTART:
004: 023 000 LDA 000
006: 123 000 LDB 000
010: 223 000 LDX 000
First Delay Loop
At this point, we need to load the A register with a 1. In cell 014, we will send this 1 to the display at address 200.
At cell 016, we begin our loop. We’ll load the value of 177 into the X register. This is the highest number we can set without bit #7 being involved in our value. If we turn on bit #7, the Kenbak will consider the number to be negative. You can lower this number to make the lights flash faster.
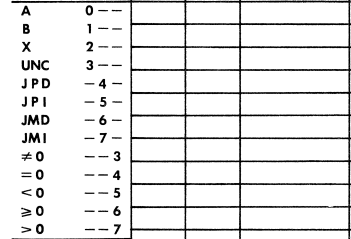
In cell 020, we decrement the X register. To build the JPD instruction, we need to look a little further down on your worksheet. We simply jump back up to cell 020, and keep subtracting the value of 1 while X is still greater than 0. Once X is no longer greater than zero, then we drop out of the loop.
BEGIN:
012: 023 001 LDA 001
014: 034 200 STA DISPLAY
016: 223 177 LDX 177
020: 213 001 SUB X 001 (X=X-1)
022: 247 020 JPD 020 (DELAY LOOP)
Second Delay Loop
Now we are ready to display the value of 2 to the user. This logic will be exactly the same, with the exception that we send the value of 2 to the display this time.
024: 023 002 LDA 002
026: 034 200 STA DISPLAY
030: 223 177 LDX 177
032: 213 001 SUB X 001 (X=X-1)
034: 247 032 JPD 032 (DELAY LOOP)
Restart the Program
At this point, we will restart the logic by simply creating an unconditional jump back to cell 012. This loads a 1 into the A register. The effect will be a “Rail Road Light”.
036: 344 012 JPD 012Full Code
You can paste this code into the memory loader on the Kenbak-1 web emulator.
INIT:
000: 000 000 000 004

RESTART:
004: 023 000 LDA 000
006: 123 000 LDB 000
010: 223 000 LDX 000

BEGIN:
012: 023 001 LDA 001
014: 034 200 STA DISPLAY
016: 223 177 LDX 177
020: 213 001 SUB X 001 (X=X-1)
022: 247 020 JPD 020 (DELAY LOOP)

024: 023 002 LDA 002
026: 034 200 STA DISPLAY
030: 223 177 LDX 177
032: 213 001 SUB X 001 (X=X-1)
034: 247 032 JPD 032 (DELAY LOOP)

036: 344 012 JPD 012
Octal Dump
If you are using a hardware emulator, you can send this octal dump directly to your Kenbakuino, or enter the octal codes on the front panel.
000,000,000,004,023,000,123,000,223,000,023,001,034,200,223,177,213,001,247,020,023,002,034,200,223,177,213,001,247,032,344,012,sKeep in mind that on the kenbakuino, you can slow your process. To do this hit STOP. Next, hold down a bit number such as 2 while pressing STOP again. The higher the bit number that you press, the slower the processor will be. Now, hit START.
For more information, visit the Kenbak-1 Category Page!
— Ricky Bryce