
Introduction to the Kenbak-1 SET Instruction
The Kenbak-1 SET Instruction allows us to turn a bit on, or shut a bit off within a byte. This is a two byte instruction. The first byte contains the instruction. The second byte contains the address to be operated on. For this exercise, I’m using the Kenbakuino. If you don’t have one of these, you can test the program on the EmulatorKenbak-1.

For the SET Instruction (first byte):
Bit #7 - Always off (0)
Bit #6 - 1 or 0 -- This tells the instruction whether to set (1) or reset (0)the bit.
Bit #5, #4, and #3 -- This is the bit location to be operated on (0-7) in the target address.
Bit #2, #1, and #0 -- These will always be 010 for the SET instruction.
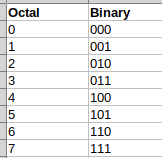
Keep in mind that we’ll usually document the instruction in octal. Two bits (7 & 6) represent the first octal digit. Likewise, bits 5, 4, and 3 represent the second octal digit. Obviously bits 2, 1, and 0 make up the last octal digit. Notice on the Kenbak that spaces between buttons represent the next octal digit. Some people might prefer Hexadecimal / BCD. In that case, you could go by the colors on the buttons instead of the spaces.
To demonstrate how the SET instruction works, we’ll write a simple program. To summarize, we set bit #4 within the A register. Next, we’ll store this to the display (200), then we’ll shift this bit 6 times to move it off of your display. After that, the program will start over. This could simulate marking a product of defective on a conveyor. After that, we track the bad product down the conveyor. At some point, we could energize a diverter gate to knock it off the line. Of course another use is simply for visual effects on the Kenbak-1.
Enter the Program
If you have not already done so, download and print the Kenbak-1 Programming Worksheet. Not only does this give you space to write your program, but also tells you how to build each command. Write down this program on your worksheet. Compare each instruction against the documentation on the worksheet. You will understand how we build each of the following commands.
To enter the program, press START, then STOP. This gets the Kenbak-1 to a known state. Press clear. On your buttons enter 003, then SET. Enter 004, then STORE, and CLEAR. From now on, just enter the next consecutive data. Be sure to press STORE, and CLEAR after each line.
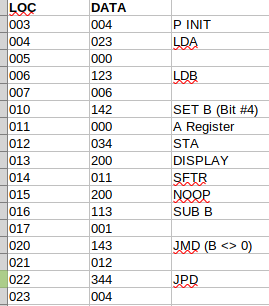
- Basically, we initialize the program counter in cell #3. The value will be 004 since our program starts in cell #4.
- Next, we initialize the accumulator to 0 in Cell #4
- At this point, we load the value of 006 into the B register in cells 006 and 007. This represents how many times we want to run the shift loop.
- Line 010 contains our SET Instruction. We are simply turning on bit #4 within the A Register.
- In line #12, we simply dump the A register onto the display.
- At line #14, we shift all of the bits to the right by one position. Line #15 is a NOOP Instruction. I added this to keep all of the instructions on even line numbers.
- In line #16 and #17, we simply subtract 1 from the B register
- Lines #20 and #21 jump back up to line #12 to perform the shift again. The loop executes until the B register equals zero.
- Lines #22 and #23 simply restart the program over again.
Run your Program
To run the program, simply press START. You will see the bits shift through the display starting at bit #4. After six executions, the program starts all over again.
For more information, visit the Kenbak-1 Category Page!
— Ricky Bryce