Introduction to the Point Contact Diode
Today, I am doing an experiment that I’ve heard of called a “Point Contact Diode”. During the World Wars, soldiers would make radios in the field. By making a “Foxhole Radio”, they could listen to radio stations for news and entertainment. One of the components required was a diode.
Basically a diode allows current to conduct in one direction. The radio was very simple. Unlike the modern radio, the “foxhole” radio consisted of the point contact diode, a coil, and a “cat whisker”. They would move the catwhisker across the coil to find radio stations. Generally, they made the coil from enamel coated wire. They would find this enamel coated wire in old transformers and motors. Furthermore, because the wire was insulated by enamel, there was also capacitance. The inductance of the coil together with it’s capacitance formed a resonant circuit. We require resonance for the circuit to work.
Building the diode
With this in mind, I’m currently working on getting the diode to work, and I will continue to update this post. I will share with you what I’ve done so far.
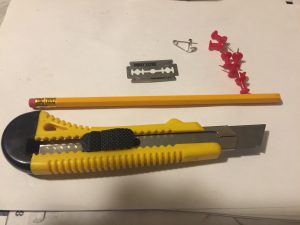
First, we need some parts. We will gather a safety pin, a razor blade, a pencil, and some thumbtacks. In theory this is all we need for the diode portion of the circuit.

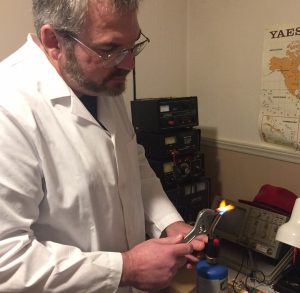
Next, I will heat the razor blade using a propane torch. The purpose of this step is to burn off any oils or coating, and allow the blade to oxidize. Oxidation has certain semiconductor properties that we will need to take advantage of.

Putting it all together
The next step is to trim down the pencil and remove part of the pencil lead. The pencil lead is made of graphite. We require graphite at the oxide junction for the diode to function properly. This is then attached to the safety pin. In this case, I’ve also soldered wires onto the safety pin and to the razor blade for stability. Remember, soldiers in the field might not have had access to solder, so part of their challenge was to keep the circuit together!

This will be similar to the final result once the diode is complete. A little bit of trial and error is required. We need to move the pencil lead around to different parts of the blade to find a spot with just the right amount of oxidation so it will conduct electricity in one direction, but not in the other.
Attempts to test this diode immediately after heating the razor blade had mixed results. I will keep you updated in this post. I will give the blade a few days for more oxidation to form, and run the test again. Hopefully the results will be positive, and repeatable!
— Ricky Bryce
