
Introduction to Buffering Inputs and Outputs
There are several reasons for Buffering Inputs and Outputs. First, the tags are easier to understand for those doing troubleshooting. Secondly, it holds data the same for one scan. Thirdly, I/O changes (Input and Output changes) to your system are easier to make.
Today, I’ll walk you through creating a User Defined Data Type. We will then create tags to utilize this data type. Finally, we’ll buffer the data into our user-friendly tag names. We are going to use a simple example of a valve with only the open and closed limit switches, and open and close solenoid in this example.
Create the UDT
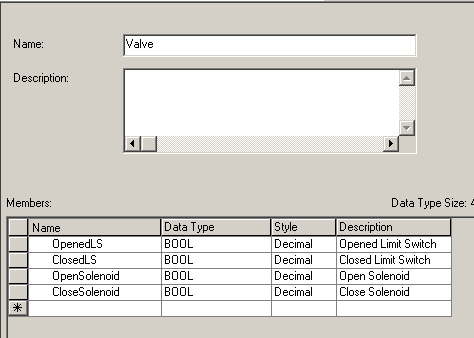
At this time, I’m going to create a User Defined Data Type (UDT) for the valve. This will make organization and troubleshooting much easier! Right-click the User Defined folder under Data Types in the Controller Organizer window. Then, create a new data type. I set up the valve data type as follows:
Afterwards, I’ll create a couple tags that use this data type. To create the tags, go to Controller Tags. This is at the top of the controller organizer window. I created 3 tags for 3 valves. As can be seen, when I expand one of the valves, all of the members of the data type are inherited.

You will also notice by looking at the tags, that I have an Input module in slot 5, and an output module in slot 6.
Our goal is to take the tags such as Local:5:I.Data.0, and “copy” that to a user-friendly tag, such as BypassValve.OpenedLS. Afterwards, the programmer can use the buffered tag throughout logic.
Write the Logic
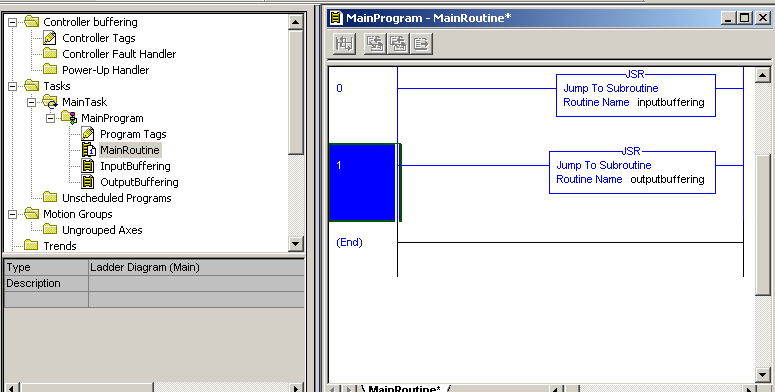
We’ll create two subroutines: One for Input Buffering and another for Output Buffering. Don’t forget to add the JSR instructions to the MainRoutine. For more information on this, visit the simple subroutines post.
Next, open the InputBuffering routine, and we’ll buffer data into the correct tags. Be sure the real input that you are buffering from corresponds with the tag that you buffer into! Repeat this process until all of your inputs are buffered to a user friendly tag name.

Likewise, buffer the Outputs. Here is a sample of logic for the OutputBuffering routine.
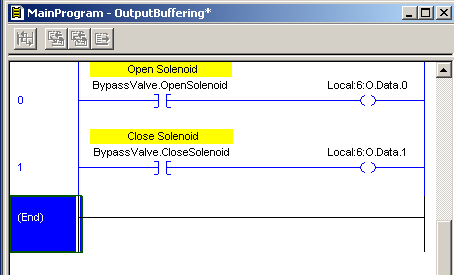
Likewise, repeat this process until all of your outputs are buffered. Notice the user friendly tags are moving onto the real world output this time.
Main Logic
In your main program logic, use the buffered tags in your code. the inputbuffering, and output buffering tags take care of the rest!
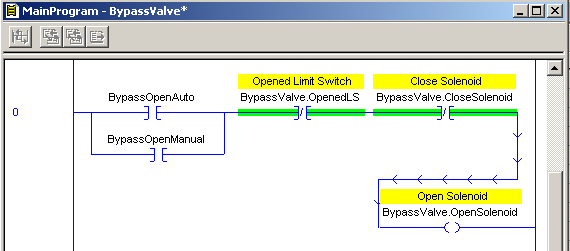
Here is a sample of how you might use the buffered tags.
— Ricky Bryce