
Introduction to Arduino Blink Without Delay
The Arduino Blink Without Delay example allows you to blink a light without using the delay() function in the Arduino IDE. In short, this means you are not stopping the logic from scanning. This, you can execute other instructions while the light is waiting to turn on or off. Conversely, the delay() function pauses the execution of logic. This means the arduino cannot perform other functions while the delay() function is executing.
If you are simply blinking a light, this is not a problem. On the other hand, in large programs, blinking a light might simply indicate that certain logic is executing. Generally, we do not want to pause all of the logic.
Another use for this feature is simply to execute certain instructions at specific intervals. We do this without delaying the entire process.
In this post, we’ll take a look at the Blink Without Delay example line by line. You will find the “Blink Without Delay” examples on most installations. This is under File | Examples | Digital | BlinkWithoutDelay.
How it Works
BlinkWithoutDelay simply works by looking at the system clock. We take a snapshot of the current time. After that, we let the logic continue to scan. When we detect that a certain amount of time has passed, we execute a block of code. Basically, you are figuring out how much time has passed to determine if it’s time to execute a block of logic. We do this while other logic continues to execute. Conversely, the delay() function will pause the execution of your void loop() routine.
Set the Variables
Before we begin, there are some variables to initialize. Let’s take a look at those variables in the example.
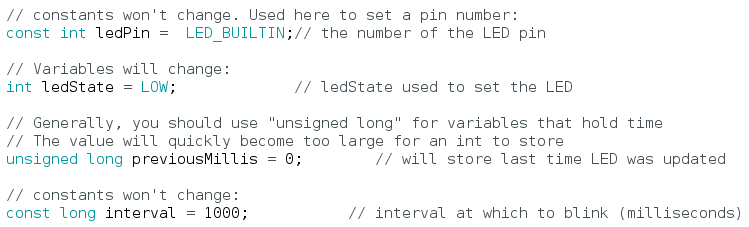
Our ledPin variable defaults to the LED that is built into the board. Typically, on an UNO, this will be 13. Likewise, we initialize the ledState, which will start as LOW, or 0.
We’ll use previousMillis to take a snapshot of the system clock. We’ll see how this works later on.
We use the interval setting to determine how long an event will wait before executing. In this case, the interval setting is 5000 milliseconds, which is 5 seconds.
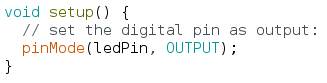
Setup Function
In the void setup() function, we simply declare our led pin as an output.
Loop Function
This is where most of the work gets done to blink a light without a delay. Before discussing the logic, let’s take a look at the code.
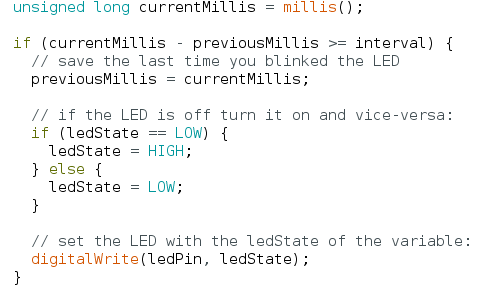
First, we update the current milliseconds of the system. We store this to the tag “currentMillis”. It’s important to realize that the value of previousMillis is still 0 during the first scan.
Secondly, look at our “If” Statement. Remember, the currentMillis is constantly updating, and previousMillis is still 0. The currentMillis variable us always incrementing. Remember this whole loop is also constantly executing, top to bottom, then restarting again.
When currentMillis – previousMillis is greater than or equal to the interval, the logic executes. Since previous Millis is still 0, when currentMillis get to 5000, the statement is true, and the logic executes.
At this point, previousMillis become 5000 in the next line (or close to that, depending on the execution time). Our “If” statement will then become true again when the currentMillis get to 10000. Then 15000 and so on.
Each time the first “If” statement is true (every 5 seconds), the ledState tag flip-flops.
For more beginner examples, visit the beginner’s category page!
— Ricky Bryce