
Introduction to Node-Red with Mosquitto
At this time, I would like to explain how Node-Red with Mosquitto can enhance your ability to communicate between devices. For example: if you have an ESP32 or ESP8266, you can publish data to a Mosquitto “broker” and another device can receive that data. In contrast, the ESP could also receive data that is published from another device. This could be a ControlLogix processor, or even weather data from the Internet. Mosquitto is similar to your post office. You have many places to put (publish) your data, and any other device can view that data. By using Node-Red with Mosquitto, your options for exchanging data are greatly expanded.
Installing Node-Red and Mosquitto
I’m using a Raspberry Pi to serve Node-Red and Mosquitto. That is the example I will use in this post. In contrast, though, you can also use a laptop running Linux, or even a windows based OS.
To install Node-Red on the raspberry pi, I just ran this command as the pi user:
bash <(curl -sL https://raw.githubusercontent.com/node-red/linux-installers/master/deb/update-nodejs-and-nodered) --node14I found that command on Node Red’s support page.
Mosquitto is also easy to install. I simply typed: sudo apt-get install mosquitto* That will install both the broker and the client packages. Keep in mind that by default those packages are not secured. Eventually, you will want to add a password to Node-Red, and maybe even to the Mosquitto broker. In this case, my Raspberry pi is behind my firewall, so I’ll set up the security at a later time.
Using the Node-Red interface
Before starting, we’ll need to know the IP address of my raspberry pi. To get this information, I’ll go to the linux terminal, and type “ifconfig”. In contrast, if you are using windows, this command would be “ipconfig”.
To access Node-Red’s interface, I’ll just type the IP address and the port number into any web browser on my network. In this case, the address will be 192.168.1.157:1880.
Publishing to Mosquitto from Node-Red
By default, in Node-Red, you have both an MQTT In node, and an MQTT Out node. Let’s start with the MQTT Out node. In this example, I’ll just use an inject node to simulate generic data. Afterwards, you can replace the inject node with another node that receives data from a ControlLogix processor, or even Weather information over the Internet.
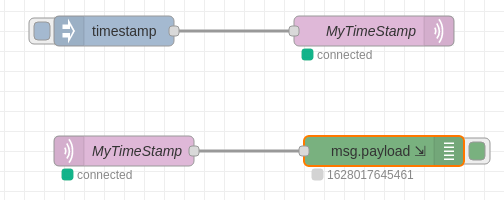
Let’s add the MQTT Out node, as well as an inject node, to send timestamp data to MQTT.
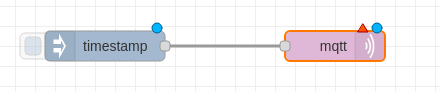
Now, we need to configure the MQTT Server. Double click the MQTT Out node.
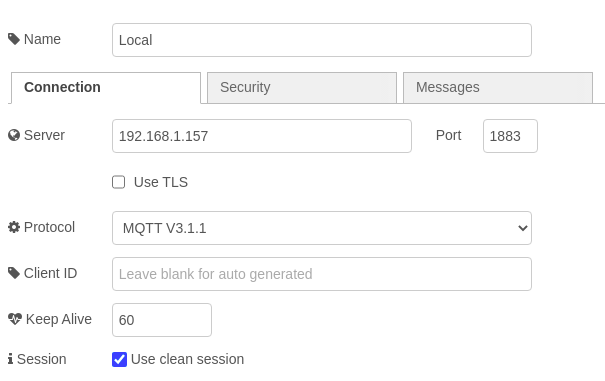
At this point, we’ll click the pencil to configure the MQTT Server.

I set up my server as follows. Keep in mind that I’m not running security. You will want to read up on MQTT and Node-Red to eventually add security.
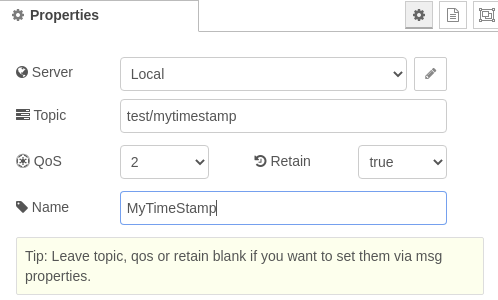
After you click update, just make up a topic that is not already in use as shown. MQTT will create a memory location to store this new topic.
Receiving Data from MQTT
At last, we’ll test our work by reading the MQTT topic with an MQTT In node.
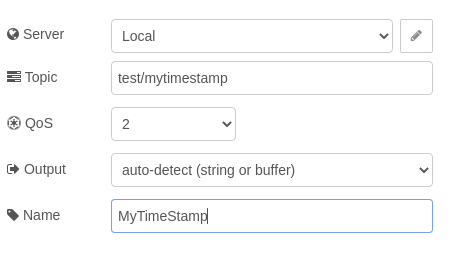
I’ll set up the MQTT In node as follows (with a debug node).

Next, I’ll double click the MQTT In node. I’ll configure the MQTT In node as follows:
Finally, we’ll deploy the changes to see if our data can make the round trip! I’ll click the left side of the inject node to inject the timestamp into MQTT. After that, the MQTT In node should read this value, and display the timestamp data on our debug node.
Now that Node-Red is working with mosquitto, you can use some example code on other devices, such as an ESP32, or ESP8266. Simply configure the ESP to look for the published topic as the IP Address of the MQTT broker,
For more information on Node-Red, visit the Node-Red category page!
— Ricky Bryce