
Introduction: Connecting to the PAL-1 Computer
When Connecting to the PAL-1 Computer, we need a straight serial cable. That is to say, pin 2 on one end of the cable connects to pin 2 on the other end. Pin 3 on one end, connects to pin 3 on the other end, etc. In other words, don’t use a Null-Modem cable, or a Null-Modem adapter.
The PAL-1 Computer uses a 6502 processor, and has an RS232 Communication port. This is a clone of the KIM-1 Computer. The default communication rate is 1200 baud with 1 stop bit and no parity. The word length is 8 bits. It does not use any hardware or software flow control. You can communicate with this computer using a terminal, or a terminal emulator. If you wish to use a stand-alone VT-100 terminal (emulator), check out my post about Geoff Graham’s project. If you connect from a modern computer, you can use terminal emulators such as Minicom for Linux, Putty, TeraTerm, or RealTerm. Just be sure to set up your terminal for 1200/8/N/1.
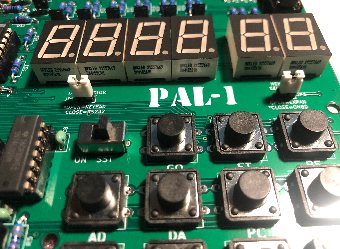
Set Up the Jumpers
Before we begin, you will want to check your jumper configuration. Since we are connecting over RS232, the jumper on the left (under the 6 digit display) should be closed. Additionally, be sure you have the right jumper set up properly for your system’s RAM. You can use either the onboard RAM (Closed), or external RAM (Open). Only use the external RAM setting if you purchased a separate RAM board, and connect it to the computer.
Connect Your Serial Cable
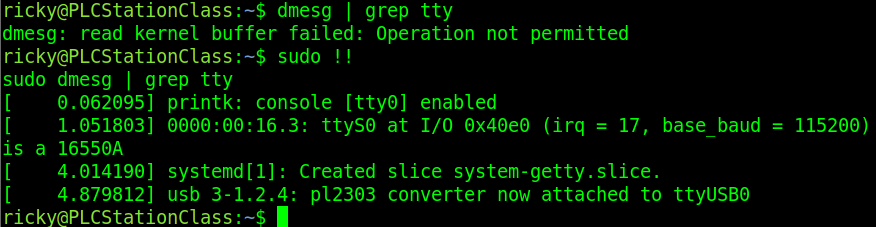
Obviously, if you have a PC, you may not have a built-in serial port. In this case, you can use a USB, or ExpressCard adapter that gives you a serial port to work with. If this is your only port in Linux, it will likely be /dev/ttyUSB0 (for a USB-Serial Converter). use “sudo dmesg | grep tty” to find this. In Windows, simply use Device Manager, and look under your “Ports”.
Set Up Your Terminal for Connecting to the PAL-1 Computer
Different terminal emulators have various ways of getting to the settings. Usually, this is very easy to find. In this case, I’ll walk through the configuration of Minicom for Linux.
First, I’ll start minicom with the command “minicom -D /dev/ttyUSB0”.
At this point, press CTRL-A then Z to configure your terminal
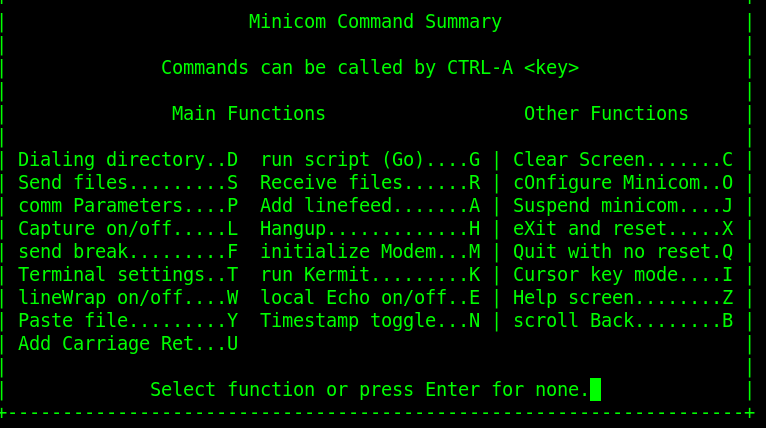
Now, tap “O” to configure Minicom:
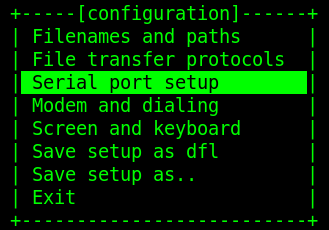
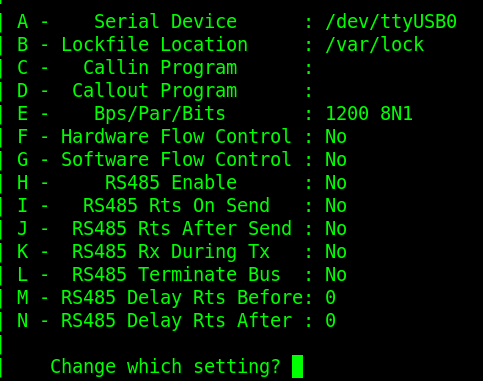
Next, scroll down to Serial Port Setup
Now press “E” to adjust the baud rate. Since we do not see 1200 baud, press the letter “B” until you have the correct setting.
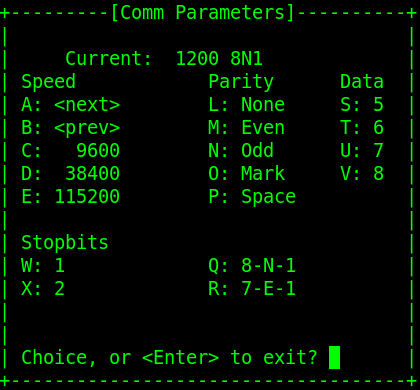
Press Enter, then press “F” to shut off Hardware Flow Control
That’s it! Now press Enter, then Exit.
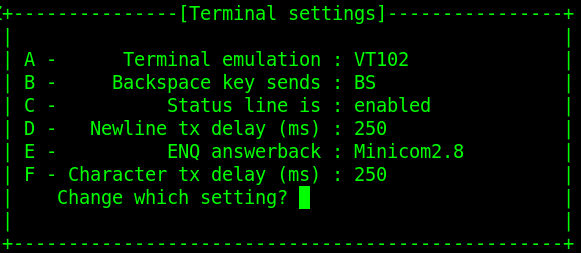
Later on, if you paste programs into your terminal, you will also need to adjust the character and line delays. This is in CTRL-A, then Z. Tap T for the terminal settings. You can start off with 250ms delay on each, which will be very slow, but should be reliable. You can experiment with this to get the delay as low as possible without getting errors.
At this point, simply press RESET on the PAL-1, then ENTER a few times on your terminal.
You should now see Data from your PAL-1! You can read up in the manual on how to enter programs, and navigate through the memory.
Summary of Connecting to the PAL-1 Computer
In Short, just make sure you have a straight through cable, and know your port settings. After that, you can start your terminal emulation program, and configure it to use this port. Be sure to start with your settings of 1200/8/N/1. You will also want to set character and line feed delays. Reset the PAL-1, then press enter, and you should be communicating! Keep in mind that with your jumper set to RS232, you will not see any display on the PAL-1 at first. You will only start off with a display if the jumper is set to Keypad mode.
For more information, visit the KIM-1 Section of my website!
— Ricky Bryce