
Introduction to Logging Switch Changes in ControlLogix
Today, we’ll be Logging Switch Changes in ControlLogix. Basically, we are creating a “black box”. This procedure works for any WORD in the ControlLogix processor. For example, we can also log alarms and faults. Later on, you can go back and see a history of the switch changes with a timestamp. In this example, we can log up to 32 state changes within the same word.
Although there are many ways to accomplish this, we’ll be using Indirect Addressing. Basically, indirect addressing allows us to have a variable address.
First, we’ll need to get the system time with the GSV command. After that, when a switch change occurs, we need to log that change along with the system time.
Keep in mind that large arrays will use a lot of memory. In this case, we’ll limit the number of changes to 200. Since this is indirect addressing, we need to be careful. We don’t want to index past our log file’s array. Obviously, that will fault the processor.
We are just monitoring one input module for this example. You can modify the code and array sizes if you need to monitor more than one input module. You can use this log for troubleshooting intermittent problems, alarm state changes, or to simply monitor operator input.
Create our tags for Logging Switch Changes in ControlLogix
Before we begin, we’ll need to make some tags in Studio 5000. I’m going to create an extra tag which will represent the current state of our switches. Obviously, you can substitute any tag for this. For example, your switches to monitor might come from Local:5:I.Data instead of CurrentSwitchState. Let’s create the tags:
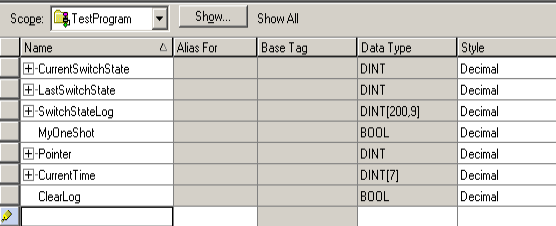
As I said before, CurrentSwitchState represents the current state of our switches. To detect changes, we’ll also have a tag called “LastSwitchState”. Additionally, we’ll have a SwitchStateLog. Notice the data type. This is an array of DINTs, which is 200 x 9. This allows us to log 200 changes. For each log entry, we will have 9 elements. This will consist of 7 elements for the current time. Also, we’ll log the last state of the switches as well as the current state of the switches.
We’ll need “MyOneShot”, and we’ll use this along with “ClearLog” for clearing the log file. The pointer tag will index us through the log file. CurrentTime will contain our system time, but you might already have a tag for this in your own program.
Get the System Time (Assumed Rung)
If you aren’t already getting the system time in your program, we’ll need a GSV Command. We’ll use the LocalDateTime attribute of the WallClockTime object. We’ll simply store the result to CurrentTime[0]. Your GSV instruction will appear as follows:
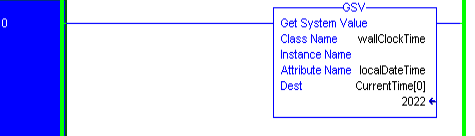
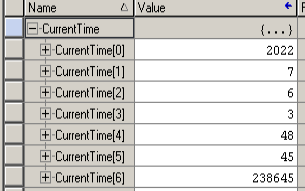
If you need to set your clock, simply go to “Controller Properties”. You will see a tab for “Date/Time”. In this case, the clock is correct. We can verify this by looking at the “CurrentTime” tag. These 7 elements are Year, Month, Day, Hour, Minute, Second, and MicroSecond.
Log Your Switches (First Rung)
At this point, we’re ready to write the logic to log switch changes. First, we’ll need to detect if a change occurred. If so, we will write the current time to our data log. Also, we’ll log the LastSwitchState, and the CurrentSwitchState. Additionally, we need to update the LastSwitchState tag after we log the data. That way, we are all set up when the next state change happens. We also need to increment our log file pointer.
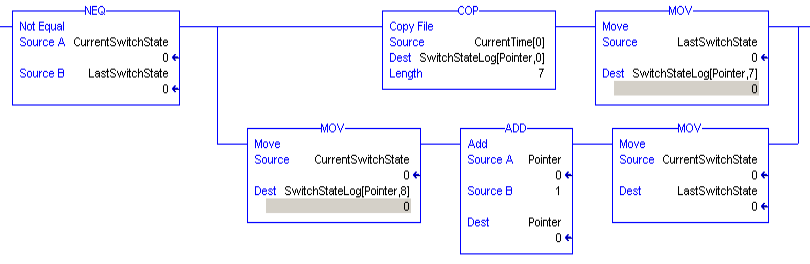
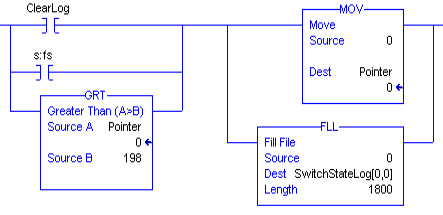
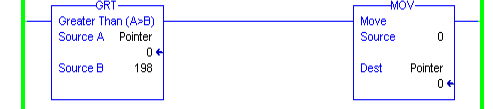
At this point, your log file should be working, however, we run a severe risk of faulting the processor. If this is production equipment, don’t finalize your edits just yet. We need a way to keep the pointer from going past 199. We’ll create another rung of logic for that. Let’s look at what we have so far.
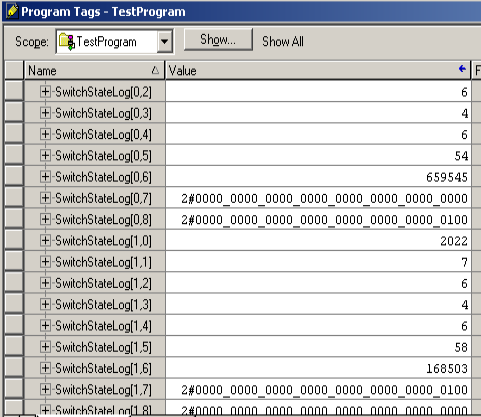
As you can see, the operator pressed a button at 4:06am (and 54 seconds), which connects to bit #2 of the input module. Four seconds later, the operator released that button. It went back to zero.
Clear the Log File (Second Rung — Multiple Examples)
As I said before, the above rung will eventually fault the processor. This is because our pointer will run past the length of the log file. We need a way to reset the pointer. Additionally, we’ll clear the log file. This makes the new data easier to see. However, you may not wish to clear the old data. You might want to simply overwrite the data with new data. That way, you’ll always have a history of the last 200 changes. In that case, you would simply omit the FLL command in the logic below. Additionally, you might want to omit the “S:FS”, and “ClearLog” branches.
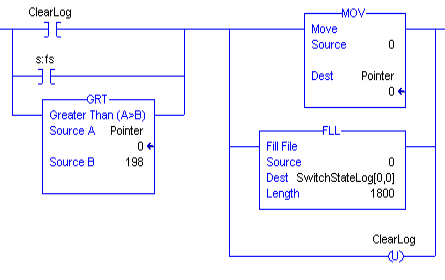
This logic resets and clears the Fault Log: Notice that we are filling “SwitchStateLog” with 1800 zeros. This is because we have an array of 200 x 9 elements. That is 1800 DINTs. The following logic allows you to hold the fault log in a “clearing” state, which basically stops the data log when “ClearLog” is high.
If you toggle “ClearLog” Manually from Studio 5000, your rung might look like this if you don’t wish to hold the log in the reset state:
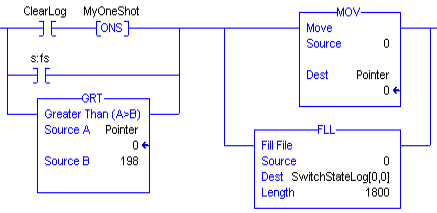
If “ClearLog” comes from a real world input, then your logic might look like this:
To simply reset the pointer, without clearing the history, your logic might look like this:
Summary of Logging Switch Changes in ControlLogix
In short, our logic will log any changes in any DINT anywhere. Simply substitute “CurrentSwitchState” for the data you want to log. Keep in mind that this logic is for example only. Test the logic fully on a test stand before implementing it into production equipment. You can easily fault the processor. Also, be sure that the tags you use do not conflict with existing tags in your project. Always check your memory usage under controller properties. You don’t want to run too close to the maximum memory of your processor. If you wish to make this log file really nice, you could set up a UDT (user-defined data type) for each log element. That way, instead of seeing a simple index number, you will see user friendly element names in your log file. For the most part though, this setup will suffice.
For more information, visit the ControlLogix Category Page!
— Ricky Bryce