
Introduction to ControlLogix Preventive Maintenance Timer
For a ControlLogix Preventive Maintenance Timer, we just need to keep track of total run time. Once the equipment accumulates a specified number of runtime hours, we’ll energize a light. This light indicates that your equipment is ready for PM. At this point, your maintenance personnel can simply perform the PM steps that you require. After that, they will just hit a reset button to start the timer again.
Preventive Maintenance is important to minimize your downtime. This is especially true when your system is already down, and your maintenance personnel can locate parts of your equipment that could potentially cause downtime. You will always have breakdowns. Many breakdowns can be prevented, though, with a good PM program.
A retentive timer (RTO) alone is usually not enough for some PM Schedules. The maximum time a timer will run is just under 25 days. In this case, we’ll combine the RTO with a counter. This counter will count our run hours. By doing this, we’ll get a maximum time of over 245 thousand years! In other words, you will not be limited on time with this combination.
Remember, this logic is for example only. It’s your responsibility to ensure the logic is safe to use on your equipment, and follow all guidelines at your facility.
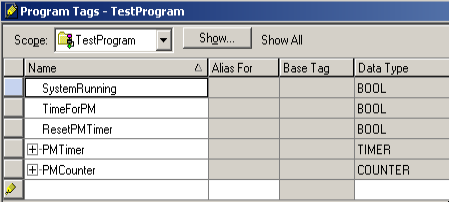
Create Your Tags
First, there will be a few tags we have to create. In this case, I’ll simply have a bit that indicates the machine is running. Likewise, I’ll have a BOOL bit to reset your timer. You will need to map these to the real I/O or to your MMI (Man-Machine Interface) MMI Software can read and write directly to bits in your ControlLogix Processor.
Write Your Logic for the ControlLogix Preventive Maintenance Timer
First, we’ll add a rung that starts a timer when the system is running. This will be a Retentive Timer (RTO). Keep in mind, the RTO retains it’s accumulated value when the rung goes false. This allows us to keep track of the total accumulated runtime since the last reset. The preset on this timer will be 3600000, which is one hour.
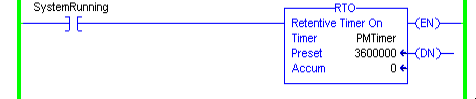
At this point, we are ready to add a counter. Each time the RTO is done (DN), we will use this bit to increment the counter. After we increment the counter, we need to reset the RTO. That way, it can start counting for the next hour. Be sure to put in the preset value. This will be the number of hours we want to count before turning on an indication that it’s time for our PM. In this case, I’m setting this at 500 hours.
Next, we are ready to write our logic that informs our maintenance crew that that 500 hours have elapsed. You can turn on a light with this bit, or flash a message on the MMI.

At last, we need to have a way for your maintenance personnel to reset the PMTimer and PMCounter. They will do this once they perform the maintenance. Keep in mind that if they do the PM Early, they can still press the reset button to start the timer over again.

Test Your Work
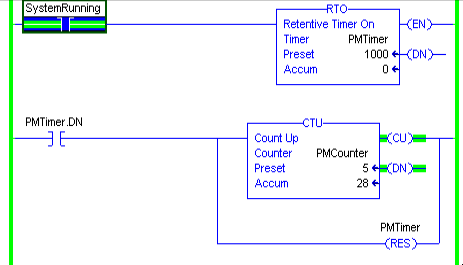
Obviously, for testing, we don’t want to wait 500 hours. You can temporarily lower the presets on the timer and counter. This will give you a value that is reasonable for testing.
As you can see, once the time expires, our bit goes true indicating that it’s time for PM.

Press the reset button, and your time should start over again. Obviously, if the equipment is still running, then your timer will restart right away. Be sure the RESET button is momentary. We don’t want to hold the timer and counter in a reset state.
Don’t forget to put your original values back into the PMTimer and PMCounter once your testing is complete.
For more information, visit the ControlLogix Category Page!
— Ricky Bryce