
Introduction to sending Arduino Temperature to ControlLogix.
In this section, we’ll send an Arduino Temperature to ControlLogix. Instead of an Arduino, you could also use the ESP8266. We’ll use the DHT22 sensor. Basically, we’ll just send this data over the serial port. Obviously, we need to also configure the ControlLogix to receive this ASCII Data. We’ll use a MAX232 to convert the serial TTL signal into RS232.
Writing the Code
Since I’m using an ESP8266 in this example, I’ll install the library “DHT_ESP8266”. In this case, I’ve modified the code to use GPIO 4 to read the temperature and humidity. Since every application is different, I won’t post the code here. You can use the example. Important to realize that I’ve modified the example to prefix humidity with H. Furthermore, I’ve prefixed the temperature with T. We then multiply temperature and humidity by 10, and send it out of Serial1. On the ESP8266, Serial1 is transmit only, and I’ve set the baud rate to 300bps.
For example, a temperature of 61.5 will be sent through Serial1 as T615$r$l using the Serial1.println function. The $r and $l are the carriage return and line feed added by the Serial1.println function. Likewaise, a humidity level of 41.5 will be sent as H415$r$l. In my logic, I’m sending the temperature every 10 seconds, then wait 1 second to send out the humidity.
Connect the DHT22
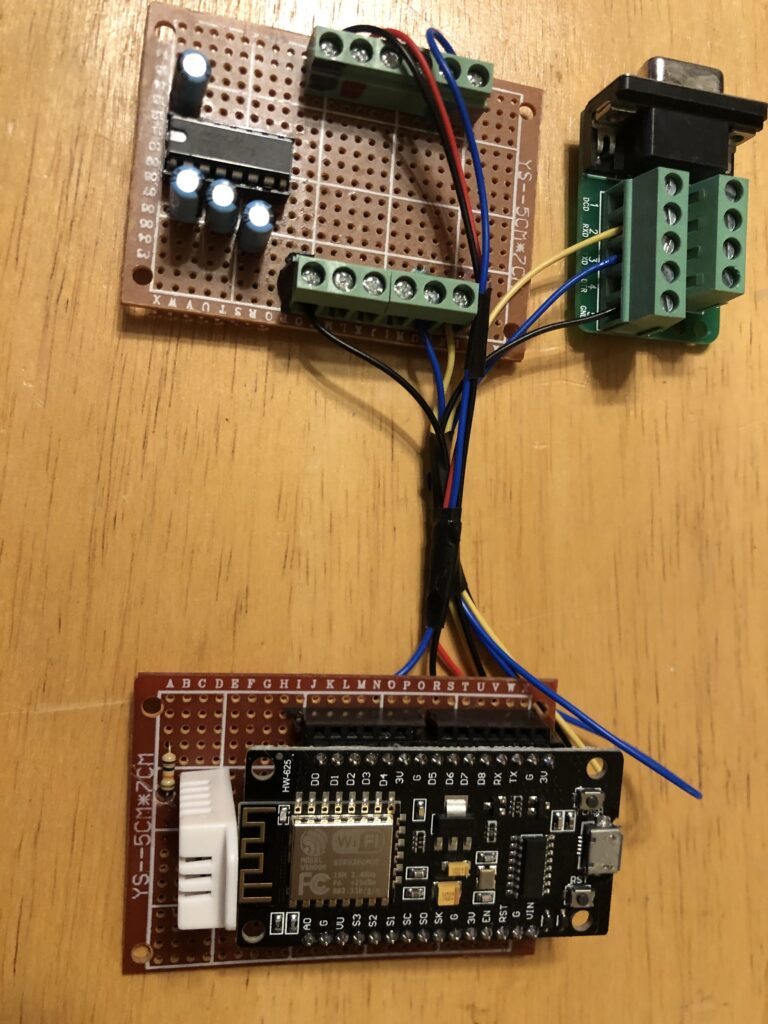
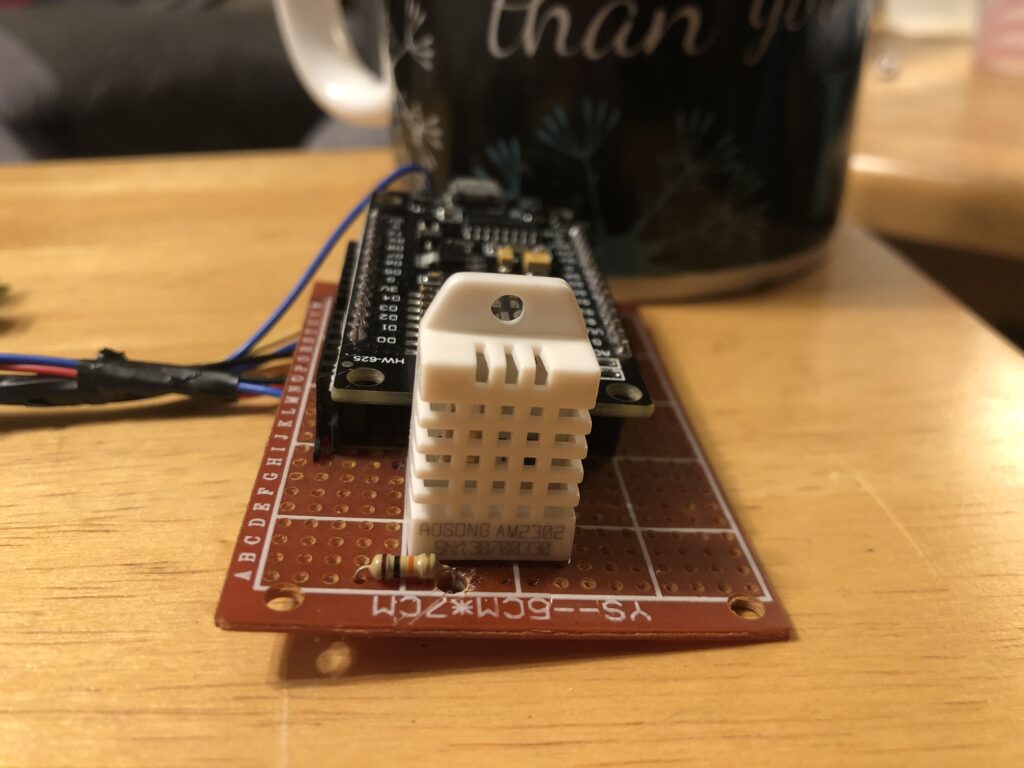
Wire the leftmost pin to +3.3v. Wire the rightmost pin to GND. Empatically, use a 10k pull up resistor. This resistor connects between 3.3v and the datapin, which is second from left. In this case, I’m wiring the data pin to D2 of the ESP8266, which is GPIO 4.
Connect the MAX232
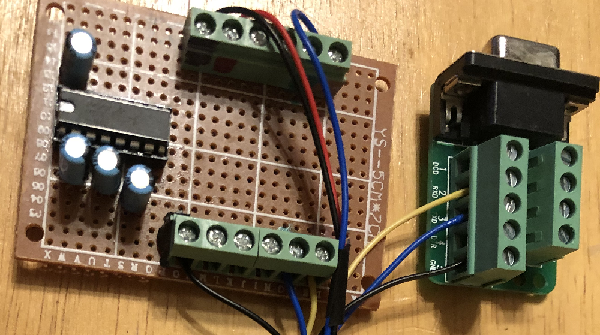
In this case, I’ve manually put together a MAX232EPE, and have added the 10uF charge pumps. However, you might want to purchase the modules that area already set up. GPIO 2 (D4) is wired to TX-In on the MAX232. Since we are not receiving any data, we only need to add the TX Line. I’ve also connected 3.3v, and Ground to the appropriate terminals on the MAX232 Module. TXOUT goes to pin 2, and GND to Pin 5 on the female 9 pin Dsub connector. To connect the D-Sub connector to the ControlLogix, use a straight through serial extension cable.
Configure the ControlLogix Serial port for sending the Arduino Temperature to ControlLogix
In Controller Properties, go to the serial port tab. Be sure to set up the baud rate that you used for Serial1.begin() in your Arduino IDE.
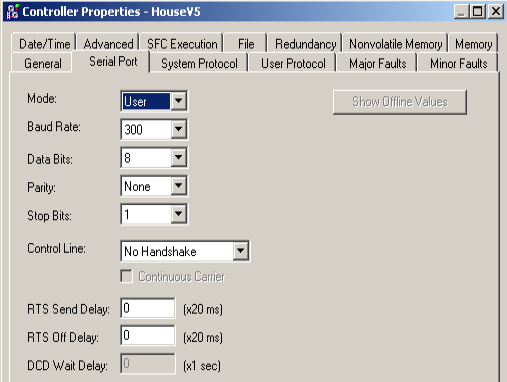
Next be sure to set your user protocol to ASCII. Set your termination characters to $r and $l.

ControlLogix Instructions for sending Arduino Temperature to ControlLogix
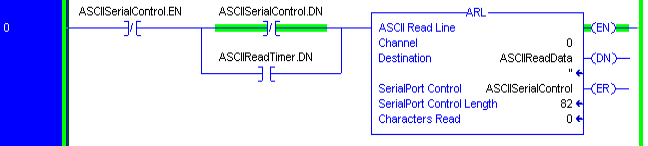
At last, you are ready to read data from the serial port. We’ll use the ARL instruction for this. The ARL takes data from the serial port, and stores this to a string named ASCIIReadData. The tag “ASCII Serial Control” is a “SERIAL_PORT_CONTROL” Data type.
After that, we’ll check to see if we are reading temperature, which has the prefix T. If so, we’ll store this to the appropriate tag. Notice that an ASCII Value of 84 would be a capitol T. The STOD converts the string to decimal, stripping the non-numeric characters.
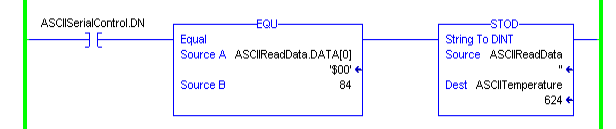
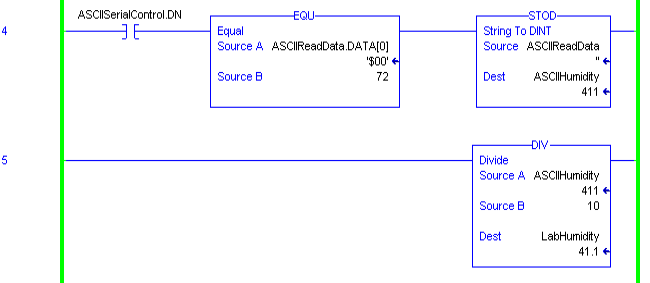
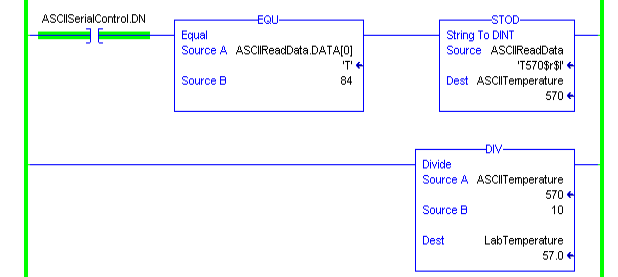
This value has no decimal point. We multiplied it by 10 before sending it out the serial port to simplify communication. Therefore, we need to divide the value by 10, and store it to a tag with a REAL data type.

Likewise, we’ll do the same for the Humidity.
At last, I’ve added a timer to restart the ARL.

If it’s working, you can see the string comes in as ASCII. Next, the value is stored to the tag “LabTemperature”.
For other advanced projects, visit the advanced category page!
— Ricky Bryce