Introduction to ControlLogix Counters (CTU and CTD)
We use ControlLogix Counters (CTU and CTD) to count transitions of a rung. More specifically, to count the false to true transition of a rung. We can use this to count pallets on a conveyor using a photo eye or proximity switch. Also, we can use counters to count the number of starts attempts on a motor. The operator might attempt to start a motor too many times within a specific time period. If this happens, the operator can be locked out, and prevent additional restarts until the motor has time to cool.
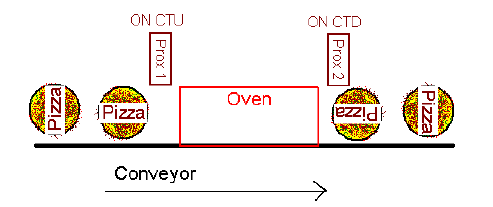
There are two types of counters: The CTU (Count Up) and CTD (Count Down) instructions. You won’t always use the CTD instruction, but if you do, it’s almost always used in conjunction with a CTU instruction. You can use this to keep track of parts within a certain area of a conveyor: When a part enters a certain part of a conveyor, you can use the CTU instruction. When a part leaves a specific area, you can use the CTD instruction. This would take a count off of the total accumulated value. Therefore, the accumulated value represents the number of parts within a certain area of a conveyor. If the conveyor gets jammed, and you have to remove all of the parts from the conveyor, use the RES (reset) instruction to clear the timer.
Here is a good example:
Create your tags
Next, we’ll go to Controller tags, and be sure you are in “Edit Tags” mode. Let’s create a tag called “MyCounter”, and give it the “COUNTER” Data Type. Remember that a data type is just the way data is structured within a tag.

Now, we’ll expand “MyCounter” by pressing the “+” next to the tag, and we’ll discuss the components of the counter.
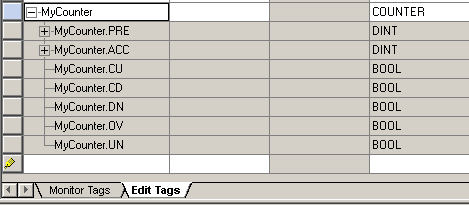
- The PRE is the preset of the counter. When the accumulated value is equal to (or above) the preset, the DN (Done) bit goes high on the counter.
- ACC is our Accumulated value. This will keep track of counts. For the CTU, each time the instruction goes true, the ACC increases by 1. On the CTD, each time the instruction goes true, the ACC decreases by 1.
- Our CU is the “Count Up” bit. This is true whenever the CTU instruction is enabled.
- The CD is the “Count Down” bit. This is true whenever the CTD instruction is enabled.
- We discussed the DN (Done) bit a little earlier. When the ACC is equal to or above the PRE with the instruction enabled, the DN bit goes high.
- Our OV bit is the “Overflow” bit. Contrary to what most believe, the OV bit does not necessarily go true when the ACC passes the PRE. This bit will go true when the counter’s accumulated value passes the maximum number we are allowed for a 32 bit signed integer. The maximum value is 2 147 483 647. If we count past this number, the OV bit will go high, and what the ACC shows is no longer accurate.
- The UN bit is the opposite of the OV bit. This is the “Underflow” bit. If you count down past -2 147 483 648, then the UN bit is set.
Add the logic for ControlLogix Counters (CTU and CTD)
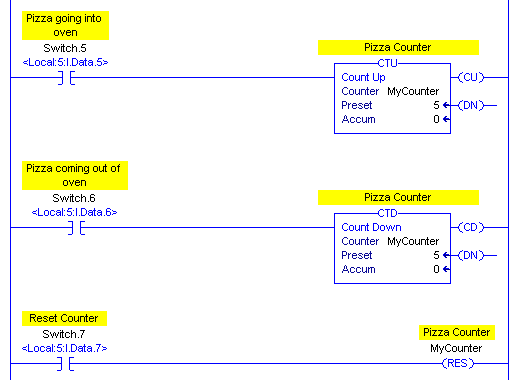
Let’s add the following lines of logic so we can test our work.
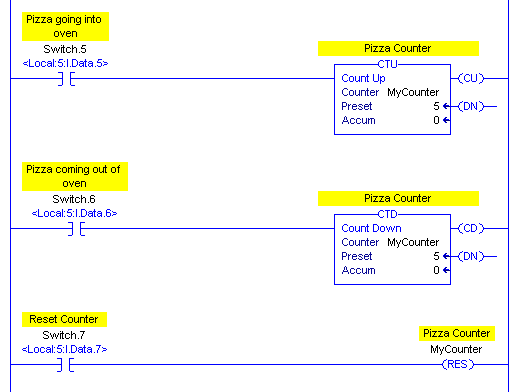
Now, watch the accumulated value as you hit switch.6. Every time you press switch.6 the accumulated value increases by one. Every time you press switch.6, the accumulated value decreases by one. You will notice that the accumulated value is the same on both the CTU and the CTD instruction. This is because “MyCounter” is your actual counter. It’s just that the CTU instruction increments this value, and the CTD instruction decrements this value. Run your counter up to 5, and you will see the DN bit goes true.
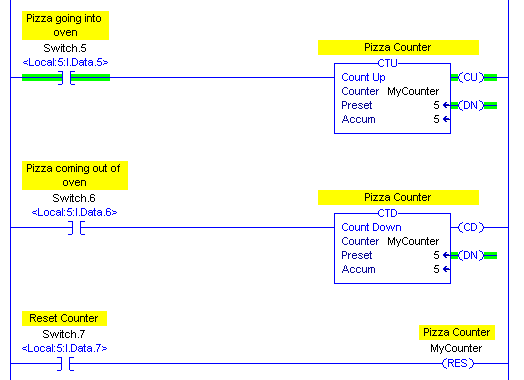
Now, we’ll shut off switch.5, and press the reset button (switch.7), and you will see that everything goes back to zero (except for the preset).
Summary of ControlLogix Counters (CTU and CTD)
In summary, ControlLogix Counters simply count rung transitions. The count occurs on the false to true transition. You have an up counter (CTU) and a down counter (CTD). Basically, this counts the number of times that a bit goes true. For example, you can use a counter to count the number of parts going by a particular place on a conveyor. When you use this with a down counter, you can count the number of parts in a particular zone.
Specifically, though, for us as troubleshooters, they do come in handy. Let’s say I suspect a problem with a guard door or estop. You can place a counter on each guard door or estop. When the machine shuts down, just go back to see which counter incremented.
Use the RESet instruction to set all counters back to zero. It’s important to realize that the maximum count is 2147483647. One more, and the counter overflows. If you need a number larger than this, simply cascade the counters. For example, one counter might count to 1 billion, fire another counter, and reset itself.
For more information, visit the ControlLogix post page!!
— Ricky Bryce

Pingback: Toggling bits in the ControlLogix processor using Ladder Logic.