
Introduction to running the Altair-Duino on the Internet (Altair 8800)
In this post, we’ll discuss how to run the Altair-Duino on the Internet. The Altair 8800 is a computer born in 1974. It was the first successful home PC. At this time, it gave computer enthusiasts a way to learn and enjoy micro computers. Up until that time, only businesses would own a computer. One example of a popular business computer was the PDP. Although the switches and lights look intimidating, it’s a very fun PC to learn on. At this time, the price of an Altair (today) would be around $5000 if you can find one.
It’s important to realize that it takes a lot of work for developers to allow us to enjoy a less expensive version of the Altair. I appreciate their hard work very much.
We aren’t going to be able to browse web pages as you would on a modern computer. Instead, we can access BBS systems over Telnet. BBS is an acronym for Bulletin Board System. Before the Internet, these were very popular. Folks who owned a computer at that time could simply dial into them. This would allow you to post messages, upload/download files, send messages to other users (email), and read news articles. Some BBS systems are tied into other networks such as FIDO net, which greatly increases the scope of your experience.
What you Need
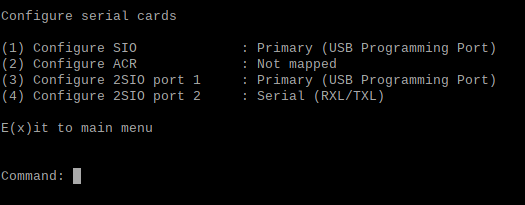
You will need a way for your Altair to access the internet. Nowadays, the most popular way is with a wifi modem. Specifically, you might use the ESP-01s. Chris Davis put together a good page on how to set this up. In my case, it’s under 2SIO Port 2 in the Configuration editor. To access the configuration editor, simply hit stop, and aux-1 up at the same time.
You will also need another way to connect to the Altair besides the wifi modem. On the Altair-Duino PRO, you can simply use the VT100 emulator that is built in. Otherwise, just use the USB connection to another computer as you normally would. It’s important to keep the WIFI modem open just for the purpose of connecting to the Internet. Additionally, be sure your WIFI modem is connecting to your router over WiFi.
Booting IMP
Generally, the modem software for your Altair is already built in. This is on Disk 12. Be sure to power up your Altair-Duino in a configuration that the WIFI modem is not in use for your personal terminal…. For example, the Programming Port. Keep in mind that your WIFI modem is also on 2SIO Port 2 in this configuration. I have the processor set to Intel 8080 emulation.
Turn on Switches 12, 4, and 1. Press AUX 2 Down to mount the disk. At this point, shut all of your switches off except for switch #3. Press AUX 1 Down to boot up to the CP/M disk which contains IMP.

Type IMP8 to load the 8 bit version of IMP.
Connecting to a Telnet BBS
IMP has a feature built in to the command menu called “CAL”. We will not use this. It will only dial numbers. Instead, we need to type “T” to go directly to terminal mode. We will issue a command directly to the modem itself. Generally, modem commands are “AT” (Attention) Commands. We’ll type the command: ATDT (hostname):(Port). For example, I’ll type ATDT ETHERNETGATEWAY.COM:23. Be sure to put a “space” after ATDT. Your Altair-Duino should now connect to the Internet. Once you sign in, you might want to go to Terminal Settings to set up a straight ASCII configuration on the BBS. Ethernetgateway.com was simply a test BBS I set up temporarily. You can check out a list of actual BBS sites here.
Keep in mind that CTRL-X then E will escape back to command mode.

Summary
In short, the procedure is simple. Just be sure you have a WIFI modem on the right port. Boot to IMP, and run IMP8. After that, type T for terminal mode. Then enter “ATDT (domain):(port)”.
If know of any suggestions, or ways to clarify any part of this post for new users of the Altair-Duino, please comment below!
For other posts on computers, and information technology, visit the category page.
— Ricky Bryce
For reference, I’m pasting a list of the IMP modem executive commands:
Command mode:
M – Display the menu
? – Display current settings
E – Terminal mode with echo
L – Terminal mode with local echo
T [name.ext] – Terminal mode [capture to fname.ext]
R[K] name.ext – Receive an 8-bit binary CP/M file via XMODEM [in 1k mode]
S[K] name.ext – Send an 8-bit binary CP/M file via XMODEM [in 1k mode]
BYE – Disconnect, then return to CP/M
CAL nnnnnnnn – Dial number
CPM – Exit from this program to CP/M
DIR – List directory and space free (may specify drive)
DSC – Disconnect from the phone line
ERA – Erase file (may specify drive)
LOG – Change default drive/user no. (specify drive/user)
and reset disks i.e., LOG A0: or LOG B: (user # unchanged)
SPD – Set file output speed in terminal mode
TBM – Toggle MODEM7/KMD batch mode selection
TCC – Toggle CRC/Checksum mode on receive
TIG – Toggle ‘ignore CTL characters’ on/off
TLF – Toggle LF after CR in “L” or “T” mode for a disk file
TRB – Toggle rubout to backspace conversion
WRT – Close current capture file
^Z – Clears screen
CTRL-X [0-9] – Function key intercept character, then (0-9)
Terminal mode:
CTRL-X E – Exit to command mode
CTRL-X F – Send file to remote system
CTRL-X L – Send log-on message
CTRL-X N – Disconnect from the phone line
CTRL-X P – Turn printer on (or off)
CTRL-X Q – Send break tone
CTRL-X Z – Clears screen
CTRL-X R – Stop copy into buffer
CTRL-X Y – Start copy into buffer
CTRL-X [0-9] – Keyboard macros