
Introduction to Zeta V2 With ParPortProp
The Zeta V2 With ParPortProp is a Z80 computer with 512k RAM/ROM. This machine is fully capable of running CP/M, and you have several options for storage. First, you can store files to an SD module. Secondly, you can use a Floppy Disk drive. The ROMWBW Firmware will recognize 8 slices on your SD Module by default. Each slice shows up as a drive letter.
Building the Zeta V2
Getting Started
A listing of everything you need is on the Malinov website. In fact, you don’t even need the ParPortProp board unless you need the keyboard and VGA features on your machine. We’ll talk more about the ParPortProp later in this post.
There are no surface mount components to worry about. As a rule of thumb, you’ll usually start with the lowest profile components first. This would be the resistors, etc. Basically, most of the components are about the same height on this board. I would be sure to put the capacitors in place before adding the ic sockets. They are a bit easier to get in place without the IC sockets installed. Additionally, be careful if you use cheap IC sockets. If you aren’t careful, you could push a pin through the socket.
Another option is to purchase a board that is pre-assembled. Here is a board that I purchased from Ebay:

Modifications
There are a few modifications you can make. For example, you can eliminate the DS1302 RTC module if you don’t need a system clock. Additionally, you can eliminate the DS1210 if you don’t wish to backup the RAM. Another modification is to eliminate the MAX232 if you only wish to use TTL. You will need to install some jumpers for these mods, so be sure to read the mods section of the Malinov Website.
Obviously, you will need to burn the firmware. You will find this on the ROMWBW site. In my case, though, I purchased a kit from Ebay that has all of the IC’s I need. The ROM was pre-loaded with ROMWBW.
When you are finished, supply the board with a regulated 5V supply, and connect to a terminal Emulator. The default settings are 38400/8/N/1. Hit RESET. If you have JP1 in place, you should see the bootup screen!
Building the ParPortProp
The ParPortProp board allows you to connect a VGA monitor, and PS/2 keyboard. For this reason, you do not need to rely on another computer as your terminal. This board also has an SD card slot. This is the only surface mount component I can think of.
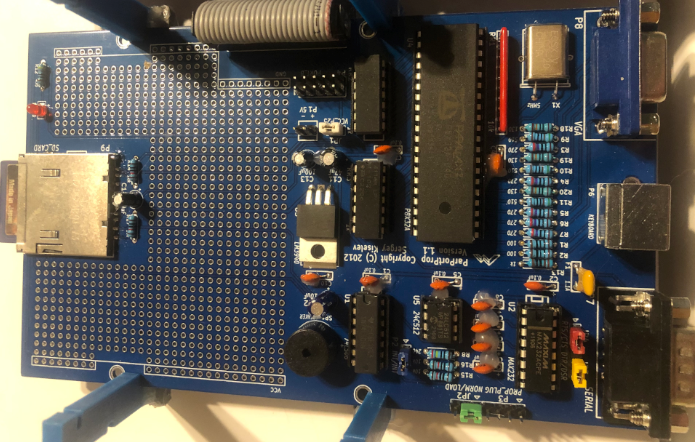
You will need to burn the Serial EPROM for the propeller chip. Typically, the ParPortProp mounts on top of the Zeta V2 board. As you can see, I’m reversing that by using a ribbon cable. Once your board is complete, be sure to remove JP1 on the Zeta V2. Otherwise, the machine will use the wrong port for the terminal. Another key point is the place JP2 on the Zeta V2 board into the “Pin 25” position. If you set this incorrectly, it’s possible to create a short to ground.
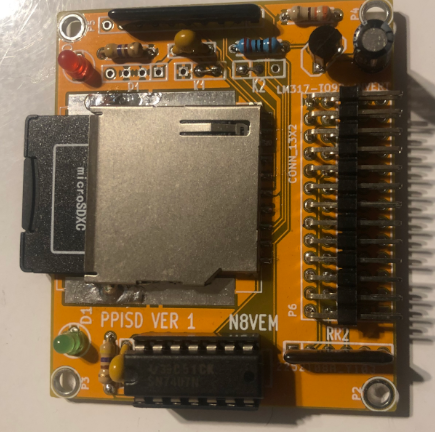
The PPISD Module
N8VEM created a module that allows you to use the SD Card without the ParPortProp. Recently, the Propeller chips are hard to come by. This allows you to leave JP1 on the ZetaV2 board in the “CONFIG” position. You can access your machine through a terminal emulator on another computer. This seemed to work well for me until I built the ParPortProp. Obviously, you will use a ribbon cable to connect the ZetaV2 to the PPISD module.
Summary of Zeta V2 With PartPortProp
In short, this is a good machine to start using the Z80 and CP/M. You can probably find a pre-built board, but it’s not as satisfying as building it on your own. Keep in mind that it’s not truly yours unless you build it with your own hands. If you are a beginner, it’s important to realize that it takes time and patience. Practice on some components on prototype board before trying to solder the Zeta system. There are plenty of YouTube videos to help you get started with soldering.