
Introduction of ControlLogix To Alexa
Today, we’ll discuss how to connect ControlLogix To Alexa. When a bit becomes true in the ControlLogix processor, we’ll have Alexa speak a specific phrase. Additionally, it’s possible to speak to Alexa to set a bit in the processor. However, for this post, we’ll just concentrate on making Alexa speak based on a value change in the ControlLogix.
Overview of my setup
In my case, I have a Raspberry Pi with Node-Red installed. You can, however, use other platforms such as Windows. My Raspberry Pi is connected wirelessly to my network. The ControlLogix has an Ethernet module which is on the same network as the Raspberry Pi. I’m also using an Echo Dot, which is on the same network. Obviously, to use the Echo Dot, you will need to have it installed in your Amazon Alexa account.
Install Nodes in Node-Red
Before we start, there are a couple nodes we need to add to Node-Red. First, we must install the Ethernet-IP node, and I’m also using remote2-applestrudel.
To add these, go to “Manage Pallet” by clicking the options in the upper right hand corner of Node-Red. I’ve also installed some Boolean nodes so I can add some logic later.

Add and Configure the Ethernet-IP Node for ControlLogix To Alexa communications
Before we begin, let’s set up our flow as shown:

The first node is our Ethernet-IP In node. Secondly, we have a function node. Lastly, we have an Alexa Routine node.
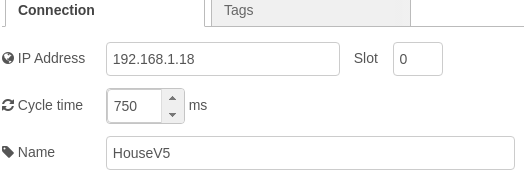
Now, let’s configure the Ethernet-IP In node. We’ll have to configure a new Ethernet End Point. Click the pencil.

Be sure to set up the IP address of your ControlLogix Ethernet module, and the Slot # of your processor.
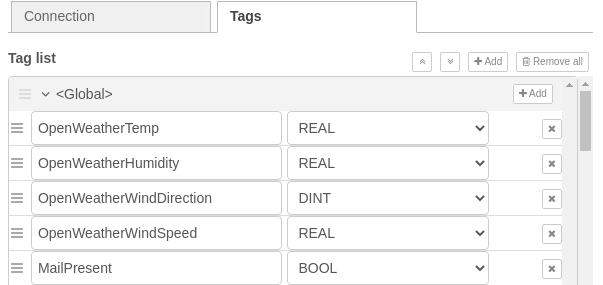
Next, click the “Tags” tab. We need to add the tags we wish to use. In this case, MailPresent is the tag I’ll be using. Be sure the data types you select for the tags match the data types of the processor. We are using Controller Tags, so they will be under “Global”. If you have program tags, you will have to create a new scope with the program name.
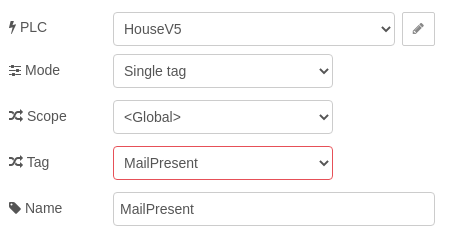
Furthermore, in the “Properties” screen, I’ll set up each field as follows:
Configure the Function Node
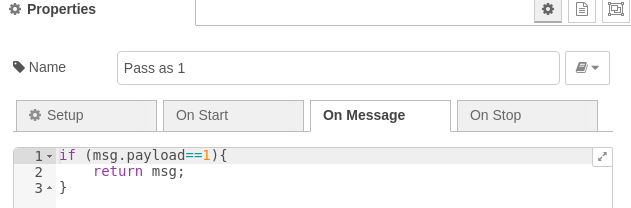
At this point, let’s set up the function node. This does not do a whole lot right now, but will give us more flexibility later on. For example: If we need to invert the value, or add extra data to send to the Alexa node, we can do that with our function.
Configure the Alexa Routine Node
Go into the configuration of the alexa routine node. If you have not done so already, you need to link to your Alexa account. To do this, click the pencil to edit your account.

Here is an example of my configuration. Be sure to set the path for the cookies. Otherwise, you will have to enter your password every time you launch the routine.

Just leave the other fields at default.
Deploy the project
Next, click “Deploy” in the upper right corner of Node-Red. You may have to open up the web browser on the local machine, and access port 3456 to enter your password the first time. Just type “localhost:3456” into the address bard of the web browser. Keep in mind, you must be running the browser from the server that node-red resides on. In this case, it’s my raspberry pi. If you do not have enough memory to run a graphical interface on the server, you can install lynx. After installing Lynx, you can use SSH to login to the Raspberry Pi (assuming SSH is enabled in raspi-config). Then you can access localhost:3456 to sign in with your alexa ccount.
That’s it! Your project should be ready to go. For more information on Node-Red, visit the Node-Red category page!
— Ricky Bryce