
Introduction to ESP32/8266 With MQTT (Mosquitto)
In this post we’ll use the ESP32/8266 With MQTT (Mosquitto). Furthermore, I’ll use the library EspMQTTClient.h with the SimpleMQTTClient example. MQTT is short for Message Queuing and Telemetry Transport. Basically, we just publish data to a broker that other clients connect to. Likewise, we receive data that other clients have published. To keep things simple, I’m not going to use any security. At anytime, you can google how to set up the security on various sites such as this one. For this example, we’ll just receive the Sunrise Hour and Sunrise Minute that another processor is publishing. Remember, to publish is to place data onto the broker, and when we subscribe, we are receiving data from the broker.
Hardware
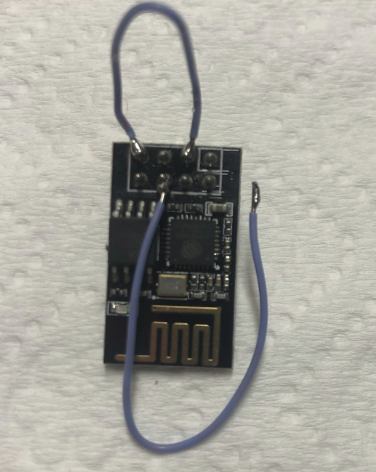
Obviously, your microprocessor must be network capable. Examples of processors you can use are the ESP32 and ESP8266. I’ve used the same library on both of these platforms. As a matter of fact, I even use the library on the ESP-01!
You will need to have a broker set up on your network. In this case, I have a raspberry pi, and I just installed this by typing “sudo apt update”, then “sudo apt install mosquitto mosquitto-clients”.
Next, you must enable the mosquitto service to run when the raspberry pi starts: “sudo systemctl enable mosquitto.service”.
You will probably want to make the IP address static. I did this by editing the /etc/dhcpcd.conf file. There are already good examples in that file for you to follow.
Accessing and Changing the Example file
Under Tools | Manage Libraries, be sure you have installed EspMQTTClient. This is by Patrick Lapointe. After that, you should find the example under File | Examples | EspMQTTClient | SimpleEspMQTTClient.
Altogether, are four sections of code that will concern you the most: Head, Setup, OnConnectionEstablished, and the void loop. Let’s walk through each of these.
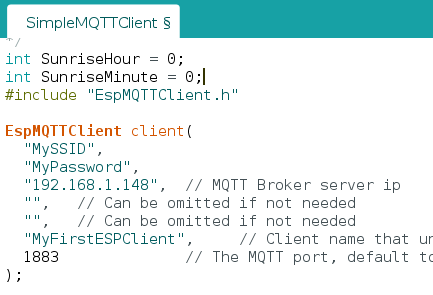
Head
Generally, we have just a few things to edit in the head. I’m going to declare a couple global variables that I will use later: SunriseHour and SunriseMinute. Additionally, set up your SSID, Password, and Client Name. Since we are not running security yet, I’ll just leave the MQTT Username and password blank.
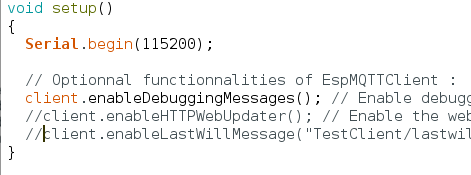
Setup
Again we are just keeping this simple. In Setup, I’m going to leave the debugging option turned on. At this time, I’ll just comment out the other two options by placing two forward slashes before the commands.
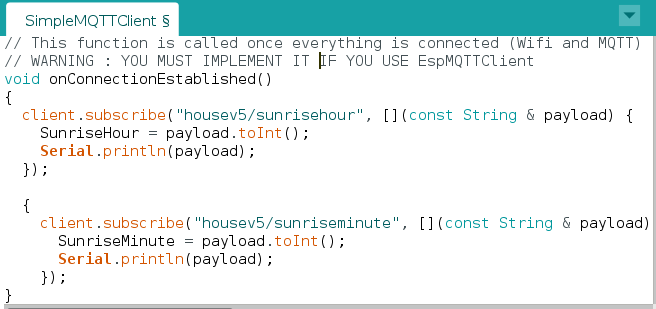
OnConnectionEstablished
This is the function where we do most of our work. We will subscribe to a topic that another processor is already publishing. I like to use integer values instead of strings, because of memory usage. For this reason, i’m placing “.toInt()” after “payload”.
Void Loop
This is where most of your logic belongs for your project. In this function, you would place code that utilizes SunriseHour and SunriseMinute. Obviously, you might send this to a display, such as the TM1637.
Above all, though, don’t forget to add the client.loop() handler! If you leave that out, your project will not work as expected.

Publishing Data to the Broker using ESP32/8266 With MQTT
Publishing data is very easy, and I’ll usually do that within the void loop(); For example, simply execute this command:
client.publish(“housev5/espcode”, String(AnyINTVariable));
Simply replace AnyINTVariable with your own integer tag.
Test Your Work
Finally, it’s time to upload the project to our processor. Be sure you have correctly selected the board and serial port that you are using under “Tools”. At last, click “Upload”.
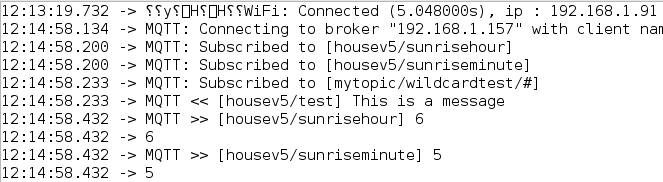
After your project is uploaded, immediately, go to tools, and open your serial monitor. Be sure you selected the correct baud rate. In this case, it’s 115200.
You should see the data changes printed to your serial monitor. If you miss this, just leave the serial monitor open, and reset your processor.
If you have an ESP-01, be sure to unplug your module, remove the jumper between IO0 and GND, then power the module up again to connect.
For more information on Intermediate type Arduino projects, visit the Intermediate category page!
— Ricky Bryce