
Introduction to Getting Started with Arduino
When Getting Started with Arduino, there are a few basic components your will need. First, you need an Arduino board. Good boards to start with include the Arduino Uno, Arduino nano, or Arduino Mega. In this case, we’ll simply use an Arduino UNO, which is probably the most common hobby board for beginners. You should also consider purchasing a starter kit. Typically, a starter kit will include a breadboard, jumpers, lights, and push buttons.
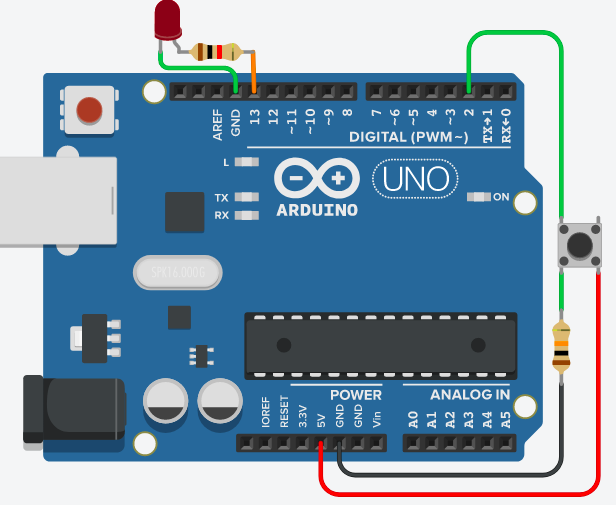
Consider the circuit below. We have an LED connected to pin #13. Because the voltage of the arduino is 5v, and the LED needs only 1.8 volts or so, we add a resistor in series with the LED. Obviously, the resistor creates a voltage drop that lowers the current flow, and therefore lowers to the voltage to the LED. We consider LEDs and other devices we control to be OUTPUTS.
Additionally, we have a push button. As you can see, when you press the button, pin #2 becomes high with 5v. When you release the button, we want the voltage of pin 2 to be at a known state. Without a doubt, we don’t want the voltage floating around on pin 2 if there is no connection whatsoever. This would cause unpredictable operation. That is why we have the 10K resistor. When you release the button, the resistor pulls pin #2 low. On the button, both of the left pins are electrically the same (top and bottom). Separately, both of the right pins are also electrically the same (top and bottom). I set up this drawing using TinkerCad.
Your first Sketch
Download the arduino IDE. You will find this at arduino.cc. Assuming you have a newer operating system, just install the latest version.
You will find some simple examples under the file menu at the top right. In this case, we’ll start with the DigitalReadSerial example. The purpose of this sketch is to read a value, and print that to your serial monitor. We will make some modifications to this sketch that allows the light to energize. Add the line “int ledPin=13;” to the bottom of the head of the code. It’s important to realize that any line beginning with // is a comment. Likewise, any code with the /* and */ tags are also comments. Additionally, you might use these comment tags to disable parts of your code for troubleshooting in the future. The head of the code (below) allows us to make some initial declarations.
It’s important to realize that you terminate each command with a semicolon.

By adding “int ledPin = 13;”, we created a variable called “ledPin”. It’s value is 13. Wherever we use ledPin in the sketch, that is basically the same as typing the number 13. It will always be 13 unless our code changes this value. The advantage of creating this variable is that if we ever change the location of our led, we only need to change the value of our tag in this line. That way, we don’t have to go through the entire code to change 13 to some other value.
Void Setup()
Void setup is where we take some initial actions. This routine will run one time when the sketch starts running on the processor. We need to declare that pin #13 is out output pin, so add the line “pinMode(ledPin, OUTPUT);” In this routine, we are configuring the serial port output to be at a baud rate of 9600. Additionally, we are now setting pin #2 as input, and Pin #13 as output.

Void Loop()
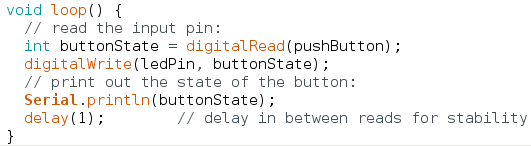
Void Loop() runs continuously. Obviously the first action we take here is to read the state of the button pin, whether it’s high or low. Next, we print it’s value to the serial monitor. Finally, we write this value to our LED… Here, you will add the last line “digitalWrite(ledPin, buttonState);” to make the LED reflect the value of the button. Lastly, there is a final delay of 1ms for stability. The reason for this is that when you press the button, it might actually make and break a few times (within nano seconds) until you have it fully pressed.
Next, under “Tools” go to “Boards”, and select the board that you are using. At last go to “Tools” then “Ports” to select the serial port of your arduino. Finally, click the “Upload” button in the toolbar.
** Note, if you are using an arduino nano, you may need to go to “Tools”, then to “Processor” to select the old bootloader.
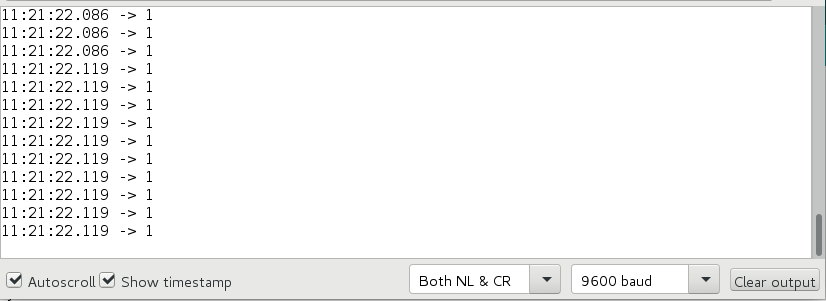
Finally, go to Tools | Serial Monitor, and set your serial monitor to 9600 baud. When you press the button, you should see the button state. Realize this value will print every scan.
For more information, visit the beginner’s category page!
— Ricky Bryce